
How to capture and edit RAW photos on an Android
Related Posts
Smartphone cameras are tuned to help you take the best photos you can without a fuss: just point and shoot. But if you’re really into photography, you may be familiar with the concept of shooting in RAW
.
RAW format images contain more of the information your camera sensor collects when you press the shutter button than the JPEG files you get by default, providing greater editing flexibility. If you want to try mobile RAW photography on your Google Pixel or top Samsung phone, here’s what you’ll do.
What is a RAW file?
Your Android phone usually saves the photo in JPEG format. It completes processing and compressing simultaneously. If you want uncompressed image files, capture photos in the RAW format. You can easily access your sensor’s recorded raw data and have file sizes that are several times larger than PNGs or JPEGs. Since the files are saved in DNG (Digital Negative), they may seem boring and unsaturated. You can use the best photo editing apps to apply the finishing touches.
We took two images in JPEG and RAW format, respectively. The JPEG image is 2.9MB, while the RAW (.dng) one weighs around 15MB.
How to take RAW photos on Android
Photographers who shoot with dedicated cameras often use RAW files for greater editing flexibility. Many of the best Android phones also let you take RAW photos. Here’s how.
Take RAW photos on Google Pixel phones
-
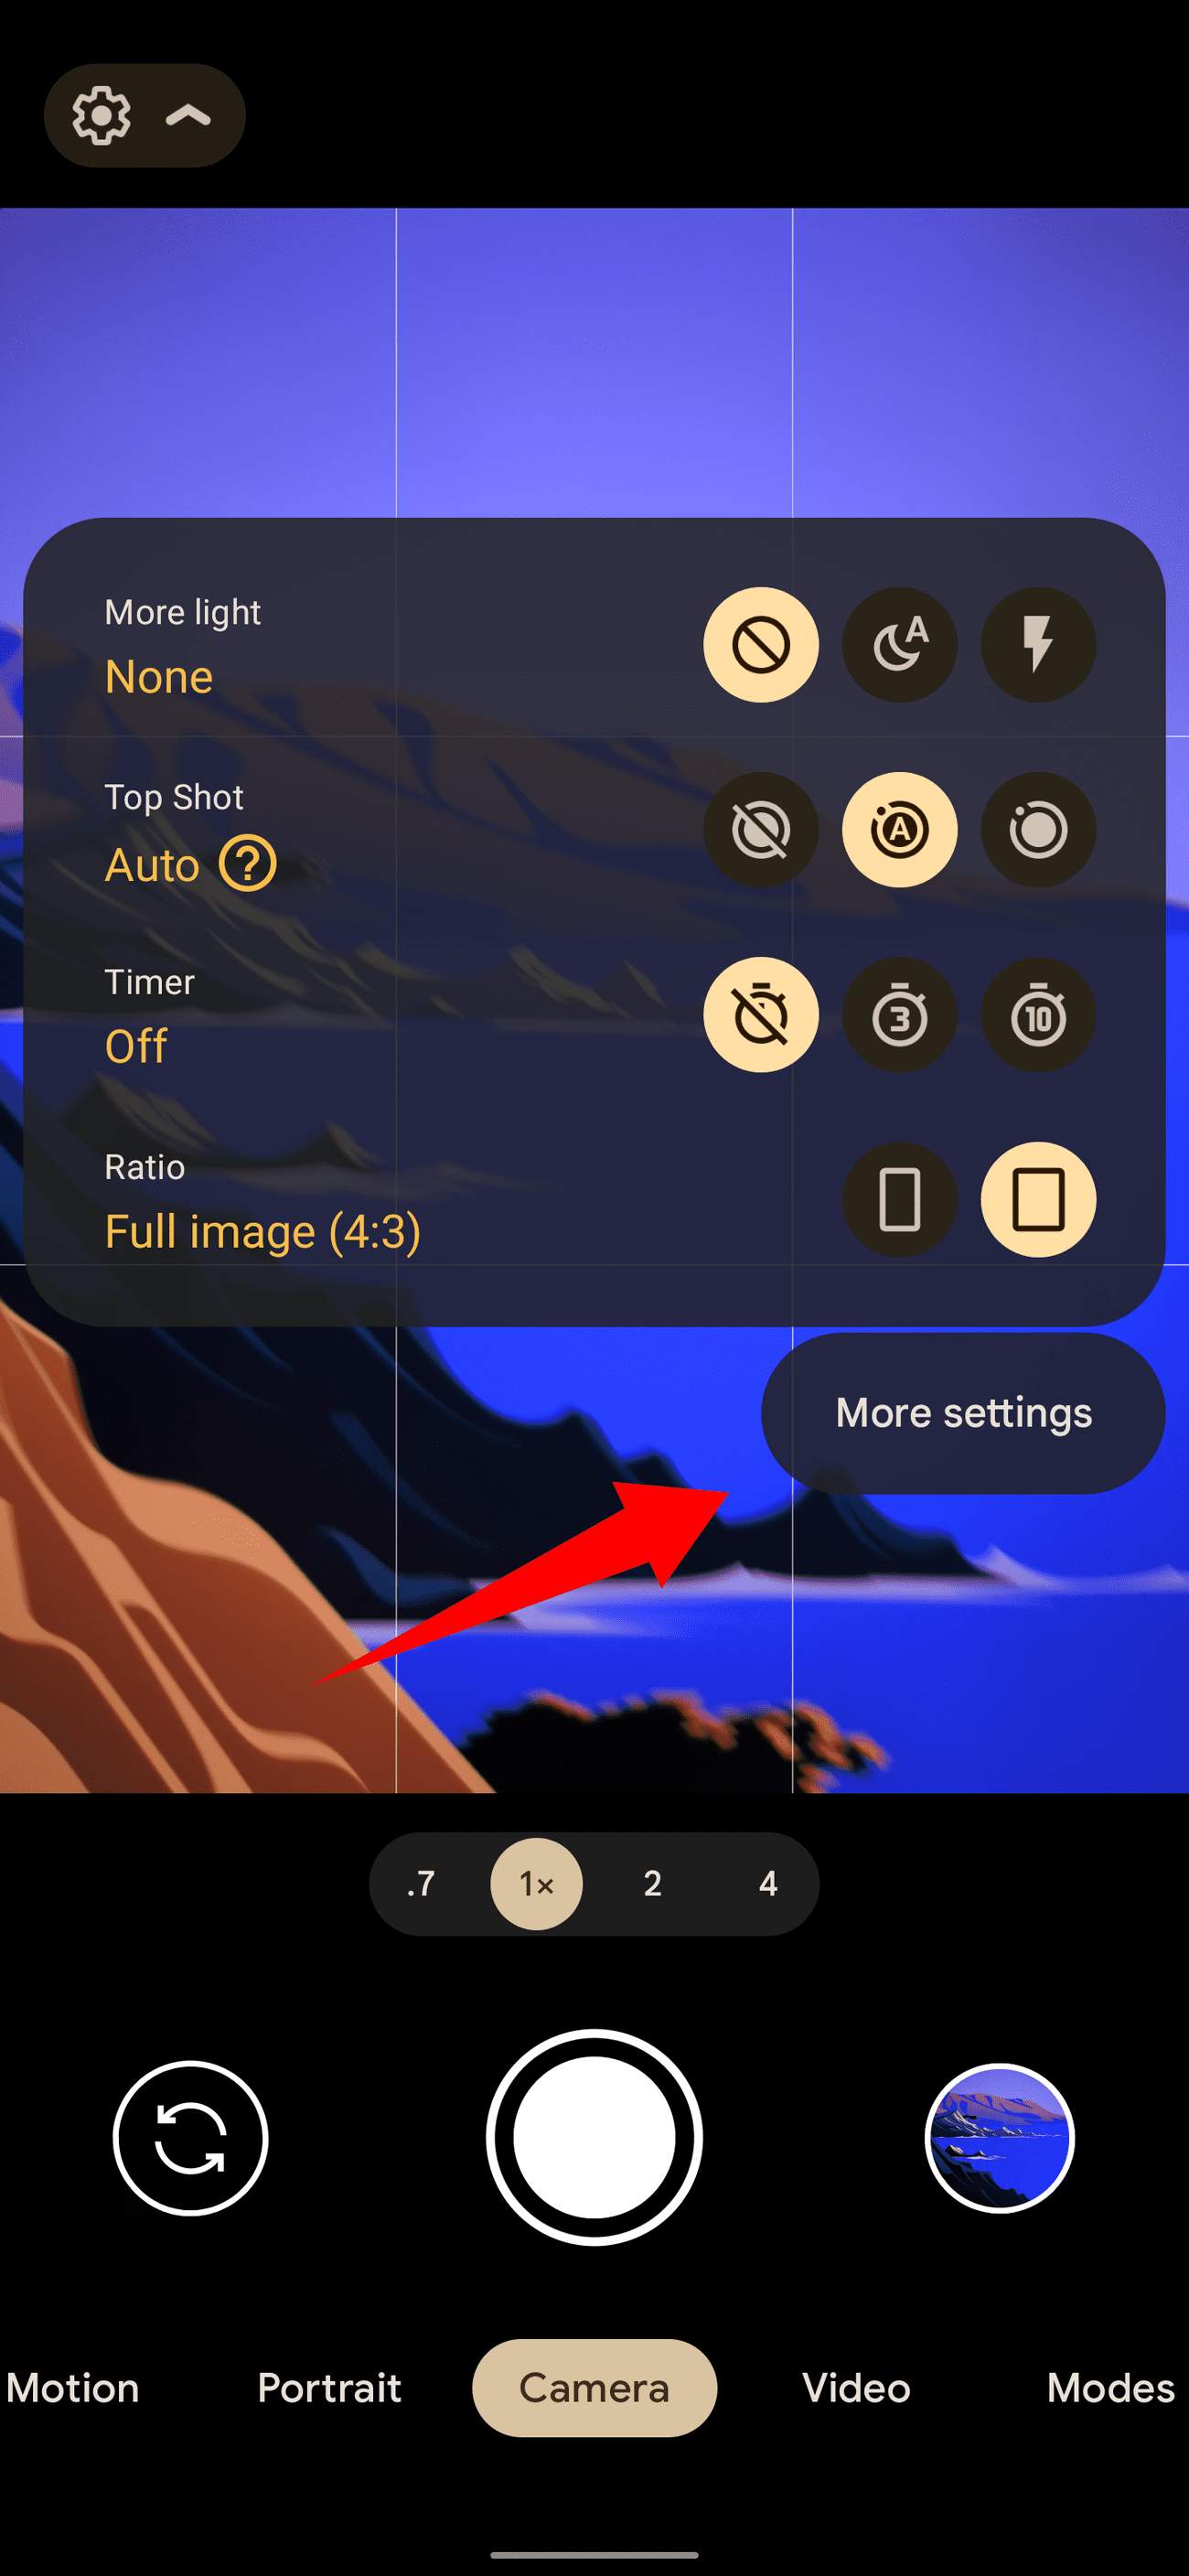
Open the
Camera app
. -
Tap the
Settings
gear
in the upper-left corner. -
Tap
More settings
.
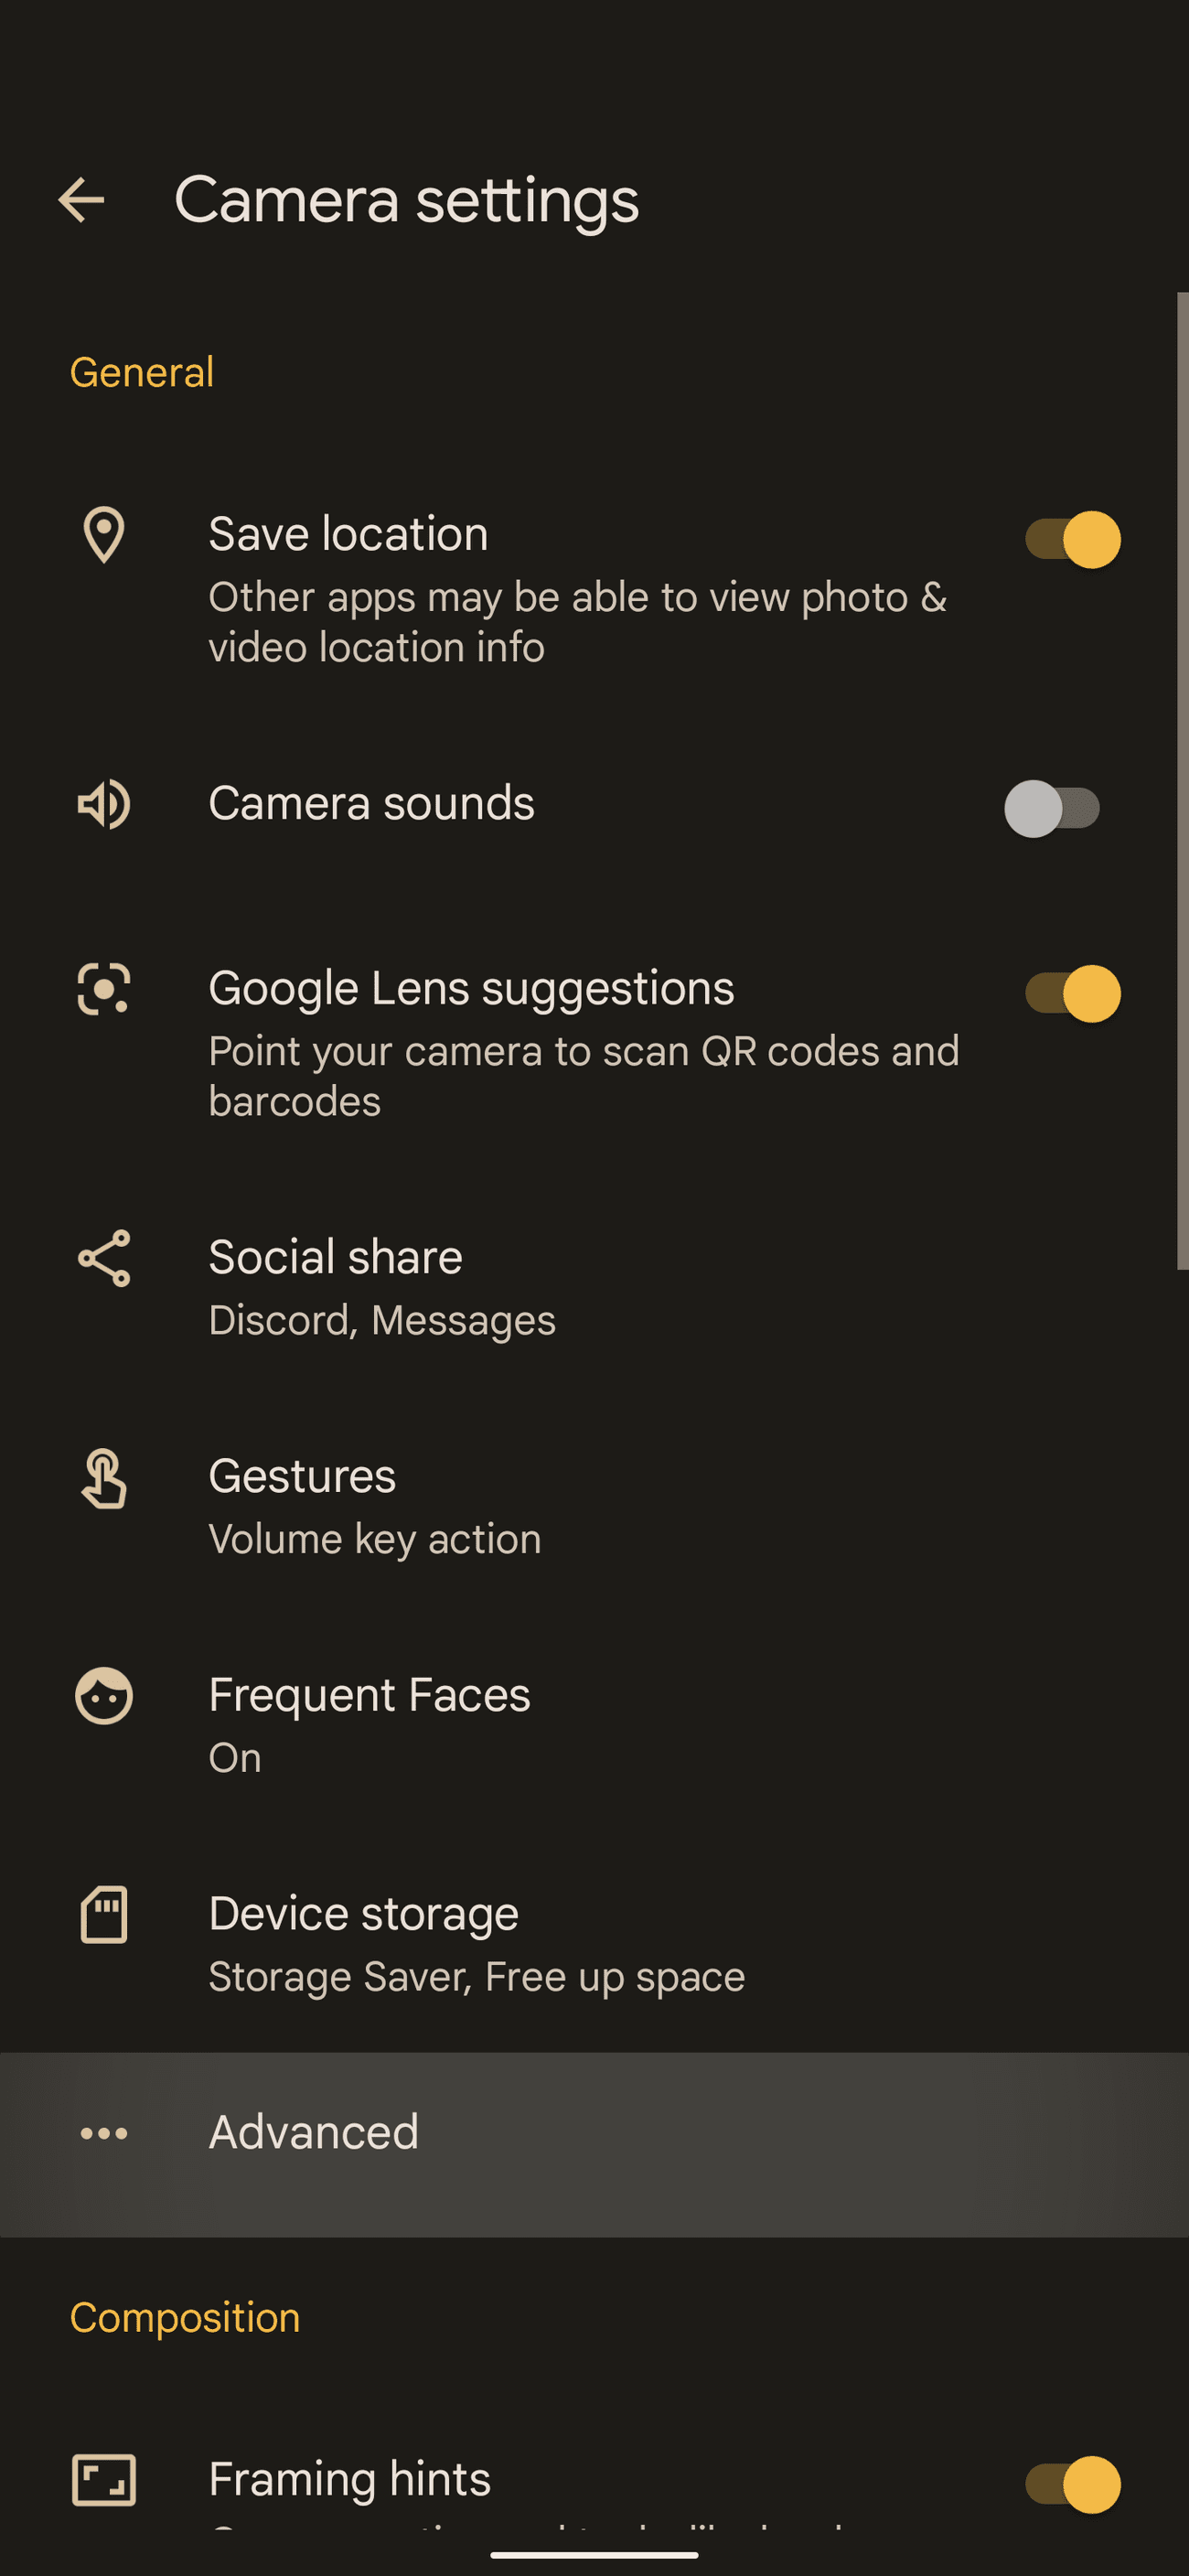
-
Go to
Advanced
. -
Turn on the
RAW+JPEG control
option.
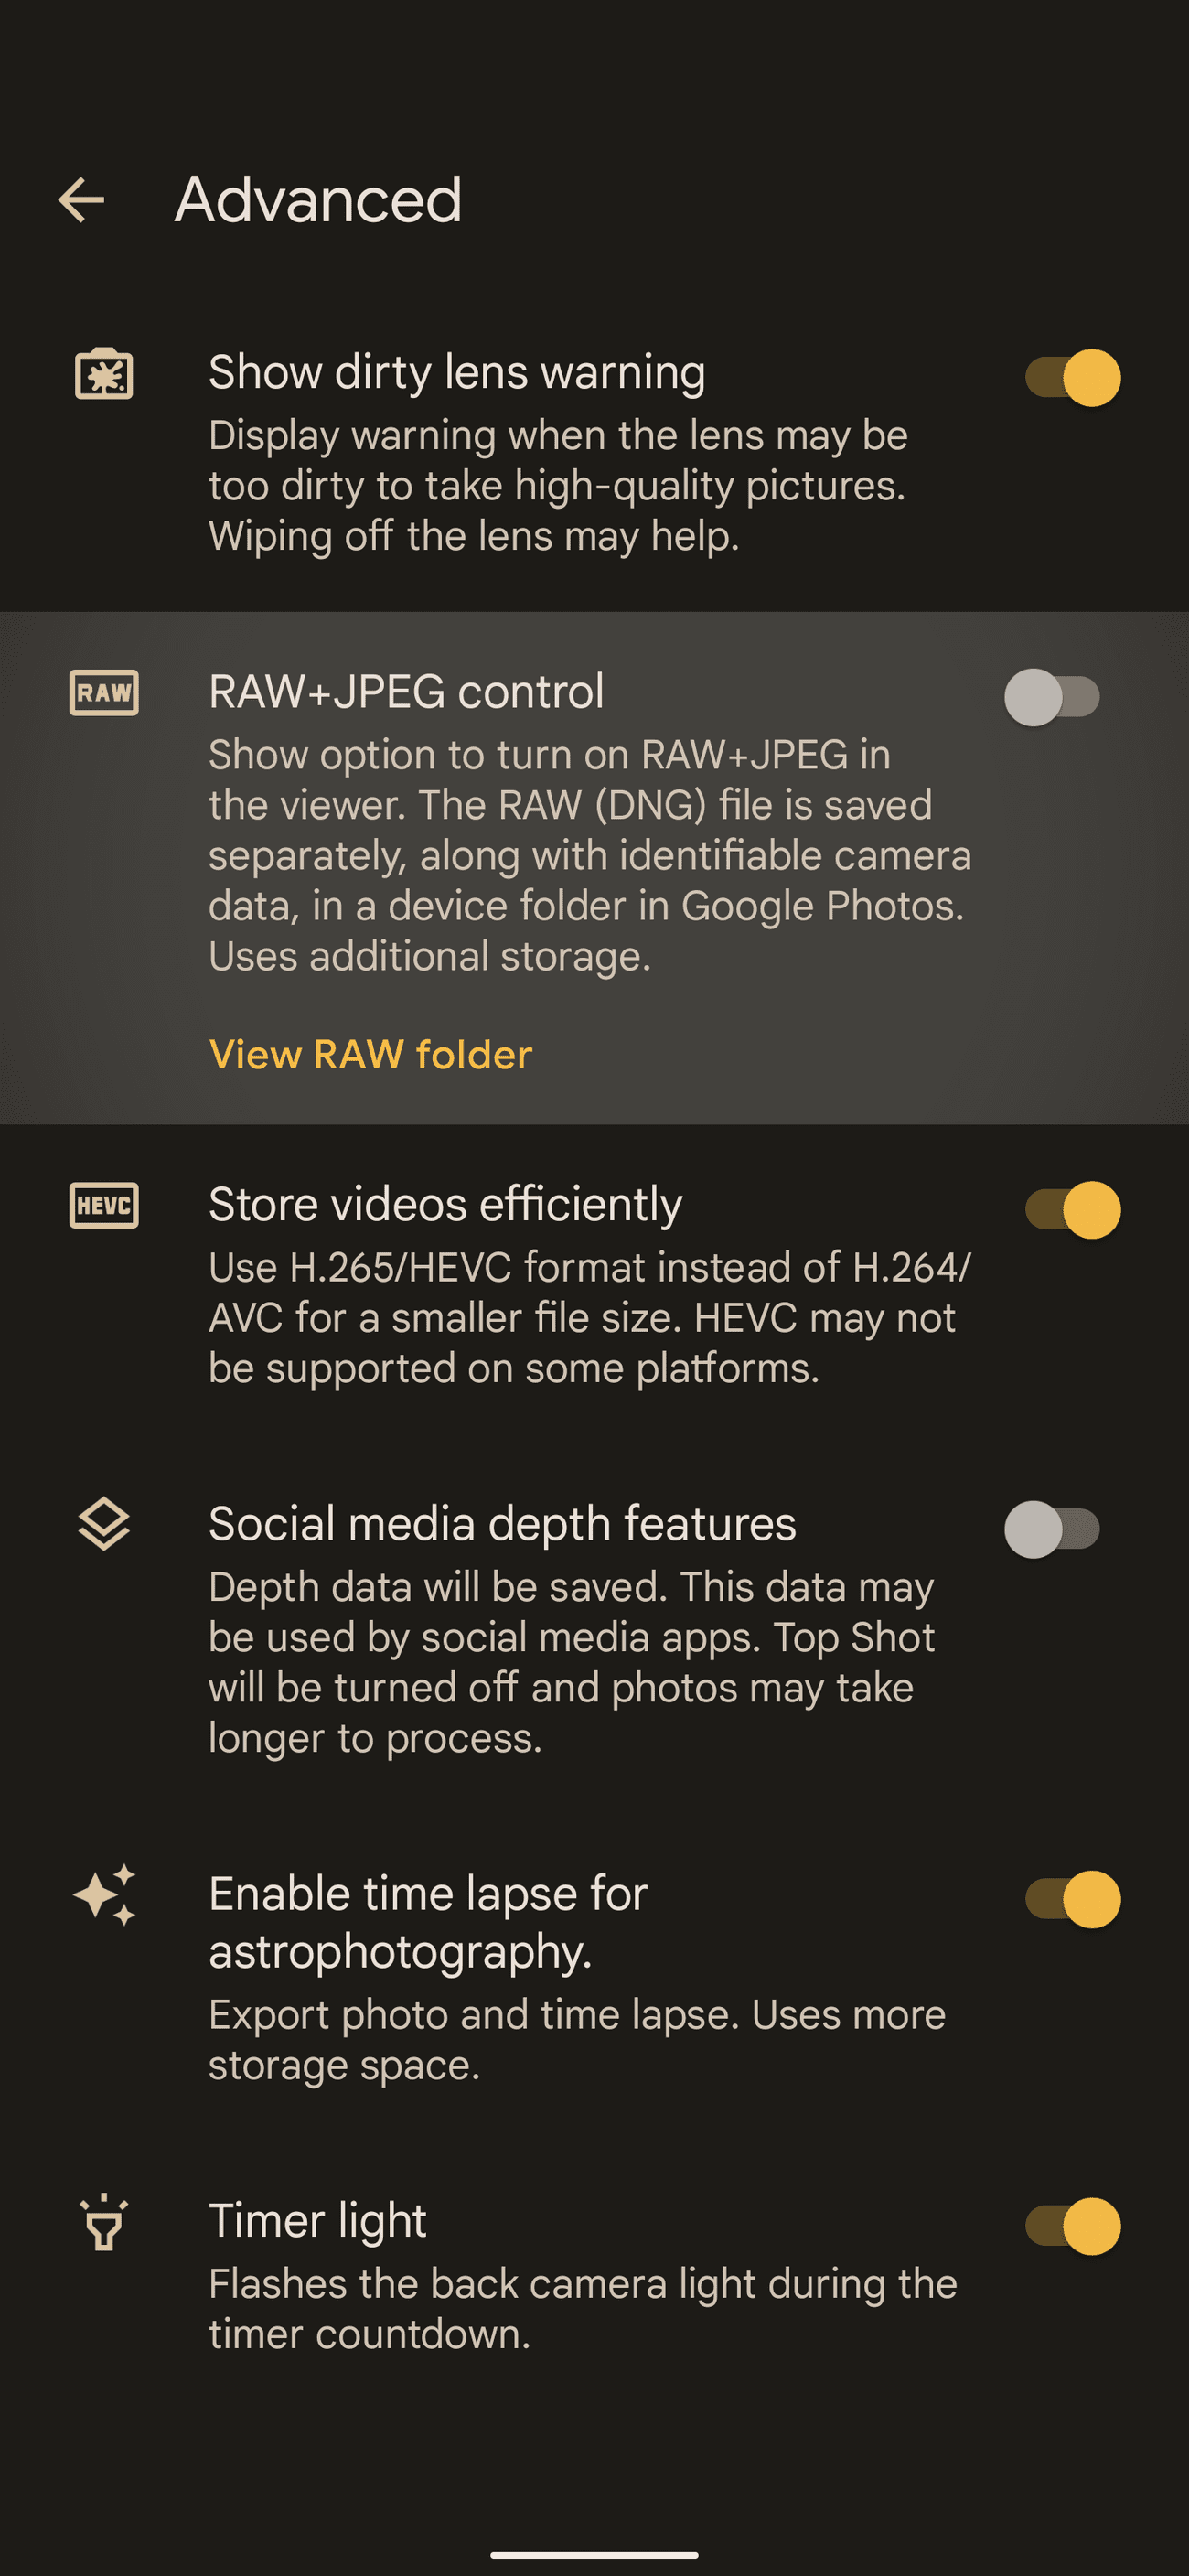
-
To toggle RAW capture on or off, tap the
Settings
gear in the Camera app and choose the appropriate icon under
RAW
.

On Google Pixel phones, RAW files are in the .dng format and saved to their own folder called
Raw
. When viewed in Google Photos, RAW files have a camera shutter icon on the thumbnails.
When you don’t want to shoot photos in RAW, turn this setting to
JPEG only
. RAW files take up a lot of storage space.
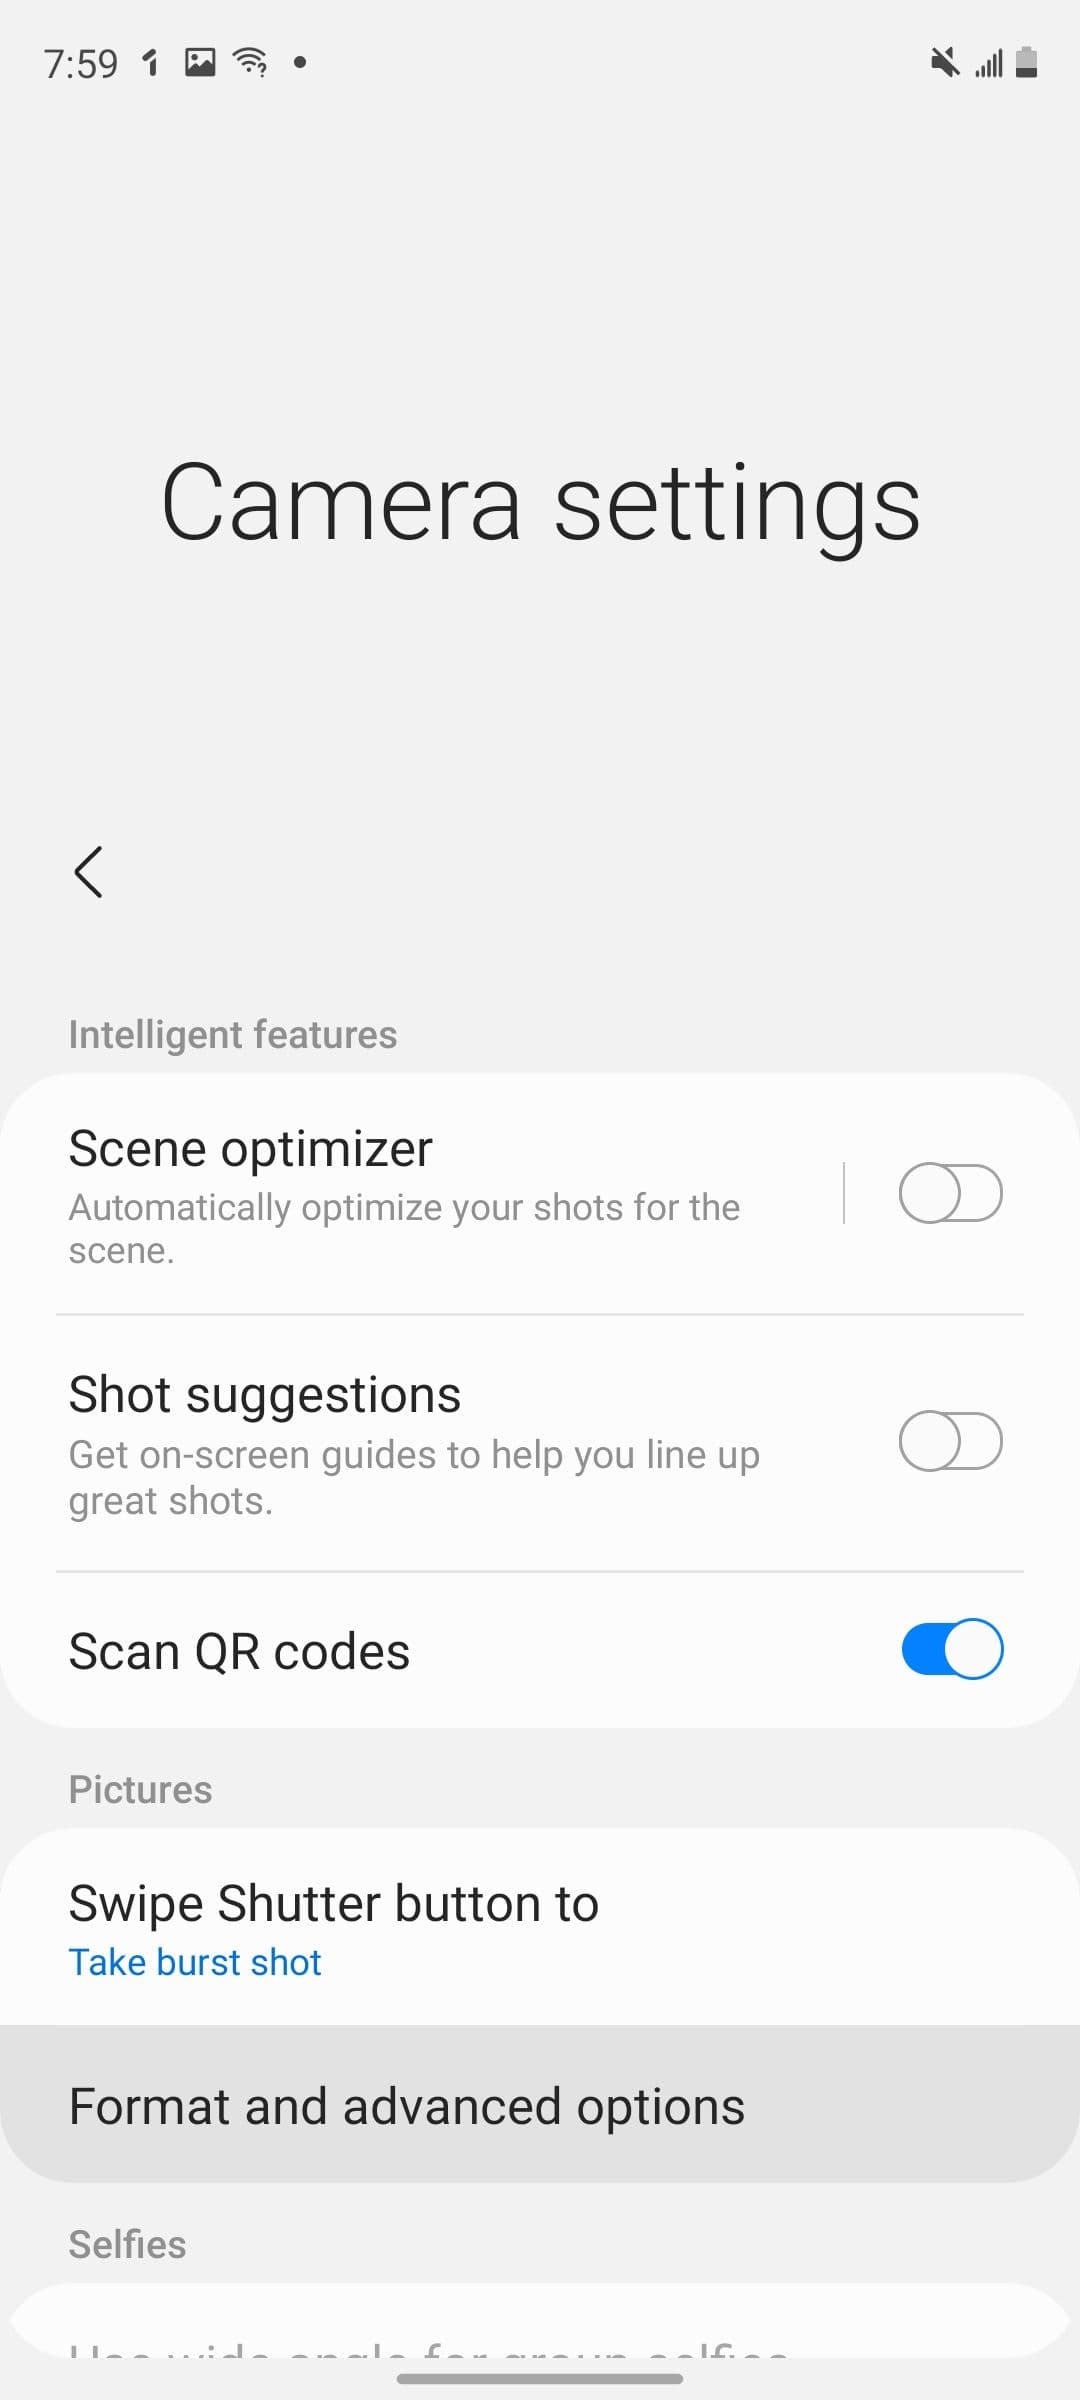
Take RAW photos on Samsung Galaxy phones
-
Open the
Camera app
. -
Tap the
Settings
gear
in the upper-left corner. -
Go to
Format and advanced options
.
-
Turn on the
RAW copies
toggle.
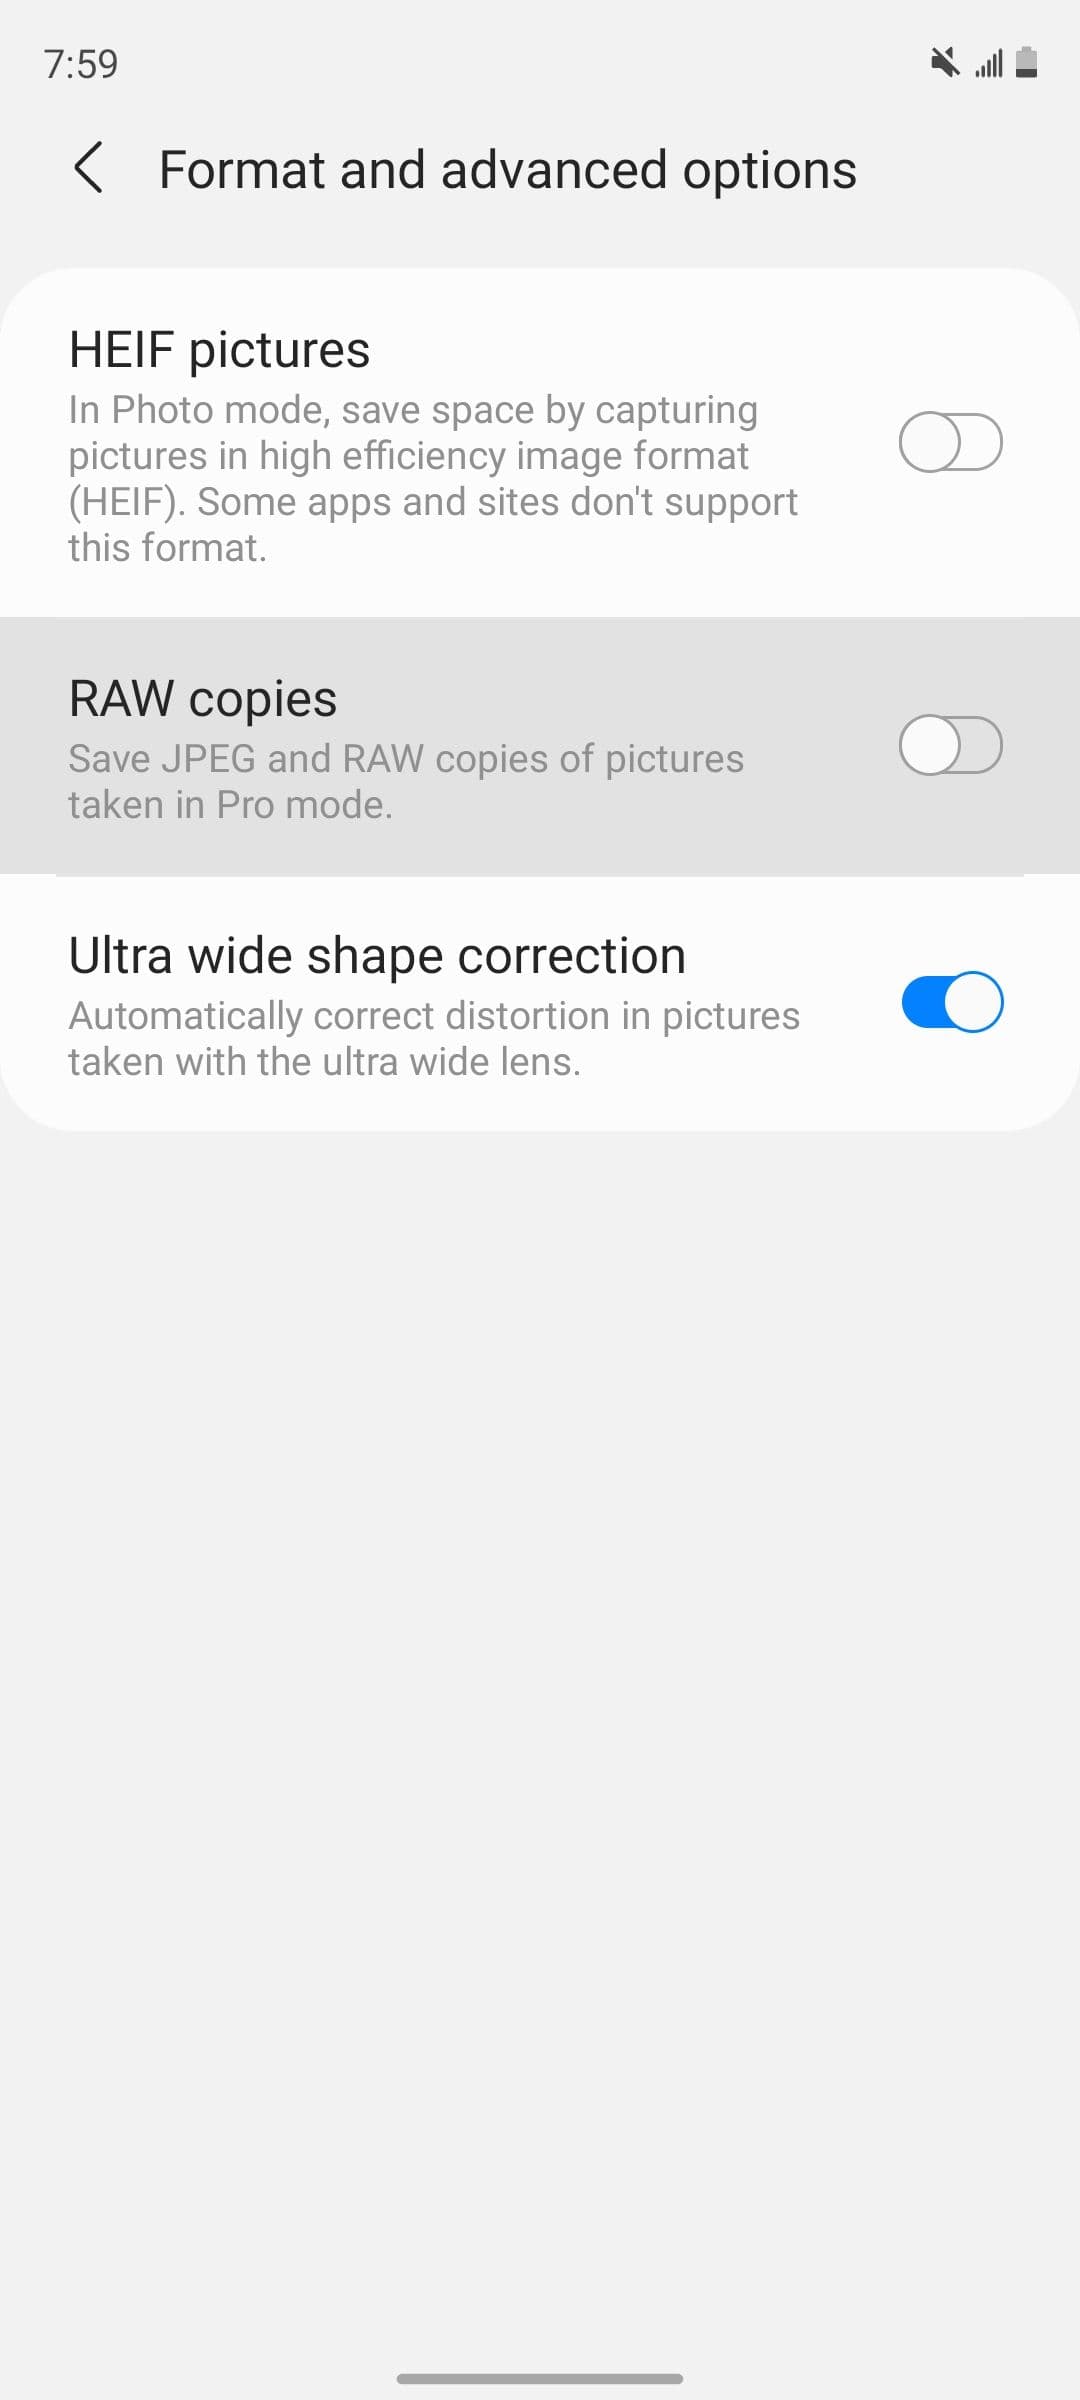
On Samsung Android devices, RAW copies are only saved when shooting in Pro mode, which is accessed from the
More
option at the bottom of the camera app. They’re saved to your camera roll along with regular JPEG files. The RAW format versions are in .dng format and have a RAW badge in the upper-right corner when viewed in the Samsung Gallery app.
Take RAW photos on other Android phones
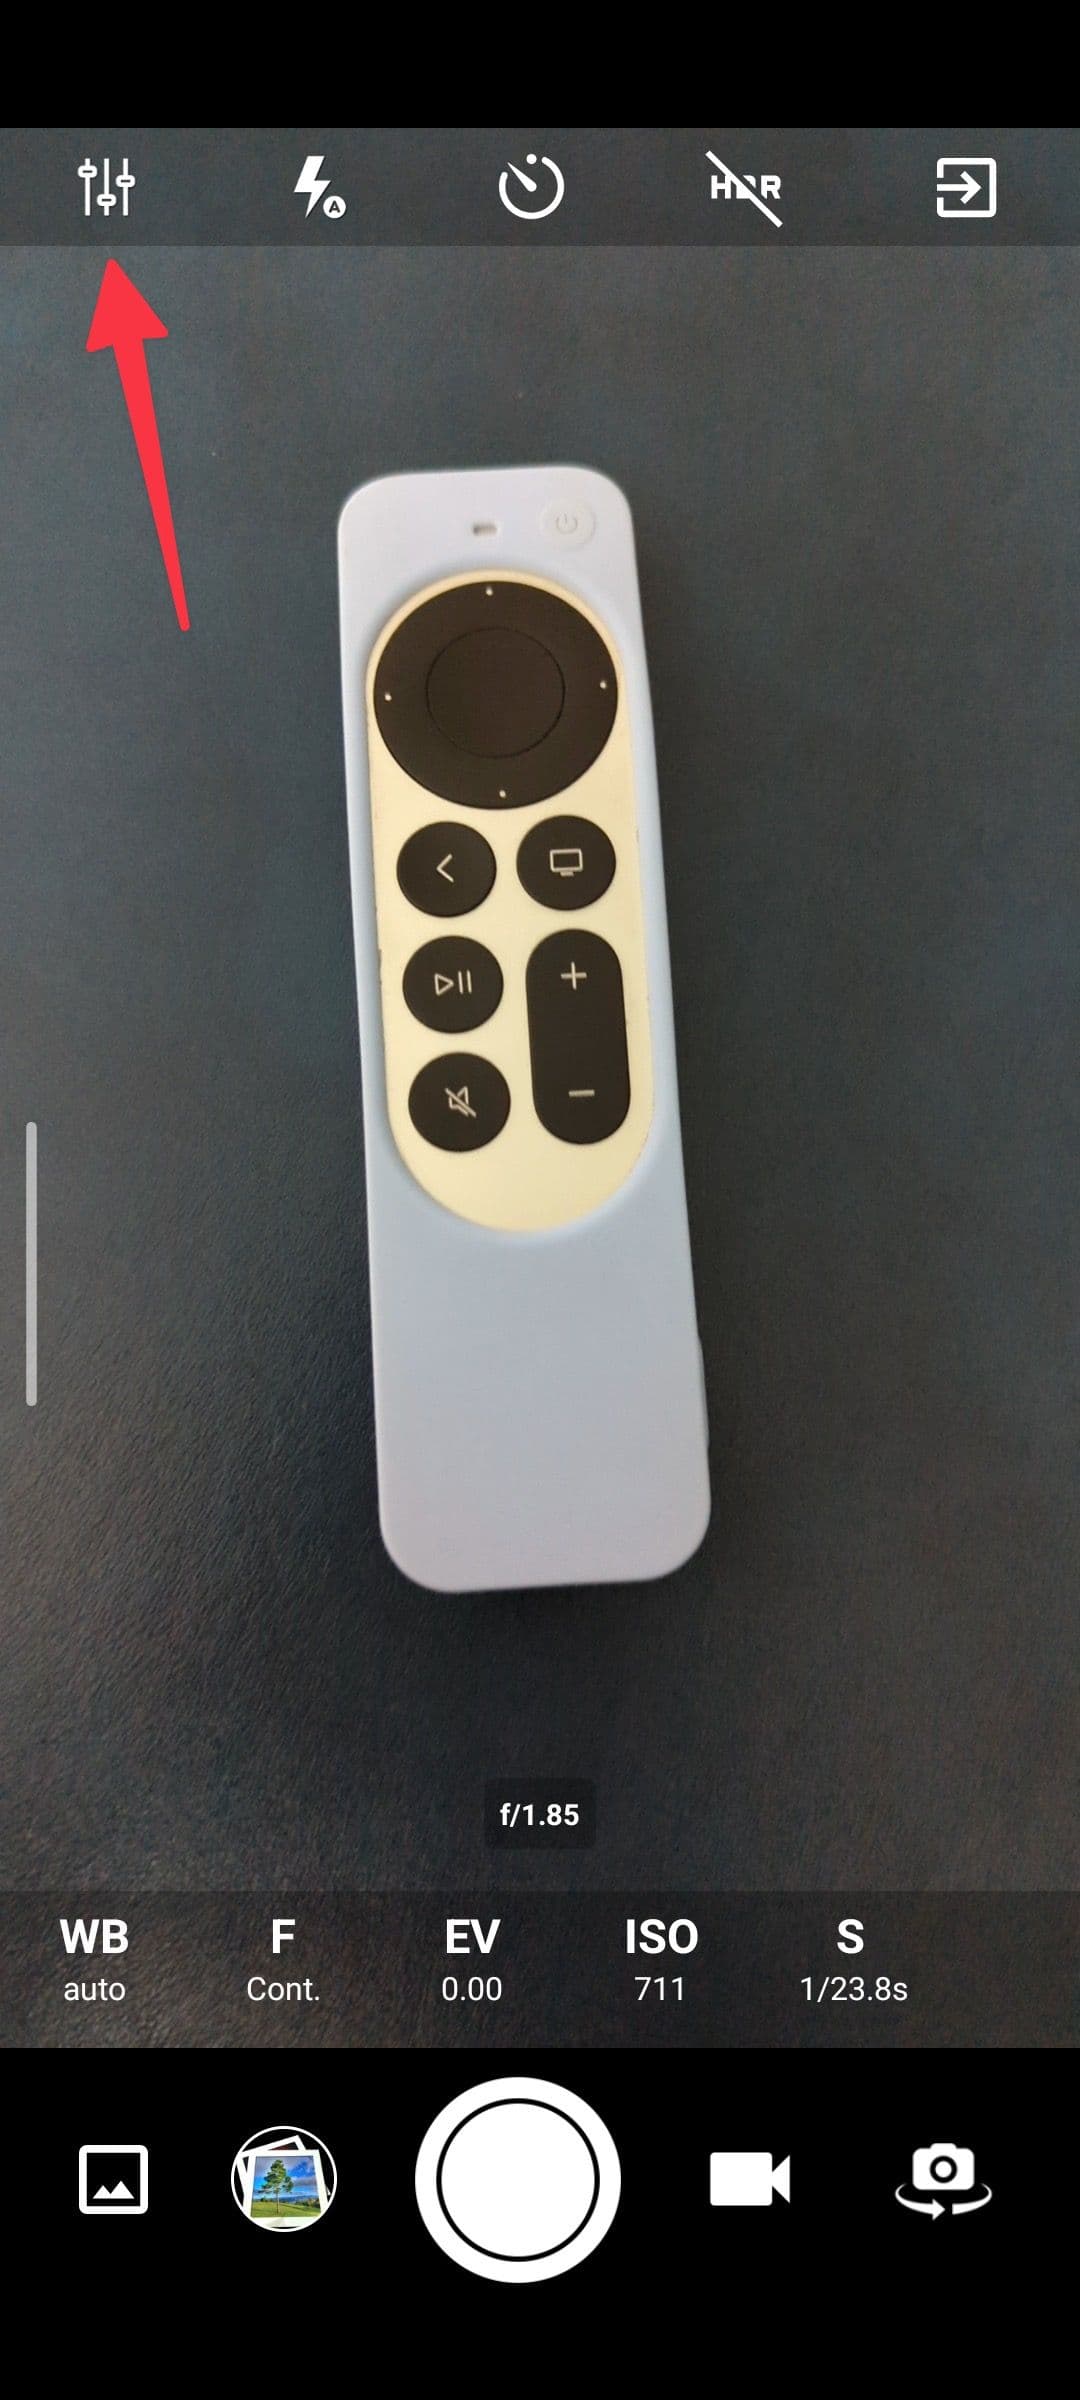
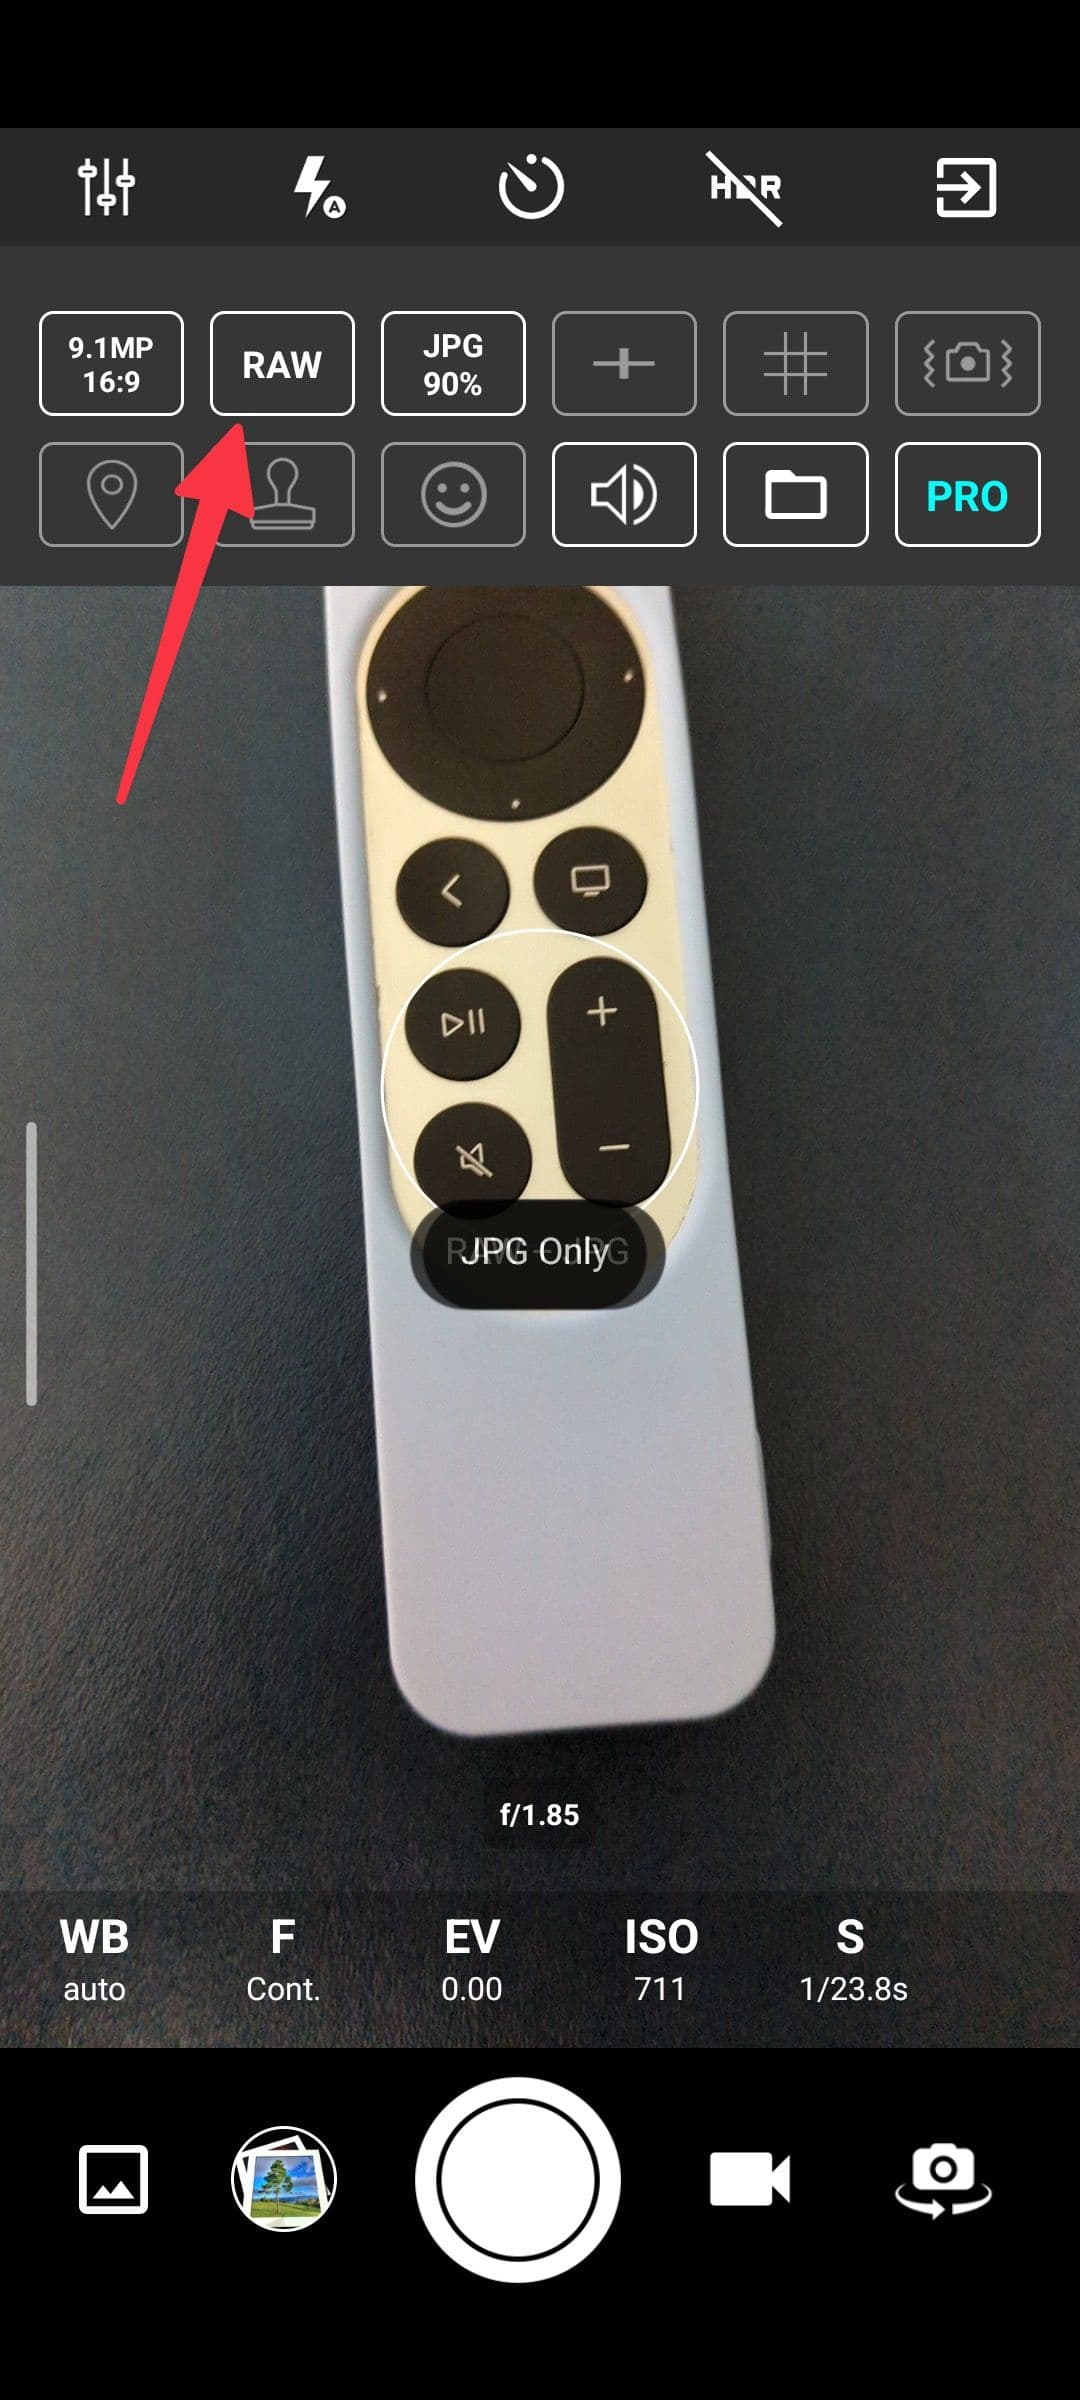
If your Android phone doesn’t support RAW mode in the preinstalled camera app, you must use a third-party camera app to complete the job. The Google Play Store is packed with such camera apps. ProCam X is one such app to capture RAW images on any Android phone.
-
Download
ProCam X
using the link below. Open the app and give it the necessary permissions. -
Tap the
More icon
at the top and change the image format to
RAW
. -
When you capture a photo, the app saves the images in JPG and RAW formats.
- Open the default gallery app and check both images under the Photos tab.
If you want to unlock high resolution, unlimited video recording, and more features, upgrade to the Pro app for $5.
How to edit RAW photos on Android
Not all Android photo editing apps support editing RAW images. Google Photos, for example, offers limited RAW support, which means none. Google-owned Snapseed provides a robust RAW photo-editing experience, but the app can also be a bit unwieldy.
Adobe Lightroom
Adobe Lightroom is one of many free RAW editing options on the Play Store. While some of Lightroom’s advanced features, like masking and healing, require an Adobe Creative Cloud subscription, the basics work for free, but you need an Adobe account.
We show you how to use Adobe Lightroom to edit your photos. If you use another app, it will work differently, but the principles are essentially the same.
To open a RAW image in Lightroom, tap the blue button that looks like a photo with a plus on it in the lower-right corner of the app’s homescreen, then select a RAW image. Alternatively, find a RAW file in your gallery app and tap the
Share
button to share it to Lightroom. When you tap the Edit button, Lightroom doesn’t appear in Google Photos’ list of compatible RAW editors.
What you see in the editor is roughly what your phone’s camera captured before post-processing was applied. Smartphones apply post-processing automatically. However, when you edit a photo’s RAW file, you take control before that happens. After opening a RAW file in Lightroom, a strip of tools appears at the bottom of the screen. We’ll touch on the ones that are available in the free version.
Crop & Rotate: Reframe your shot

Use the Crop & Rotate tool to trim your photo. To crop the photo, drag the white handles on its edges. To rotate it, slide your finger left or right under the photo and near the dotted arc. To reset the picture’s position, double-tap the picture.
-
Aspect ratio
: Offers several predefined aspect ratios to apply to your image. By default, most phones take photos in 4 x 3. -
Aspect ratio lock
: When this option shows
Locked
, the aspect ratio applied to your photo remains constant. When set to
Unlocked
, the height and width can be adjusted independently. -
Straighten
:
Automatically
levels your photo. This works well sometimes, but it doesn’t do anything you couldn’t do with the normal cropping tools. -
Rotate
:
Rotates your photo 45 degrees clockwise. -
Flip H
:
Mirrors your photo horizontally. -
Flip Y
:
Mirrors your photo vertically.
Auto: Adobe’s best guess
Lightroom offers an Auto feature that touches up your photos in a single tap, tweaking light and color settings. If you like how it looks, you can keep it. Otherwise, you’ll want to use the manual settings.
Light: Change your photo’s lighting
Lightroom’s Light tools let you change things like brightness and contrast to dial in the look of your photo’s lighting.
-
Exposure
: Changes the overall brightness of your photo. Left is darker, and right is brighter. -
Contrast
: Changes the difference in brightness between dark and light parts of your photo. Left is lower contrast (less difference), and right is higher contrast (more difference). -
Highlights
: Adjusts the brightness of bright areas (the highlights) in your photo. Left is darker, and right is brighter. -
Shadows
: Adjusts the brightness of dark areas (the shadows) in your photo. Left is darker, and right is brighter. -
Whites
: Changes the white point in your photo. Right makes more colors appear white, and left makes fewer colors appear white. -
Blacks
: Changes the black point in your photo. Left makes more colors appear black, and right makes fewer colors appear black.
Color: Tools to make the colors pop
The Color tools let you tweak white balance and saturation.
-
Temp
: Adjusts white balance to change how cool or warm colors appear. Left is cooler, and right is warmer. -
Tint
: Adjusts white balance to change how green or magenta the colors in your photo appear. Left is more green, and right is more magenta. -
Vibrance
:
Adjusts saturation (color intensity) without causing unpleasant color casts. -
Saturation
: Changes the intensity of color. Left is less intense (all the way left is black and white), and right is more intense.
Effects: A grab-bag of features
Effects is a bit of a catch-all, with tools to add or remove various effects.
-
Texture
:
Adjusts how much texture is visible. Left softens images, and right sharpens textures. -
Clarity
: Adjusts contrast around edges. Left is lower, and right is higher. -
Dehaze
: Tweaks lighting to add or remove apparent haze in your photo. Left adds a hazy look, and right removes haze. -
Vignette
: Makes the outer edges of your photo lighter or darker. Left is dark, and right is light. Midpoint, Feather, Roundness, and Highlights change various attributes of the vignette effect. -
Grain
: Adds simulated film grain to your photo. Size and Roughness fine-tune the grain effect.
Detail: Reduce noise and sharpen
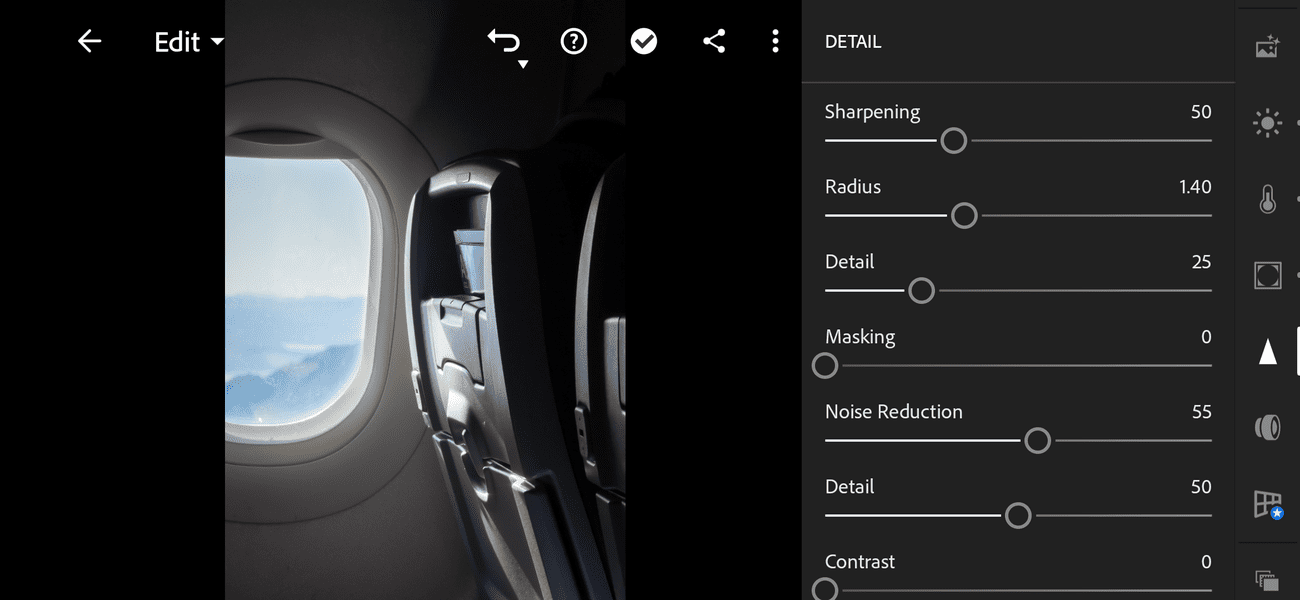
-
Sharpening
: Sharpens the detail in your photo. Radius, Detail, and Masking change how sharpening is applied. -
Noise reduction
: Reduces random variation (noise) in apparent brightness. Detail and Contrast change how noise reduction is applied. -
Color noise reduction
: Reduces random variation (noise) in color. Detail and Smoothness change how color noise reduction is applied.
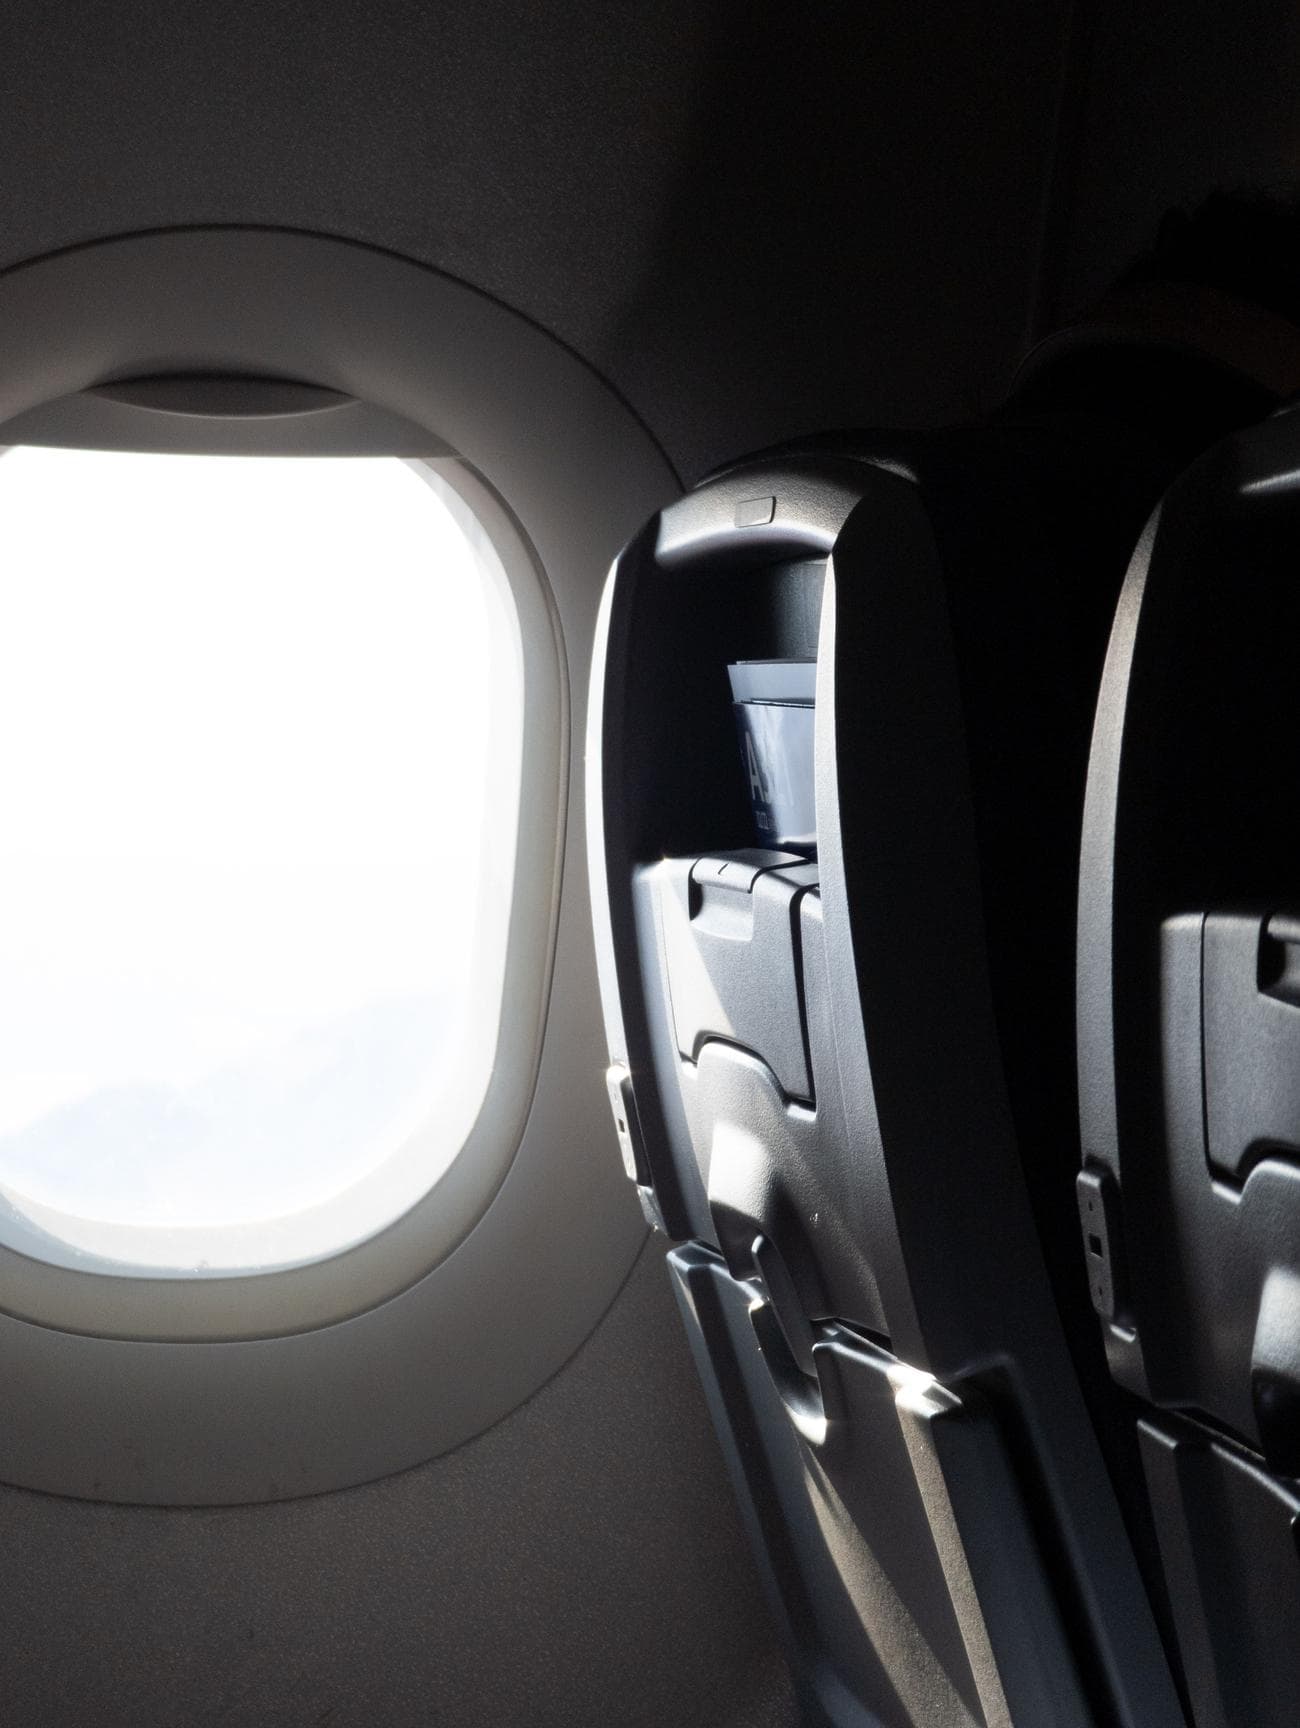
To give you a better sense of what you’ll see as you edit your RAW files, here’s an example of the process with a photo taken on the Google Pixel 7 Pro.
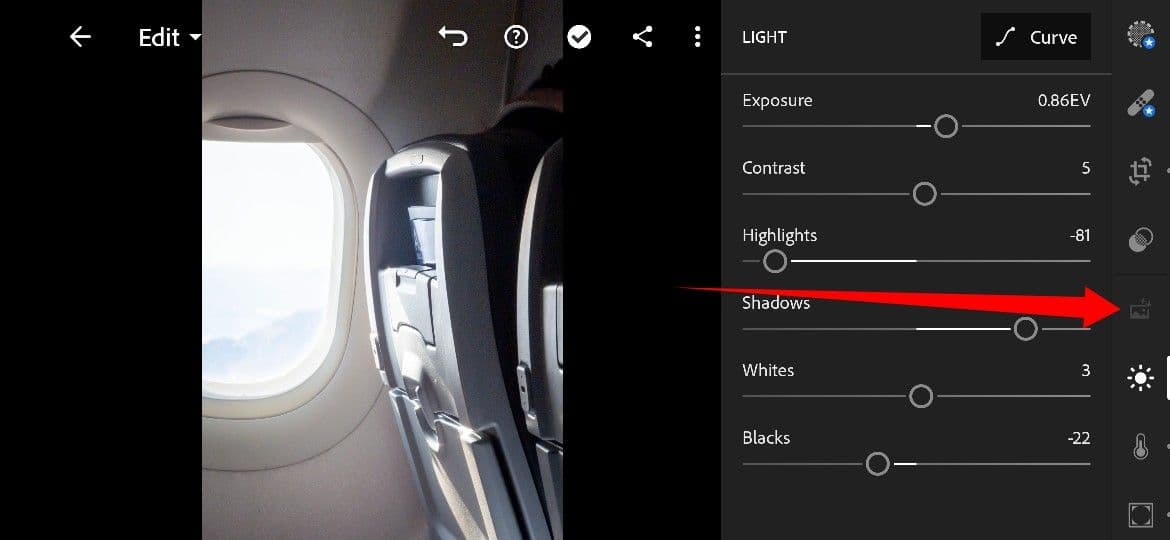
- Here’s the image as converted directly from its RAW file.
-
The light coming through the window is blown out in the unprocessed photo. To recover the detail in that part of the frame, the
Highlights
slider in Lightroom’s Light tools is set to -100.
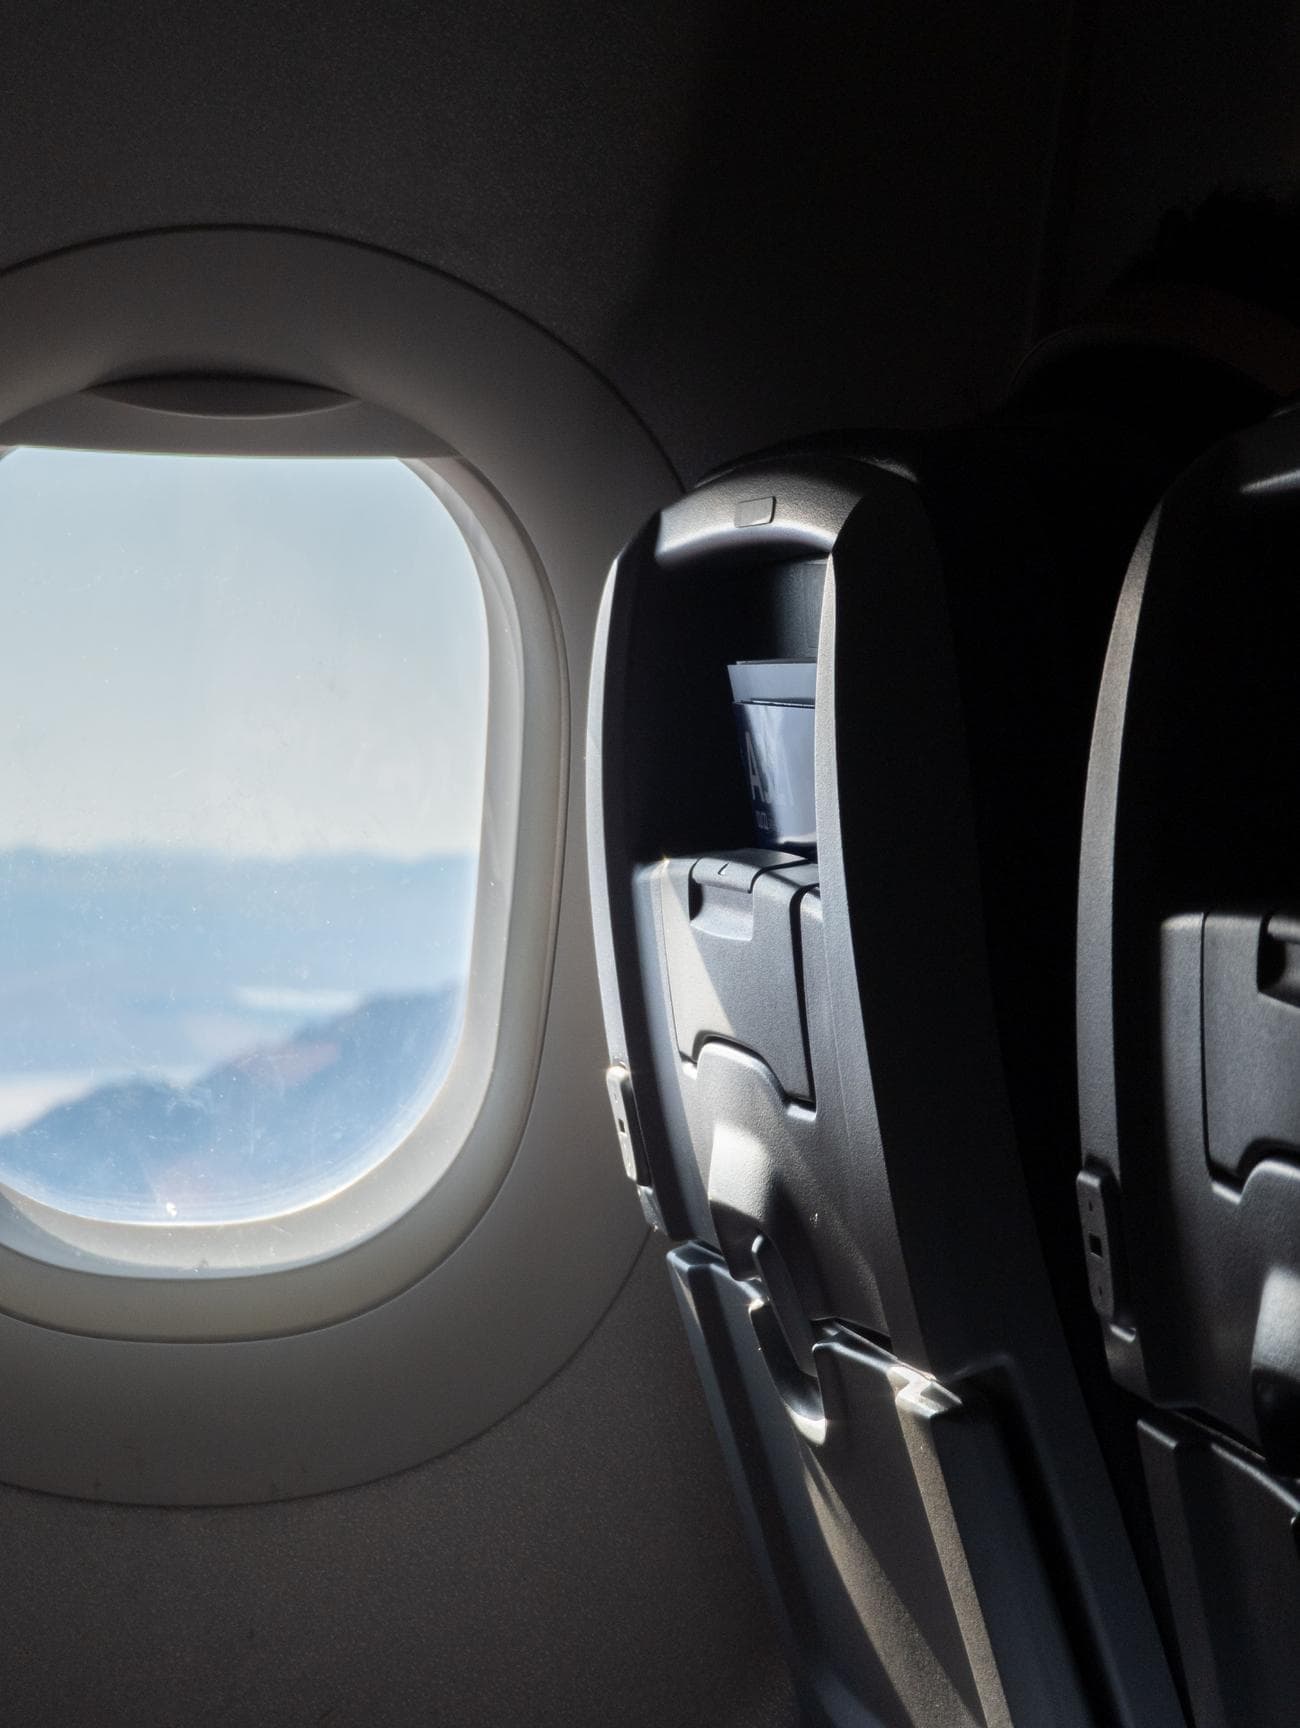
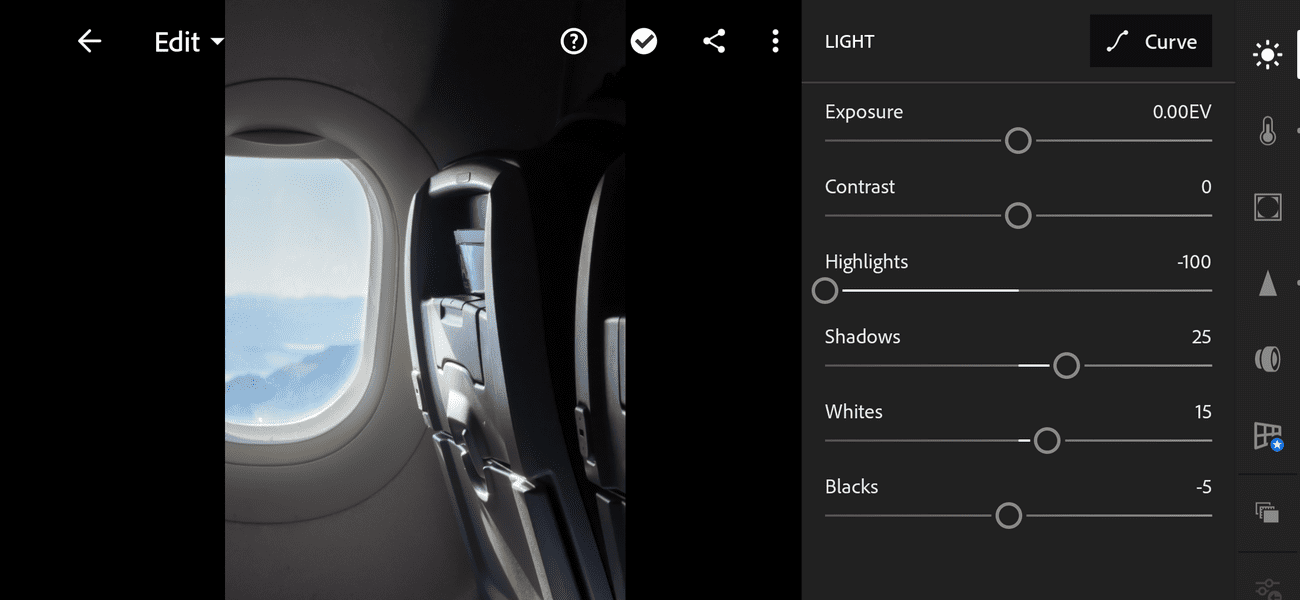
-
The photo has good contrast, but the shadows inside the plane are a little too dark. To brighten them up, the
Shadows
slider is set to +25. -
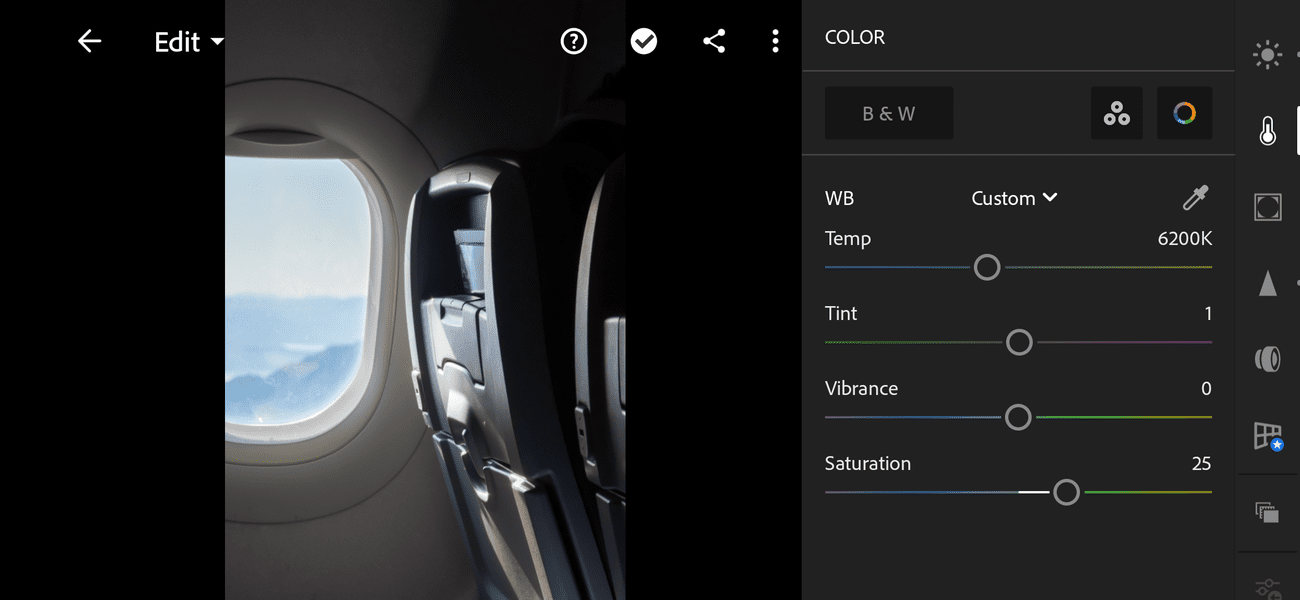
More saturated colors would help this photo pop. The
Saturation
is set to +25 in the Color tab to add more saturation.


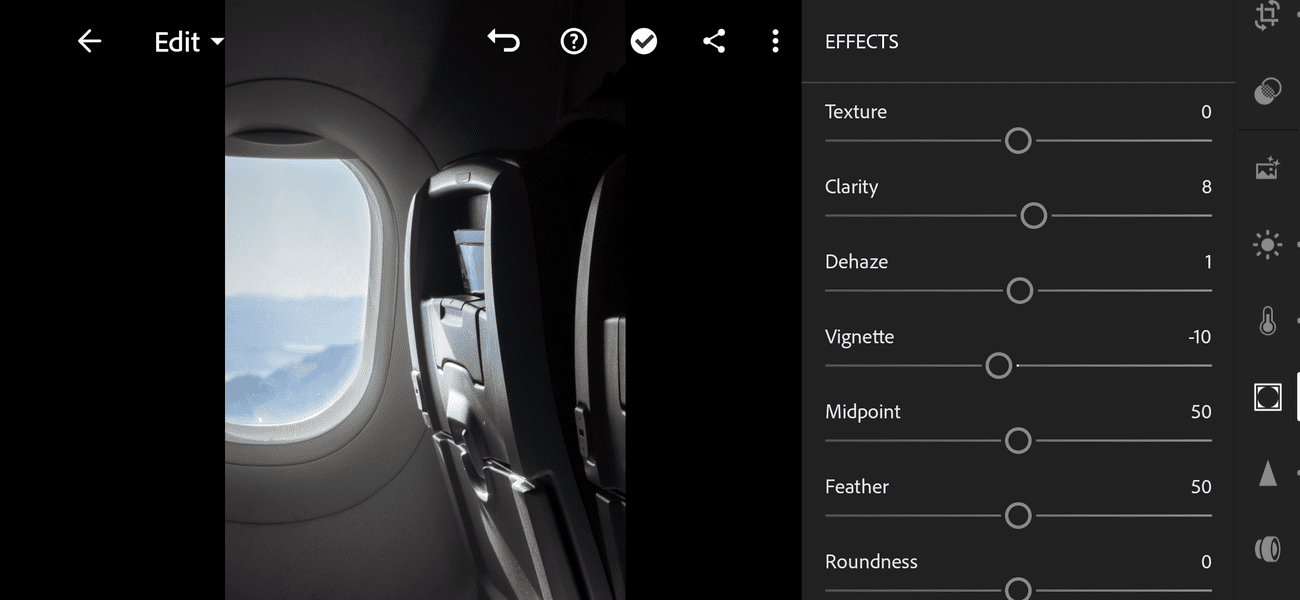
-
To tone down some of the graininess above and below the window, the
Noise Reduction
slider in the Detail tab is moved from its starting point of 10 up to 55. -
To make the photo a little narrower, the
aspect ratio
is changed from its default 3 x 4 to a taller 2 x 3 in the Crop & Rotate tab.

-
To darken the edges a little, the
Vignette slider
in the Effects tab is adjusted to -10.
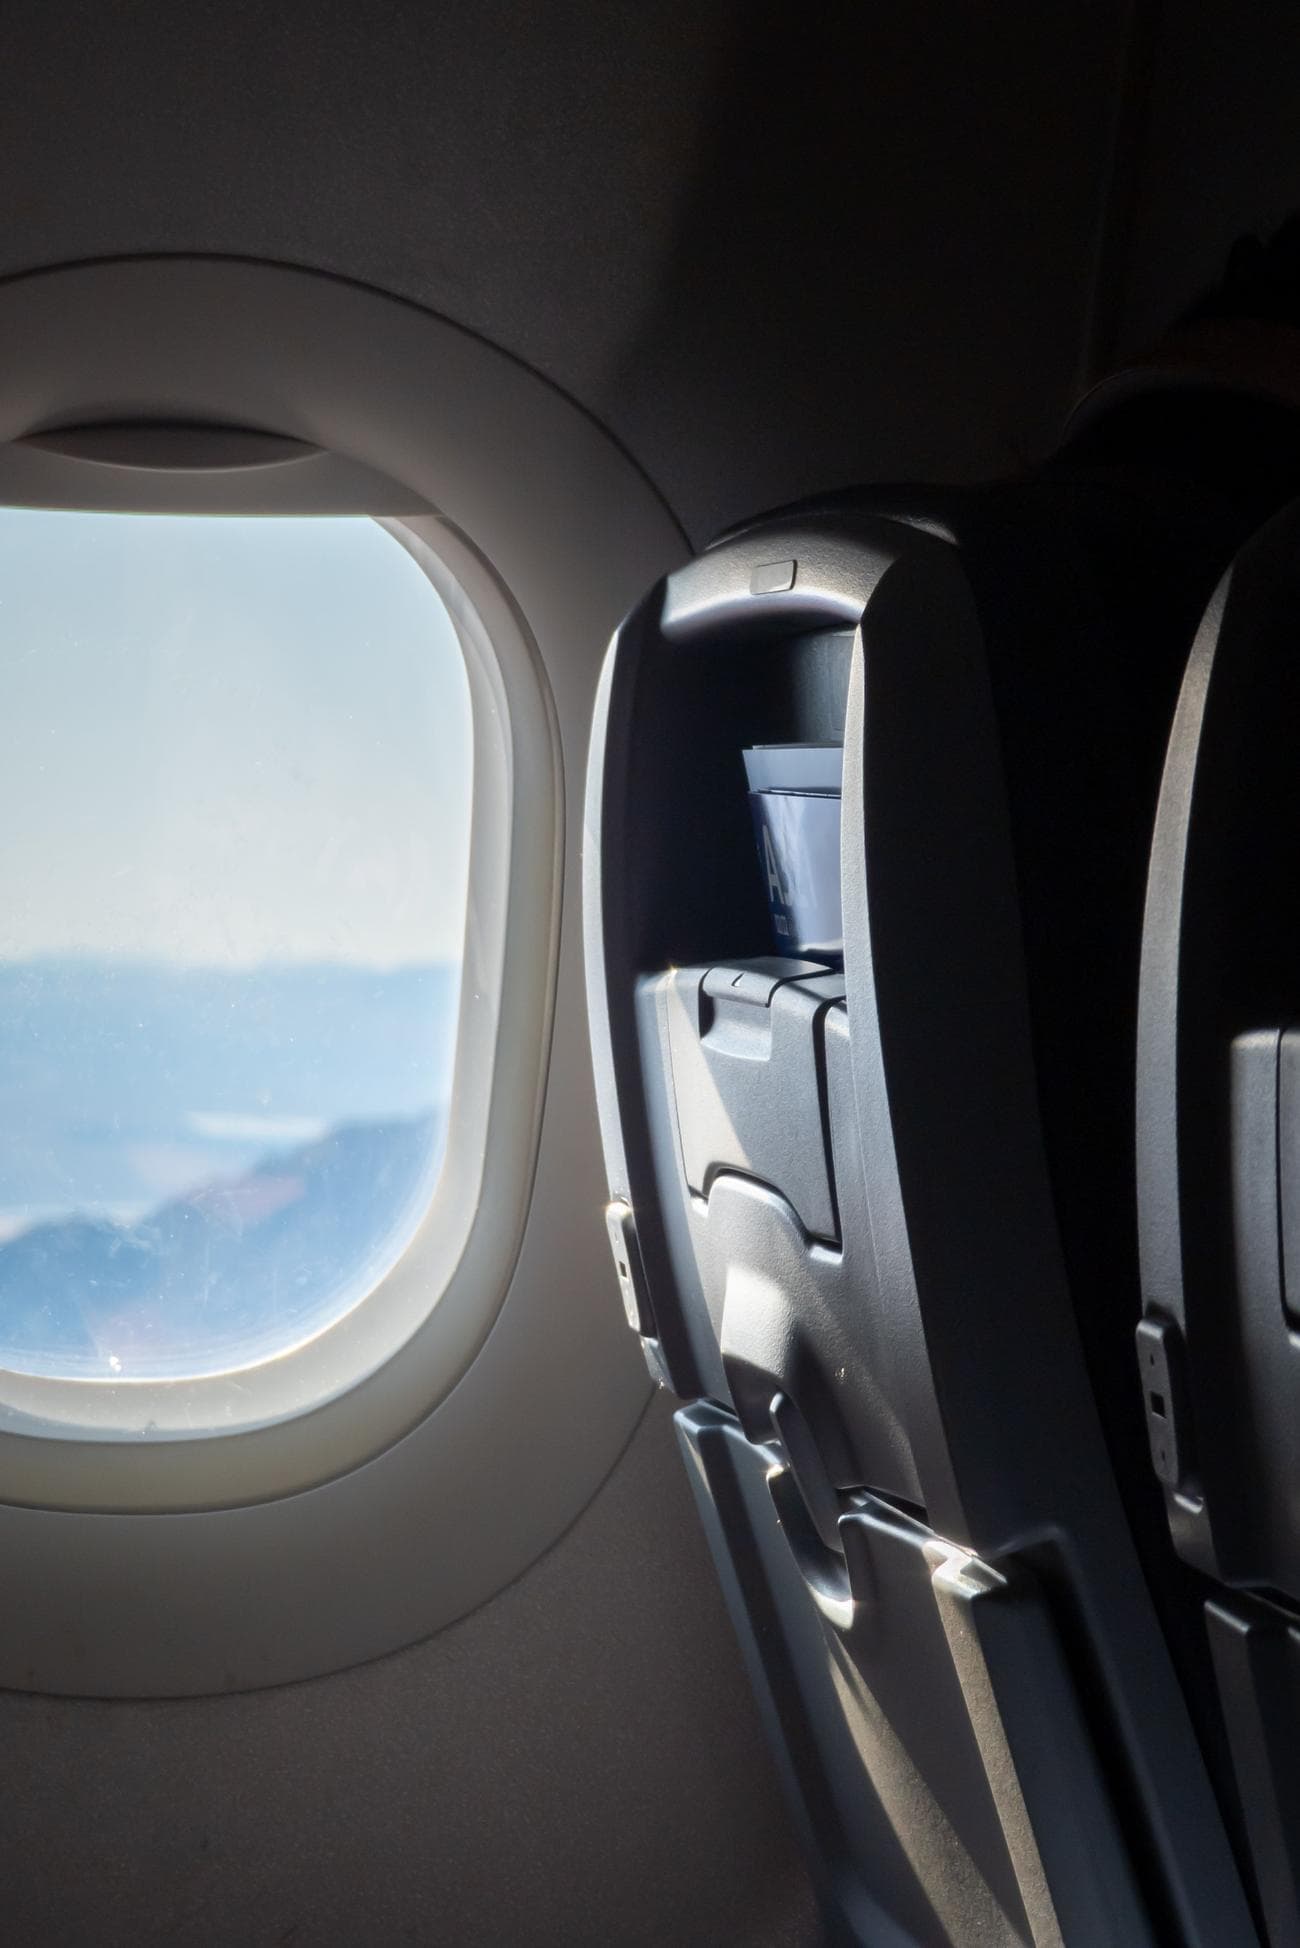
You won’t use every tool on every photo. The warmth, tint, exposure, and several other qualities of this photo weren’t changed. The sliders you’ll use depend on the look you want. Once you’re finished editing, tap the
Share
icon in the upper-right corner of the screen. There are options to save the photo to your device (it lands in a folder called “AdobeLightroom”), share it to an app, or save it with custom settings (with options for file type, resolution, and quality).
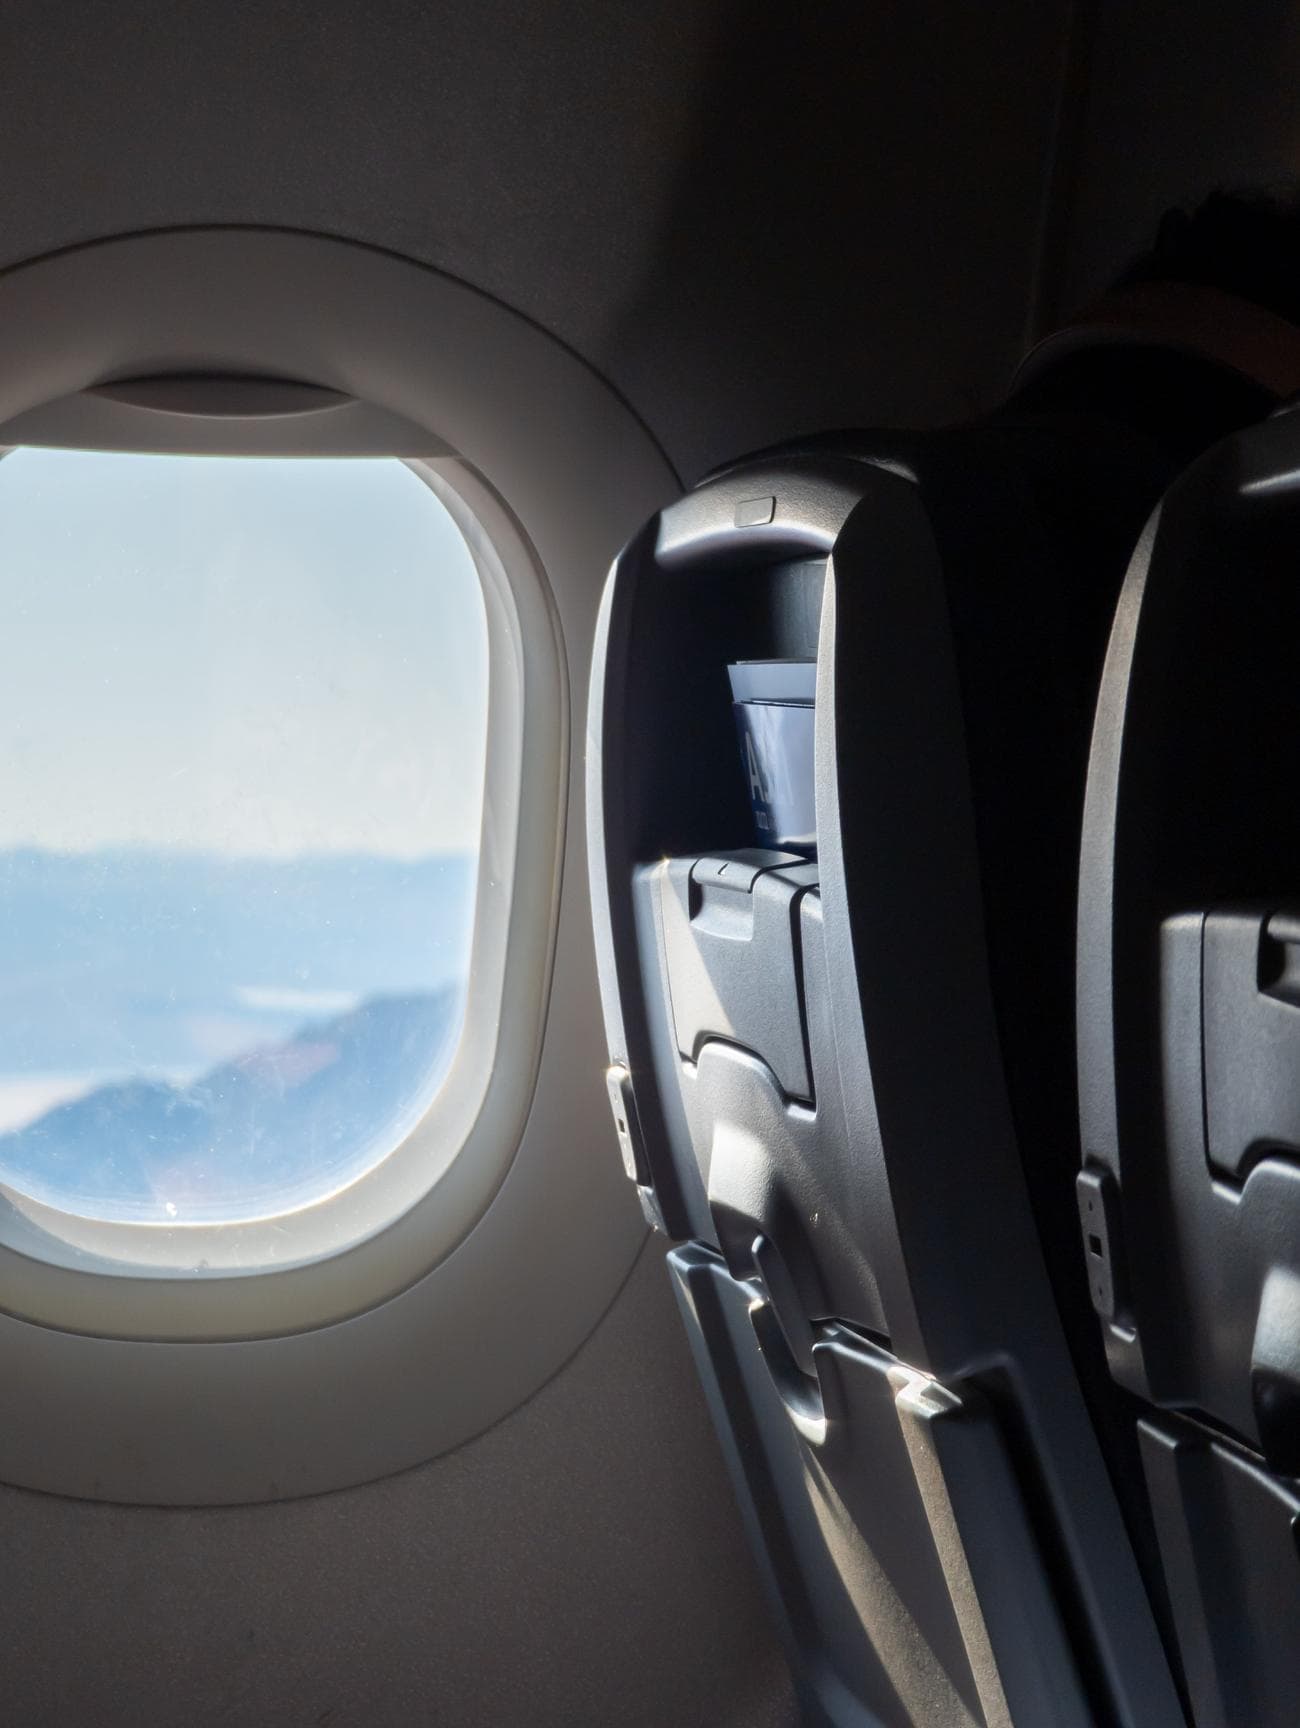
Before you get too excited about the ability to edit RAW files catapulting your mobile photography to new heights, notice how similar the manually processed RAW photo in the example looks to the same photo as processed by the Pixel 7 Pro with no input from the photographer:
Left
:
Manually edited from RAW.
Right
: Automatically processed by Pixel 7 Pro. Is it worth the effort?
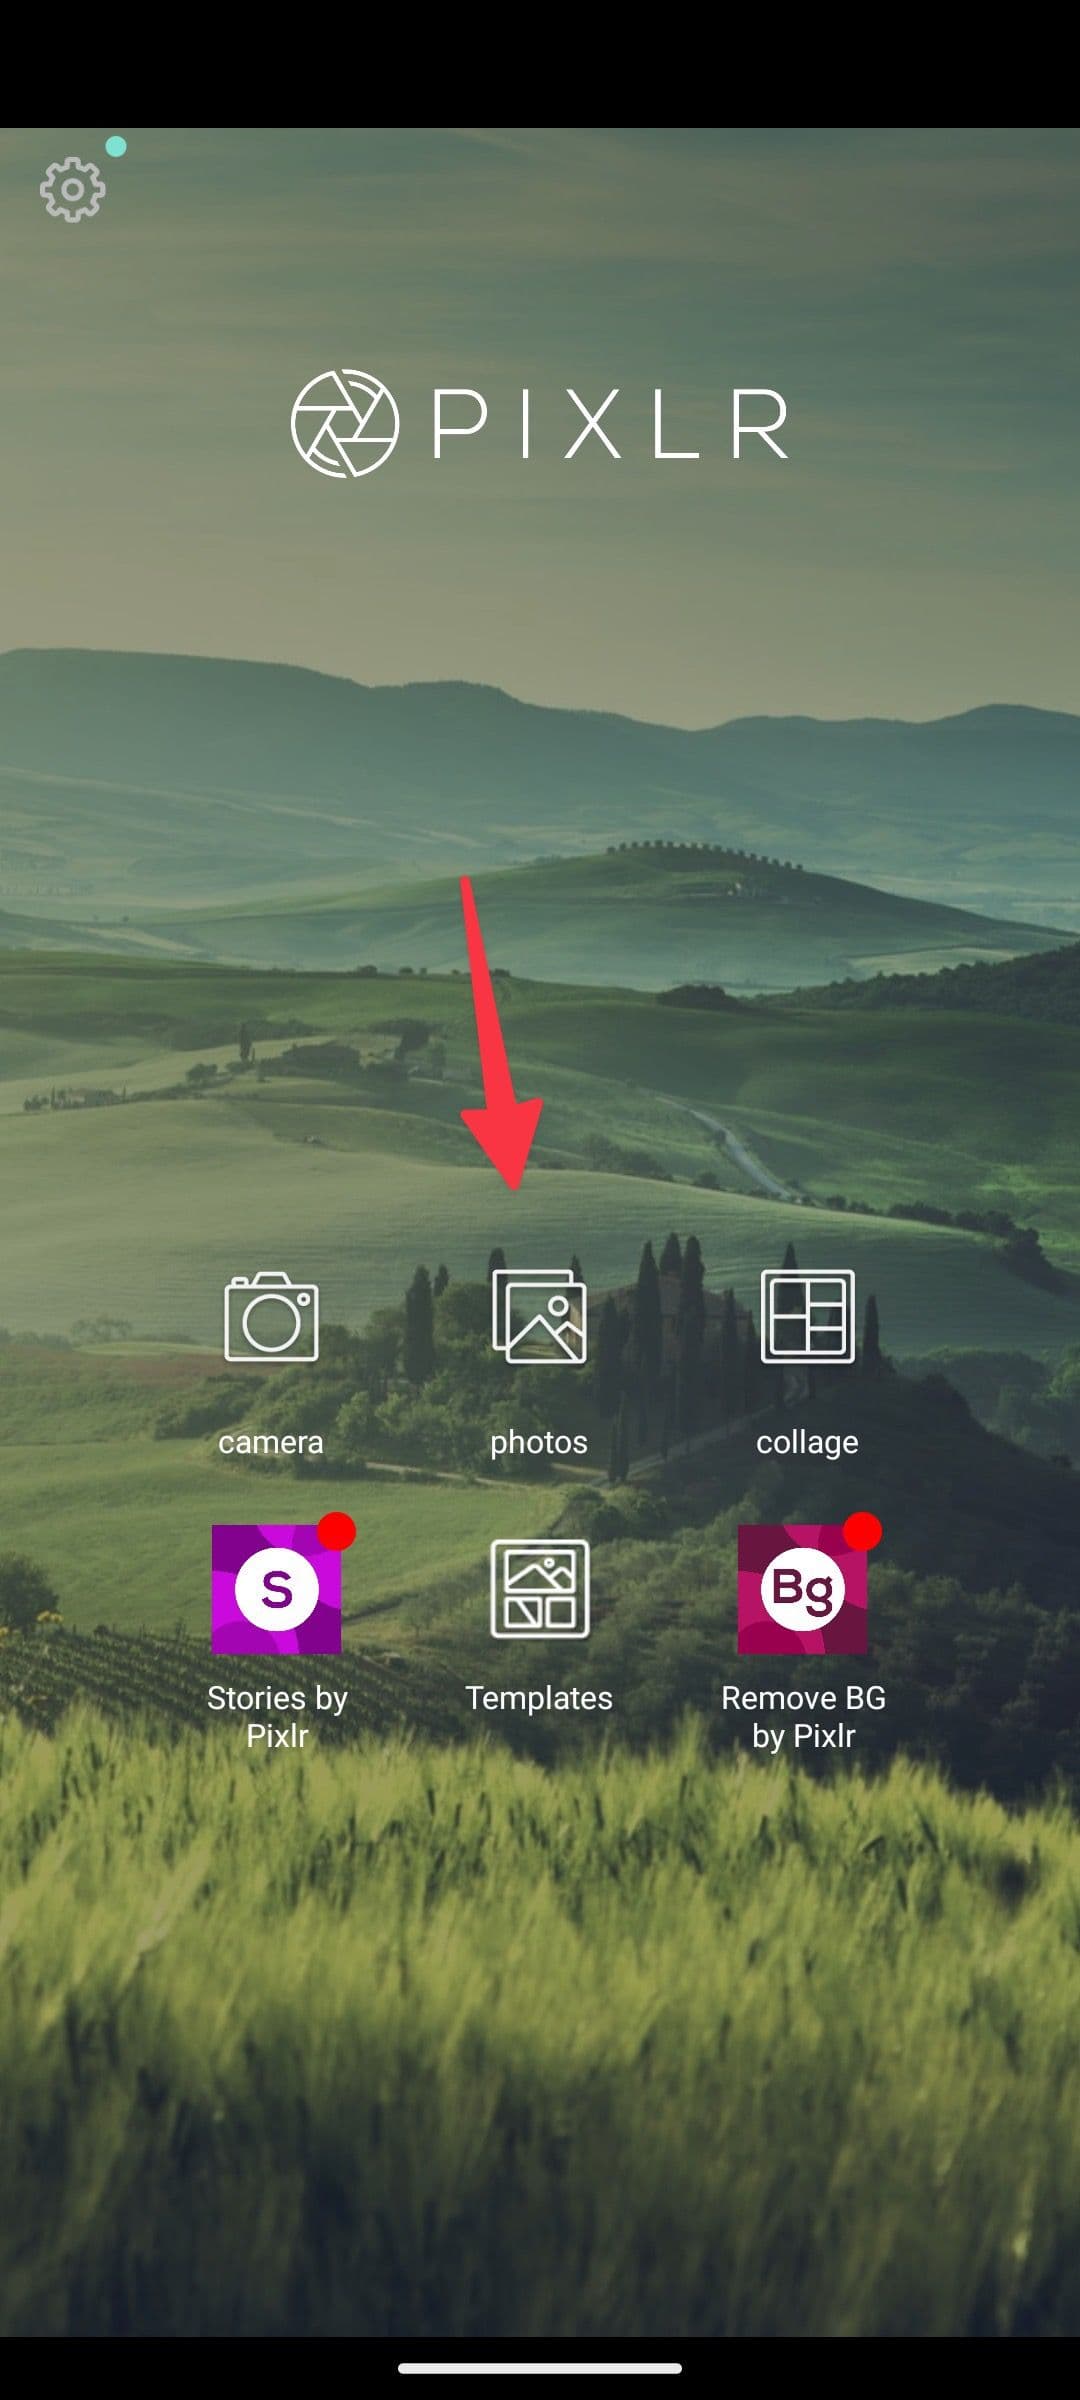
Pixlr
If you don’t want to deal with Adobe apps on your Android app, use Pixlr to edit your RAW photos. It’s a feature-rich Lightroom alternative on Android.
-
Download and open
Pixlr
on your Android phone. - Open your RAW photo from the home page.
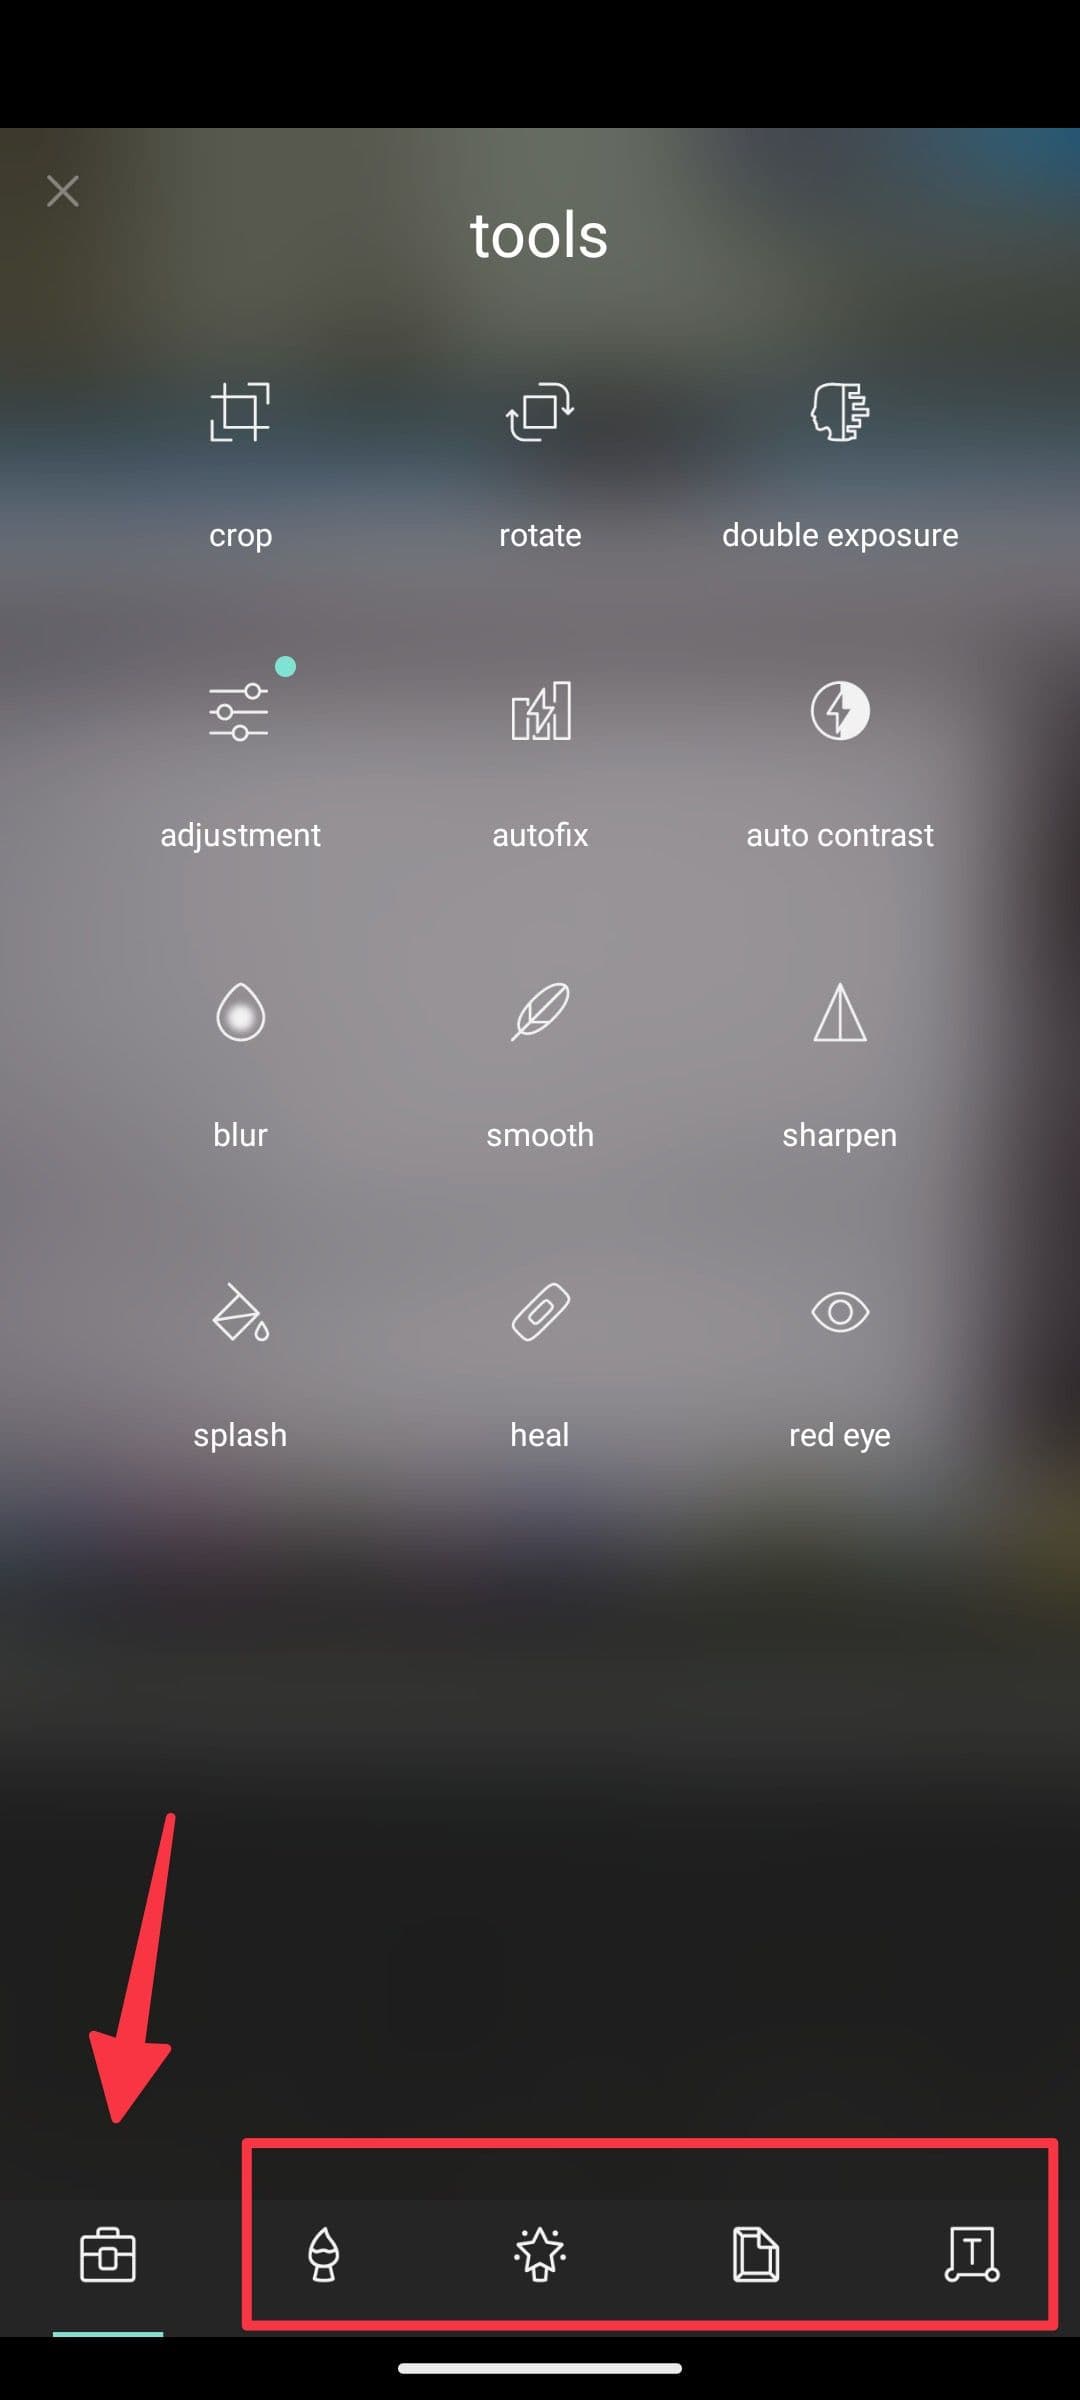
-
Tap the
bag icon
to access options like crop, rotate, double exposure, adjustments, auto contrast, blur, smooth, and more. -
You can also use brushes, play with several filters, add a frame, and add text to your RAW photo.
Do you really need to shoot photos in RAW?
We wouldn’t recommend most people — even most hobbyist photographers — manually process RAW smartphone photos. But if you’re a budding photographer who wants the practice, have a specific photo in mind that you don’t think your phone’s image processing would do justice, or are curious about mobile photography, there’s value in checking it out. If you own a Samsung Galaxy phone, we have a guide to help you get the most out of your photos with Samsung Expert Raw.
