
How to replace Google Drive with a Synology NAS
Related Posts
If you have a large team working in your office, Google Drive may not always be the right collaboration tool. To make sure your important work files are stored on a server you control and are readily accessible without needing to rely on an erratic internet connection, look at an offline solution. And it looks like Synology may have the perfect replacement for you.
Synology may be better known for its awesome NAS enclosures, but its real virtue lies in the accompanying software. Synology Drive packs a lot of modern goodies that you’ve come to expect from Google Drive while adding an extra layer of privacy. Businesses and individuals can benefit from the perks that Synology Drive brings to the table.
Now that you’ve decided to switch away from Google’s service, here’s everything you need to know about setting up Synology Drive as a Google Drive alternative.
When to use Synology instead of Google Drive
Google Drive is easily accessible and may be a more feasible option for many users when compared with a Synology NAS (network-attached storage). This is particularly true if you need the tool for a single purpose, like backing up data.
Google Drive could be your best bet for purposes requiring less than a terabyte of data. It has plenty of integrated bells and whistles, and the introductory rates are affordable. It all boils down to how much value you place on your personal or business data and how important it is to keep your files in your storage space instead of in someone else’s cloud servers.
If you need more storage space, check out Google One, which is a subscription service that includes Google Drive storage, Google VPN, and other niceties. The payment plans start at $2 a month or $20 yearly for 100GB of storage. Plans go as high as $300 a month for 30TB of storage. The sweet spot is $10 a month or $100 a year for 2TB of data, which is cheaper than most 2TB HDDs.
With a NAS, you don’t need to pay a monthly fee, but there’s an upfront cost attached, and it’s a hefty one. Even if you pay a monthly fee for Google Drive, it will take years to match what you’ll pay for your own network storage. Still, there are cases, such as shared team projects, where you need spacious local storage, creating a more compelling need for the switch to a Synology NAS.
How to manage your files on a Synology NAS
Synology has some file management systems in place with some overlap, which can be confusing if you’re new to this. Consider the following as you decide what will work best for how you plan to use your network drive.
Map your Synology NAS to Finder or File Explorer on your Mac or Windows PC
File managers on Mac and Windows can connect to your network drive, giving you access to your files on Synology, like from internal storage. This way, you don’t need to log in to your NAS’s interface, and your files remain accessible in the same files app you’re used to without taking up space on your computer’s storage. Here’s how to set it up.
-
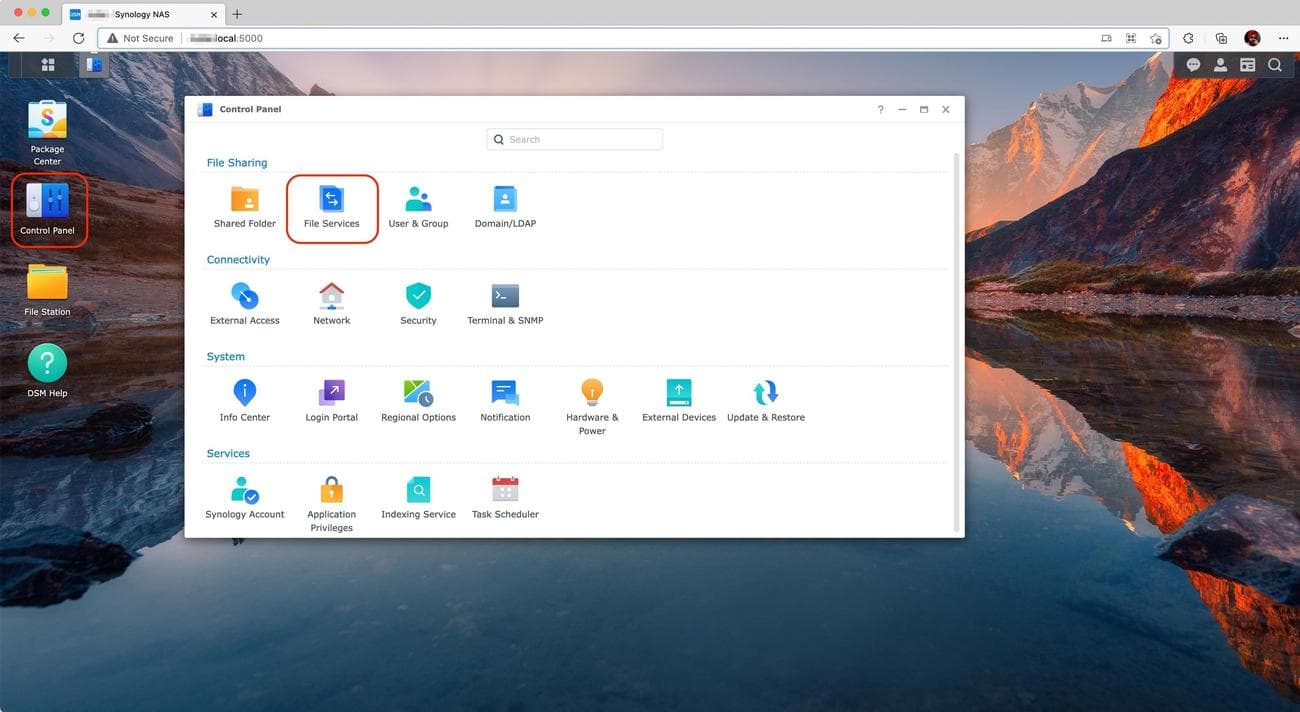
Go to your
Synology DSM
in a web browser and open
Control Panel
. -
Select
File Services
.
-
Under the
SMB tab
, enable the
SMB
and
WS-Discovery
options and click
Apply
.

-
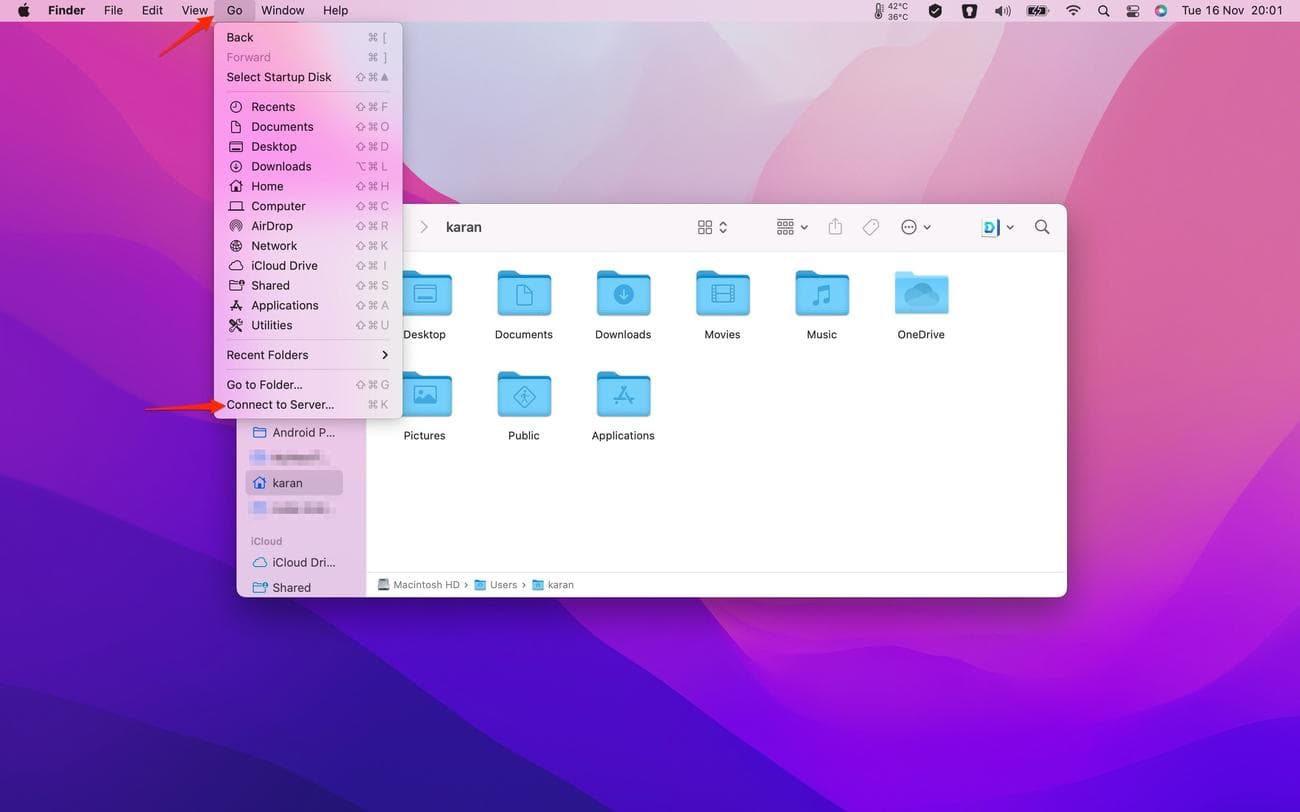
In Mac’s Finder, click
Go
in the top menu bar. -
Select
Connect to Server
or use the
Cmd
+
K
shortcut.
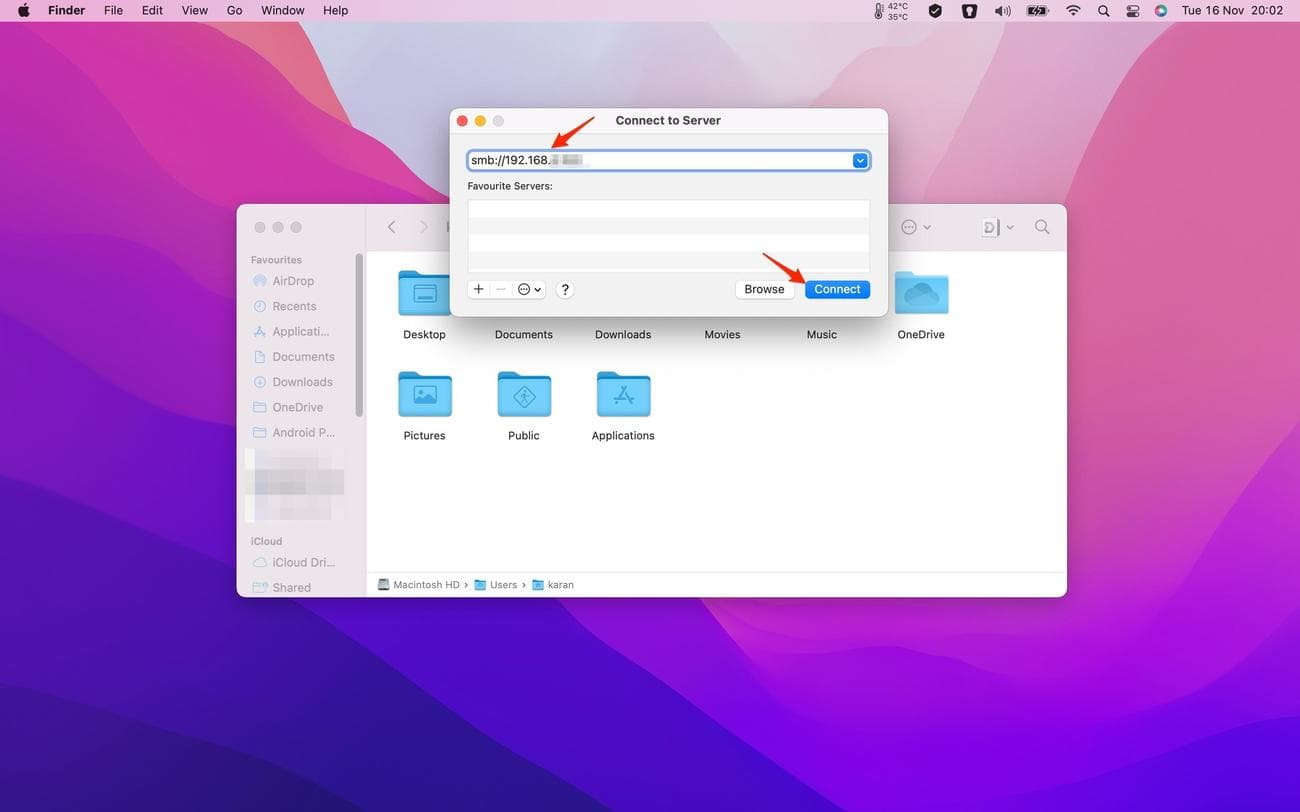
-
Enter your NAS’s
local address
. This address could be a custom name you’ve given, like
smb://xyz.local
, or a local IP address your router assigned to the NAS, usually in the 192.168.X.XXX format.
-
For Windows, right-click
This PC
in File Explorer and select
Map network drive
.
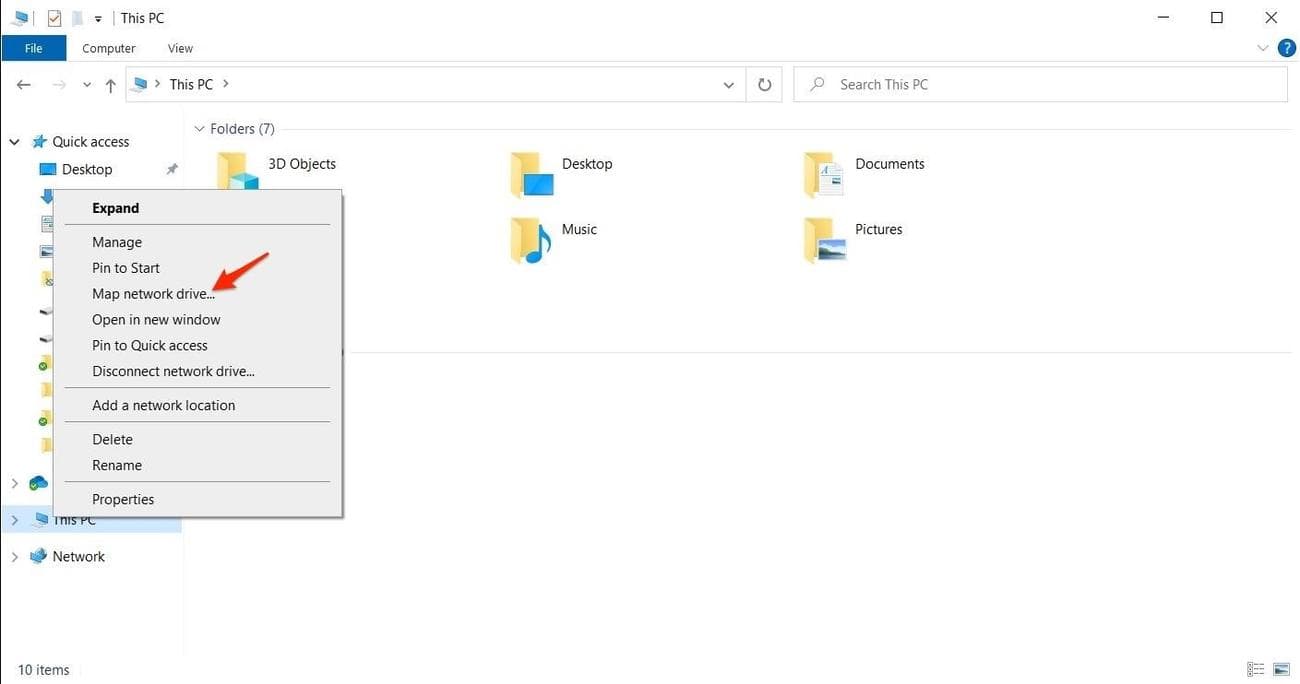
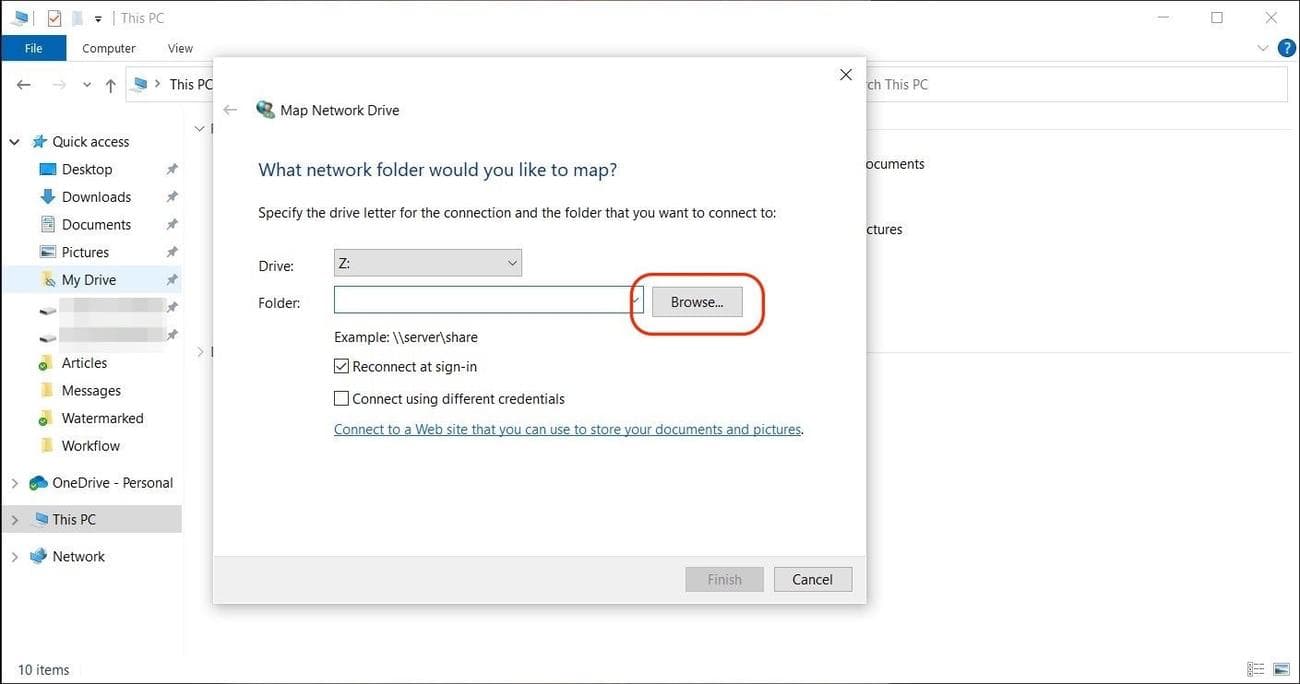
-
Click
Browse
and select the drive label.
-
Select your
Synology NAS
from the list.
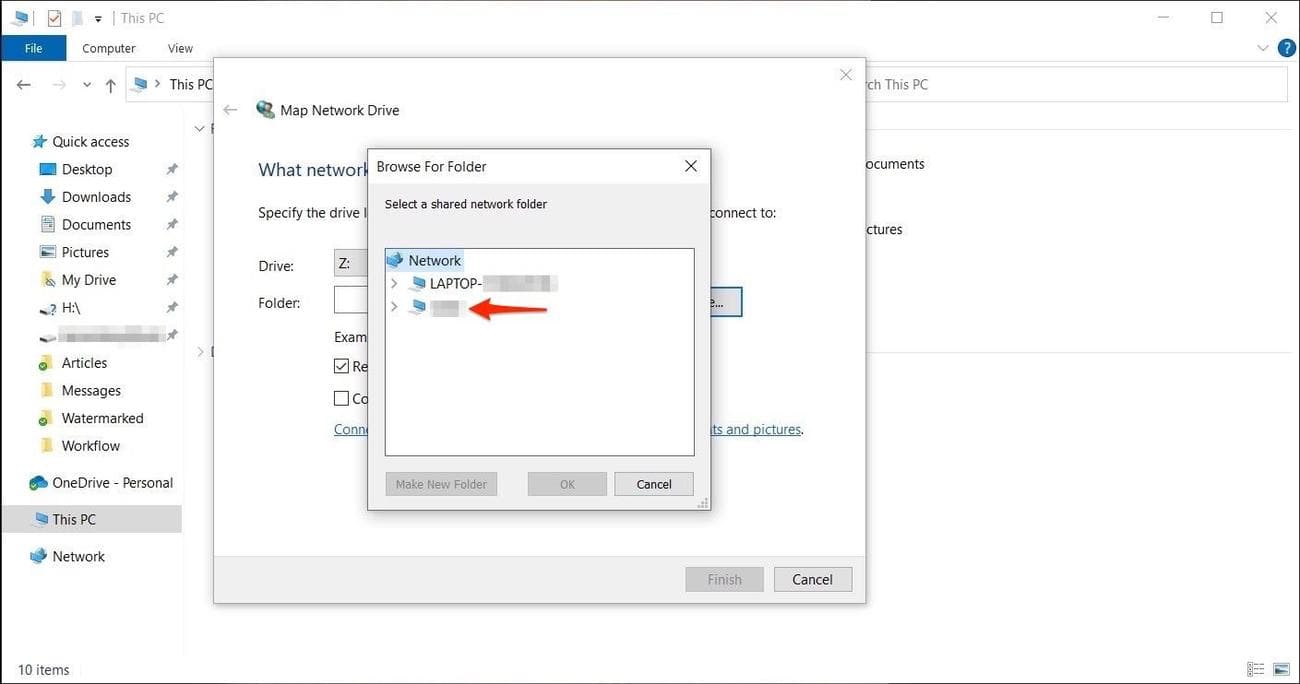
-
Enter your login credentials.
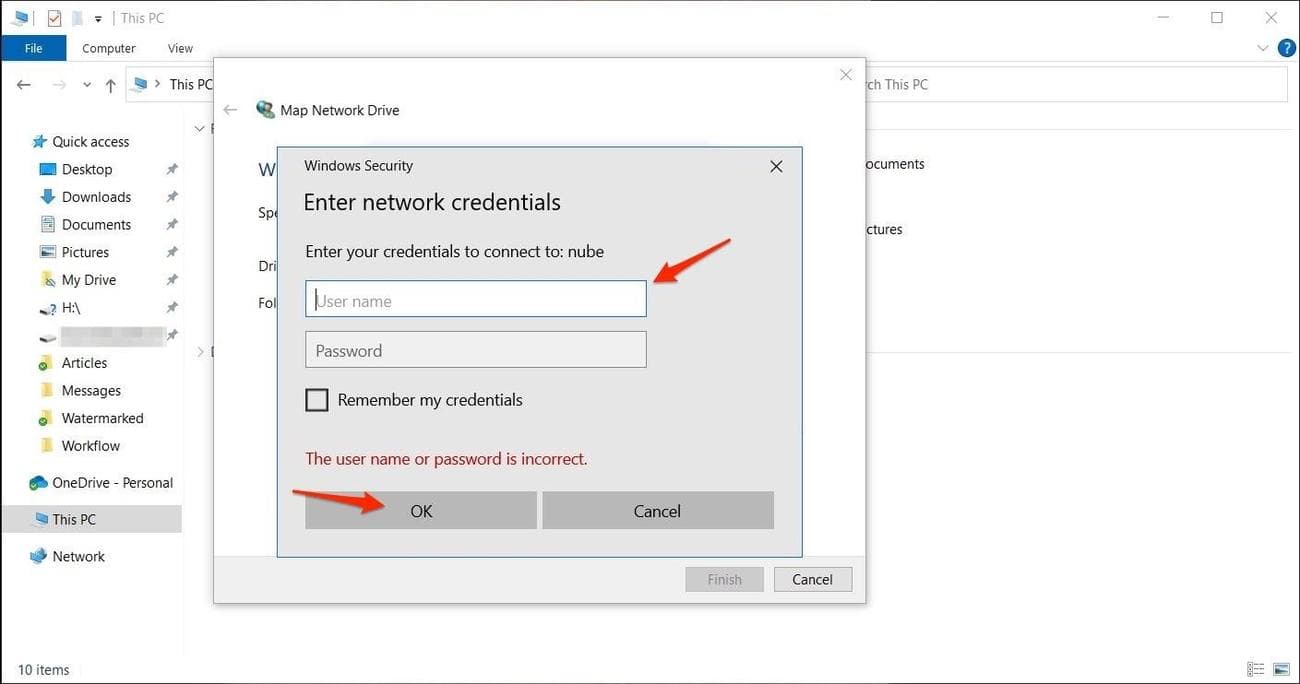
Your Synology NAS is visible in Finder or File Explorer. It’s recommended to pin the folders you frequently use to the sidebar for quick access. After mounting a local network drive, the files are only accessible when you’re on your home network.
Give Synology permission to back up and sync your computer’s folders
Google Drive has seemingly inspired some elements of Synology’s alternative, conveniently named Drive. Aside from borrowing the name and a few smart features, Synology Drive supports syncing and backup for your computer, which functions similarly to the sync tool that Google Drive offers. This is handy when you want to sync some of your folders with multiple devices and people on your network. It only takes a handful of steps to get Synology Drive up and running.
-
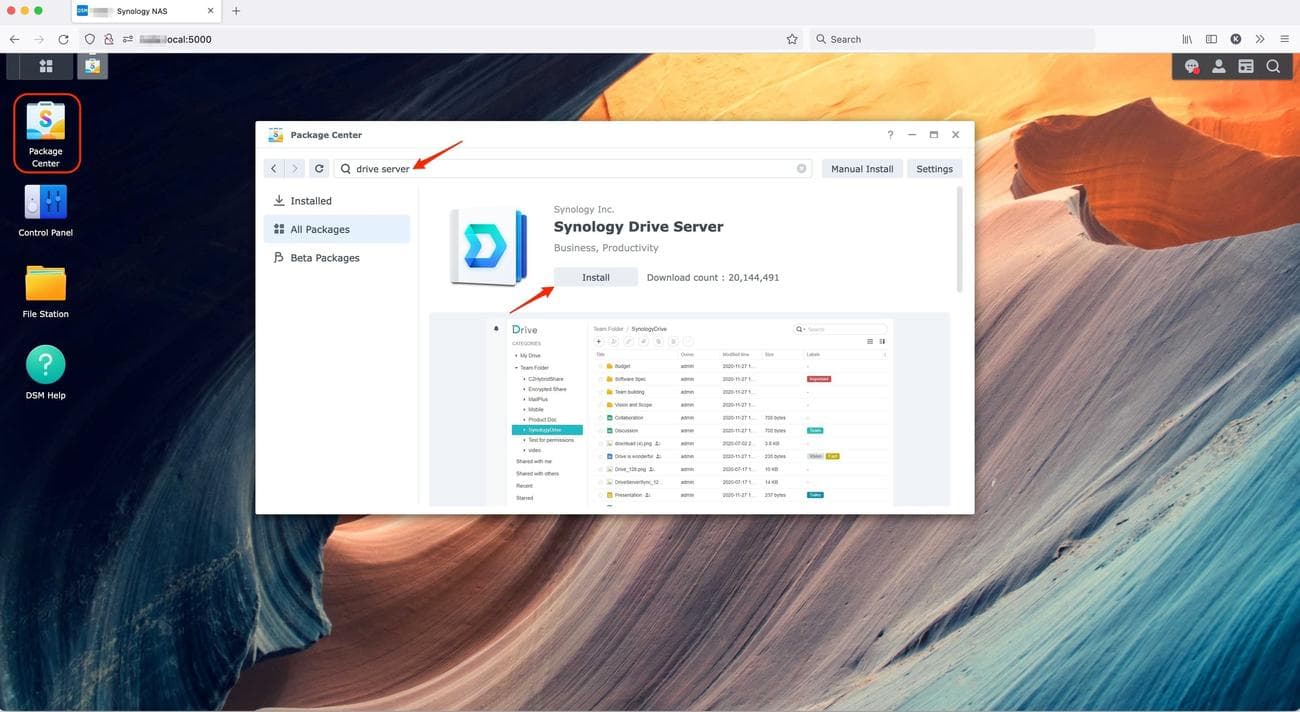
Go to your
Synology DSM
in a web browser and open
Package Center
. -
Search for
Synology Drive Server
. -
Click the
Install
button and let it run until the process is complete.
- The Drive app installs along with the admin console. You can now use Drive’s web app to transfer files from other directories.
-
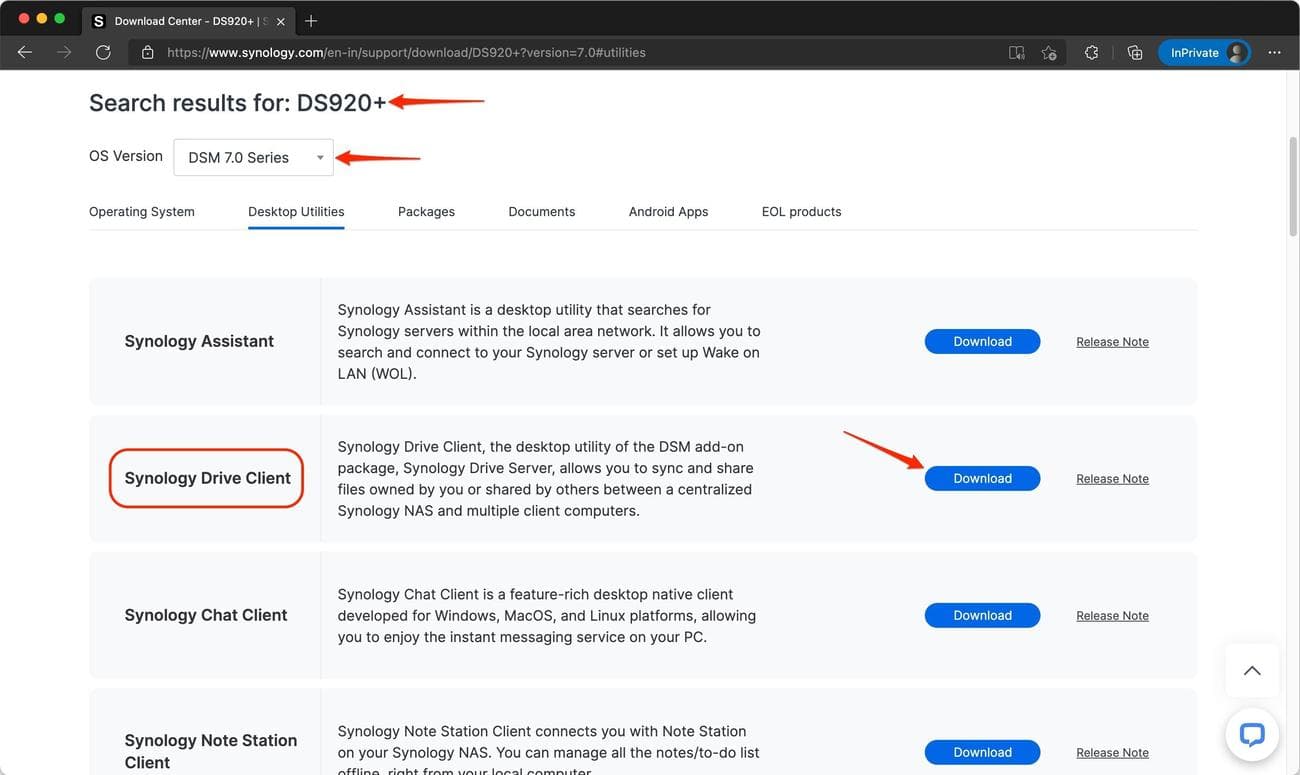
Download the
Synology
Drive Client
for your computer from
Synology’s website
. You are asked to provide details about your NAS model, its OS version, and your login credentials.
-
Select
Backup Task
.
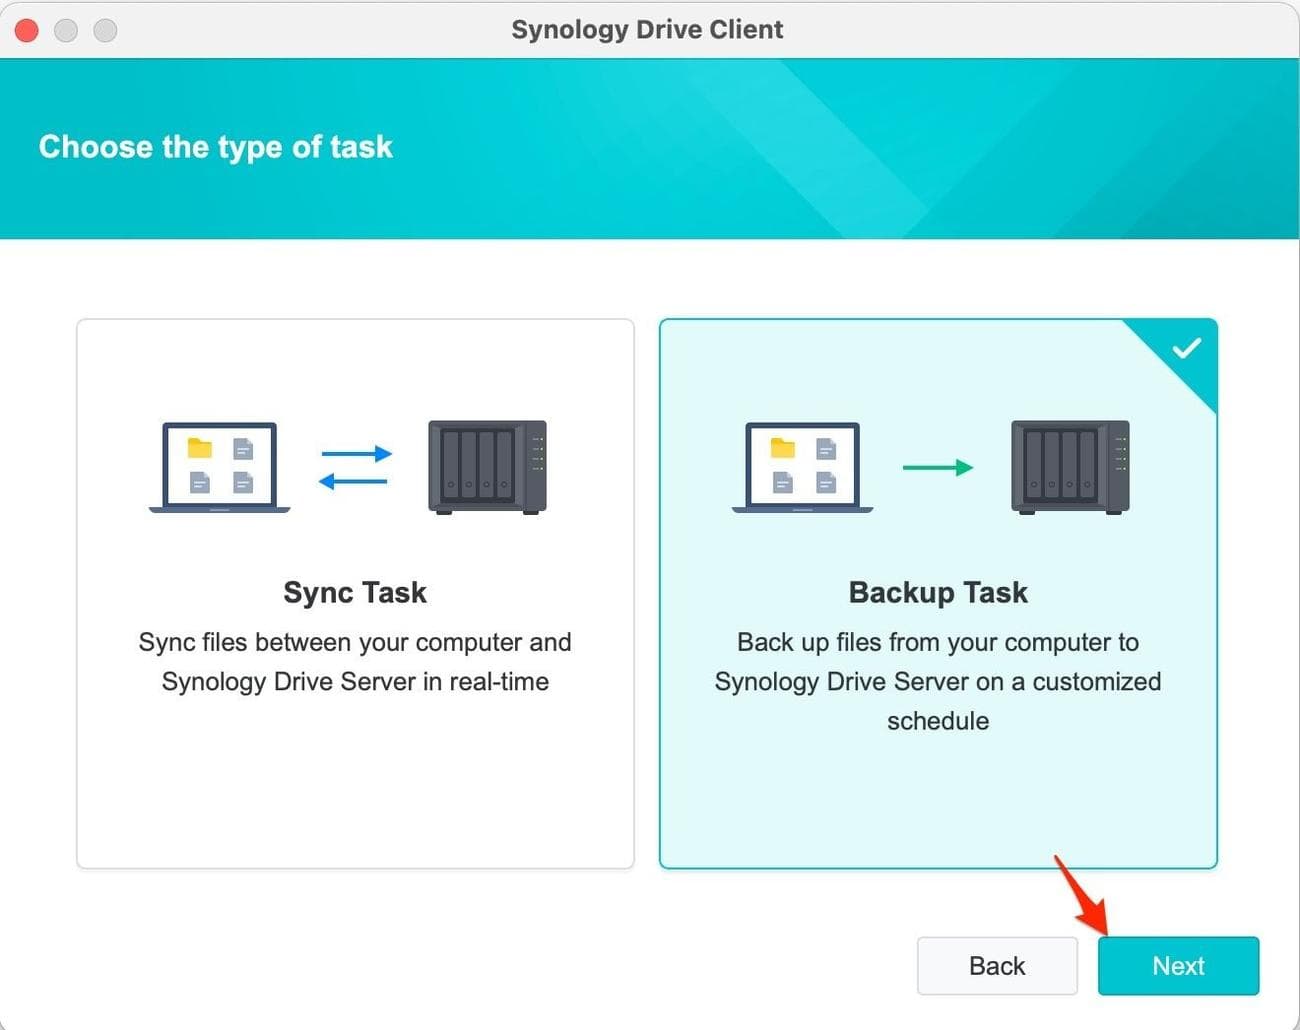
-
Select the folders you want Synology to keep a copy of.
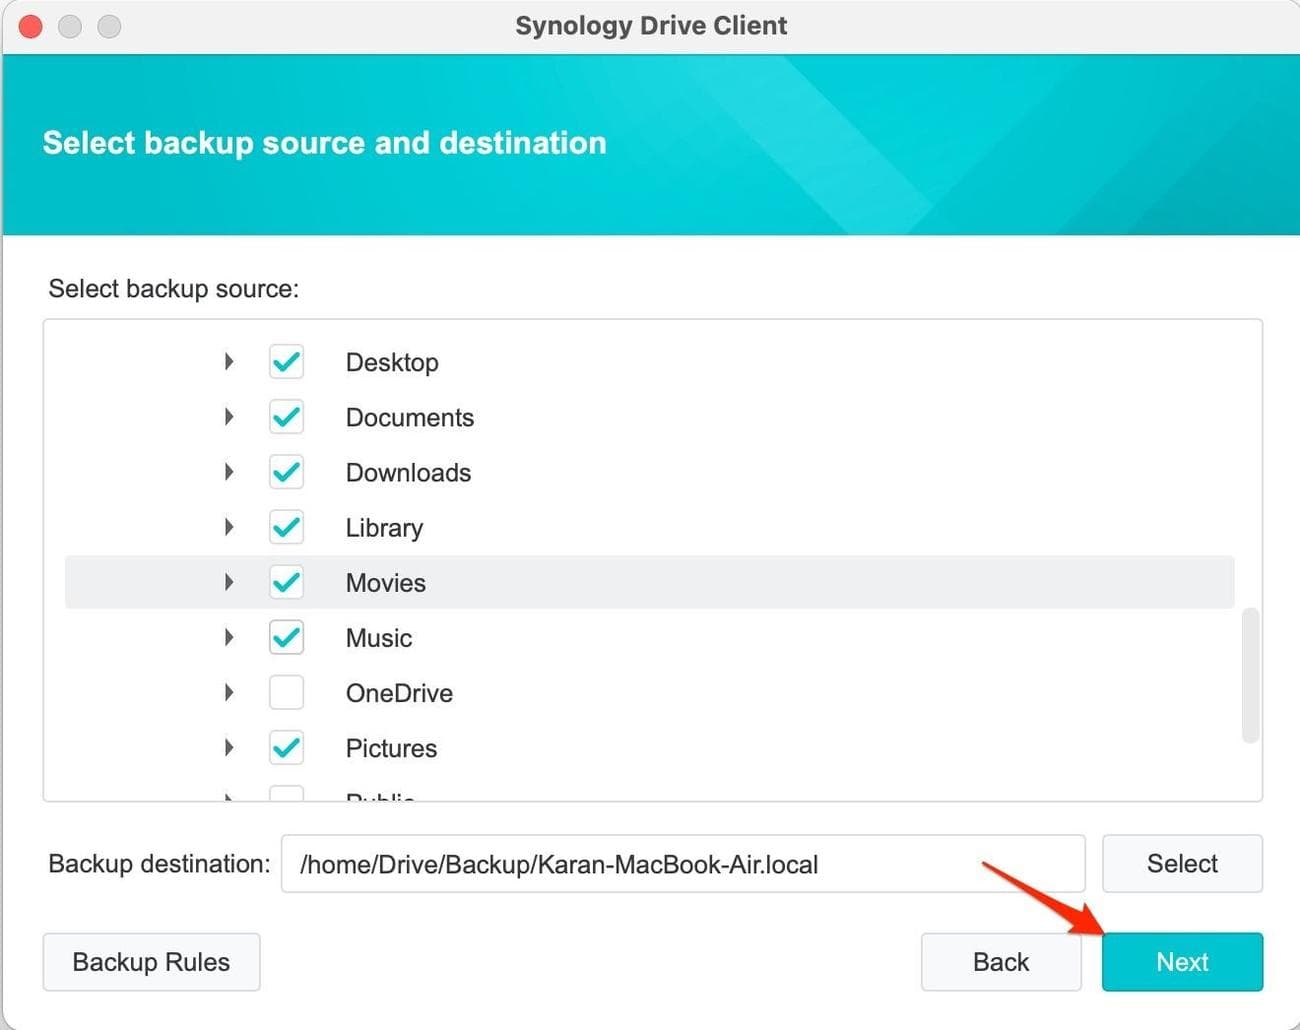
-
Select your backup preferences.
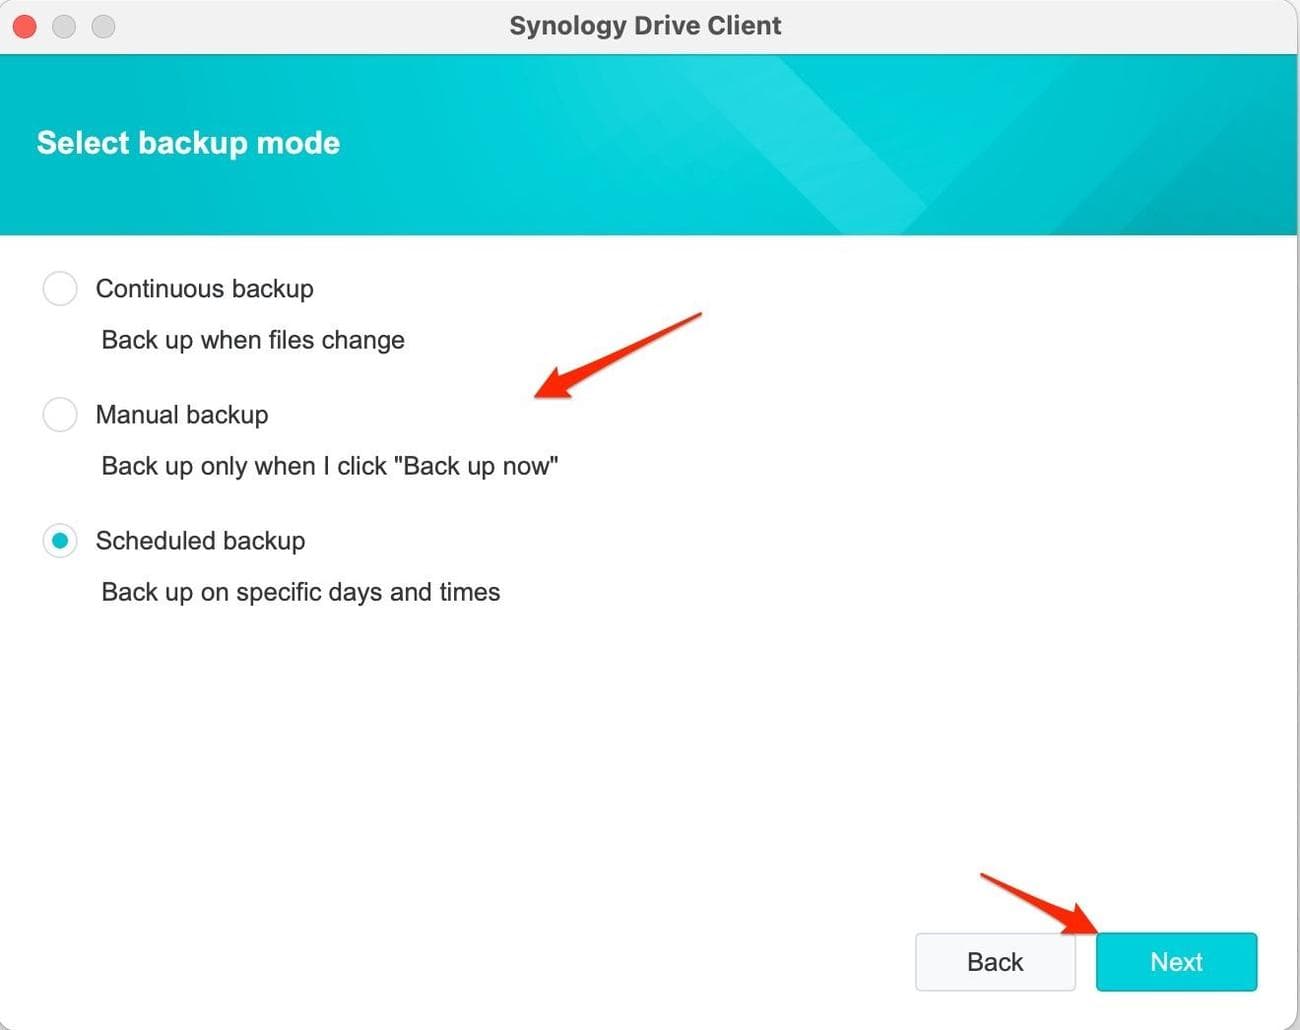
-
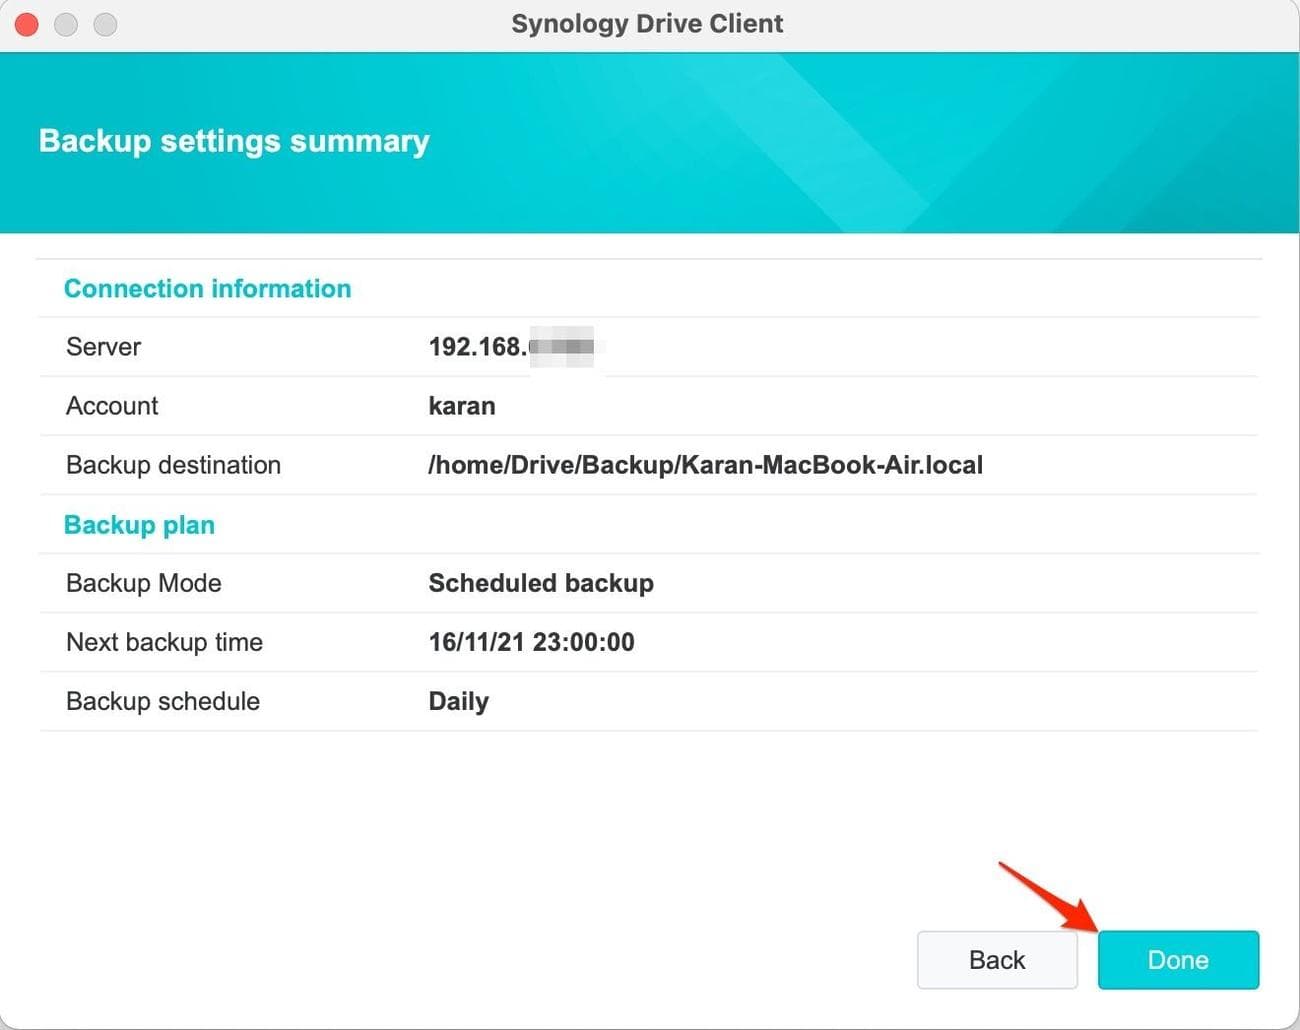
Check your backup information, then select
Done
.
-
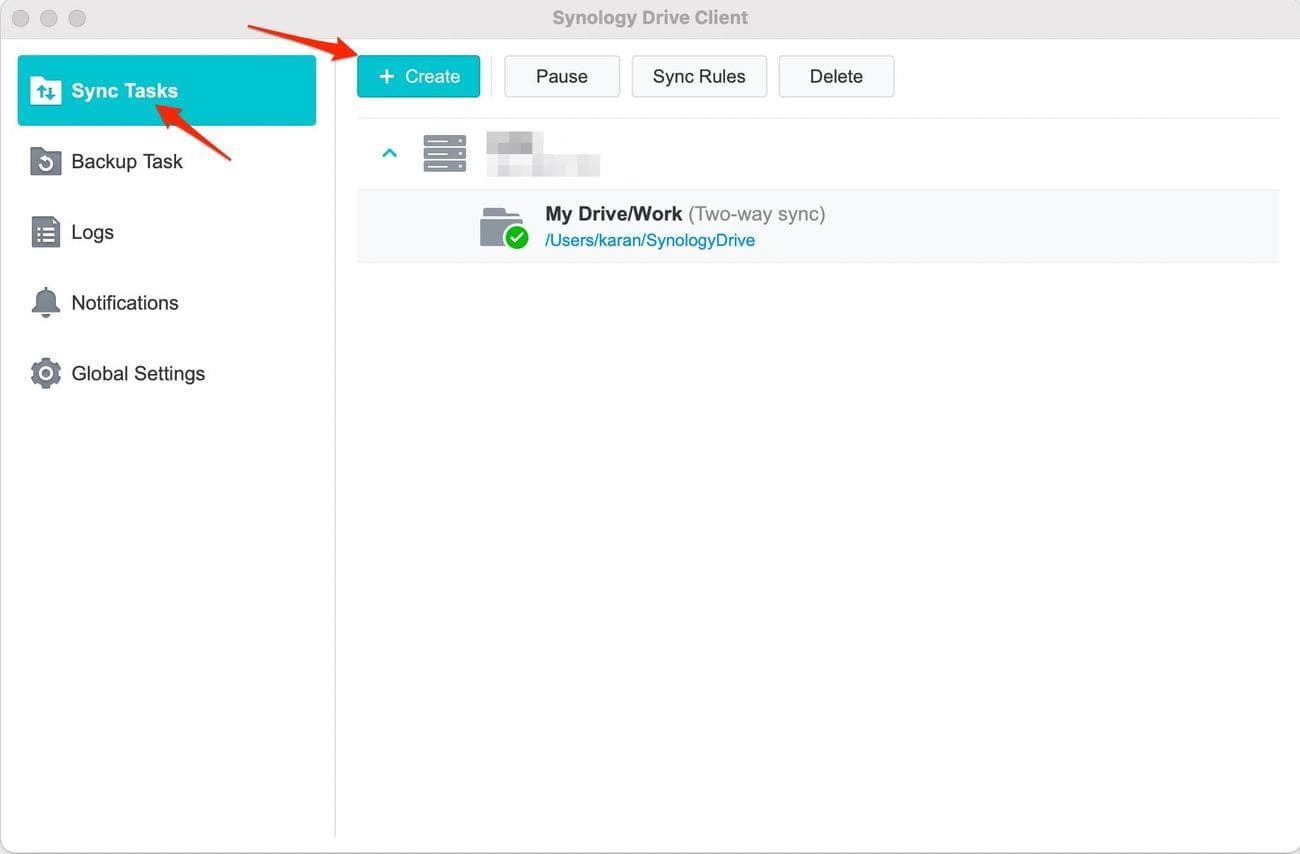
For syncing, create a new
Sync Task
from the Drive app on your computer.
-
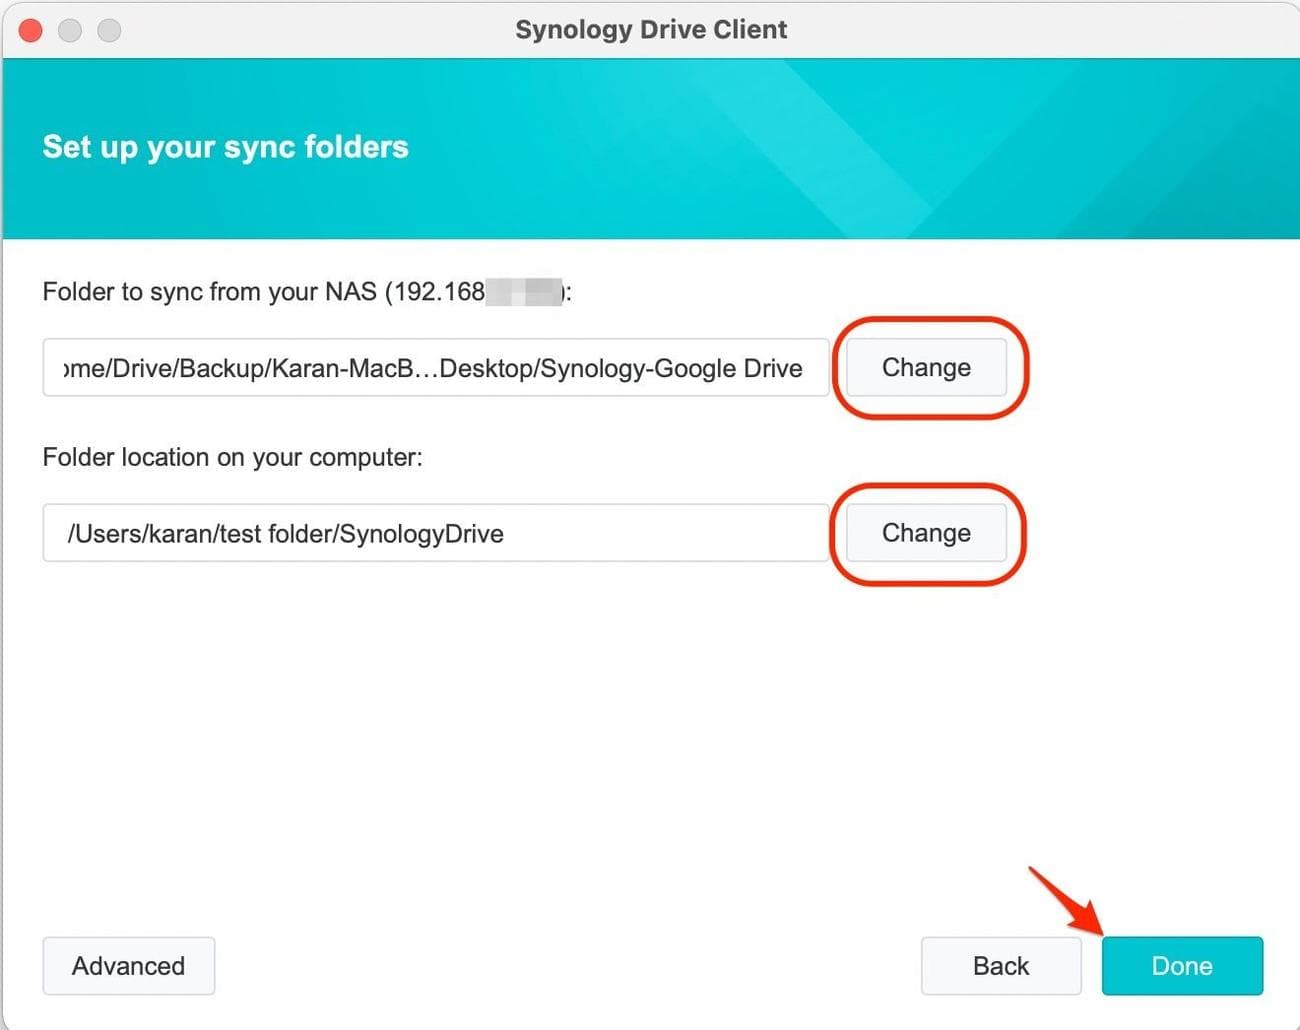
Select the folders on your NAS and computer that you want to keep in sync, then click
Done
.
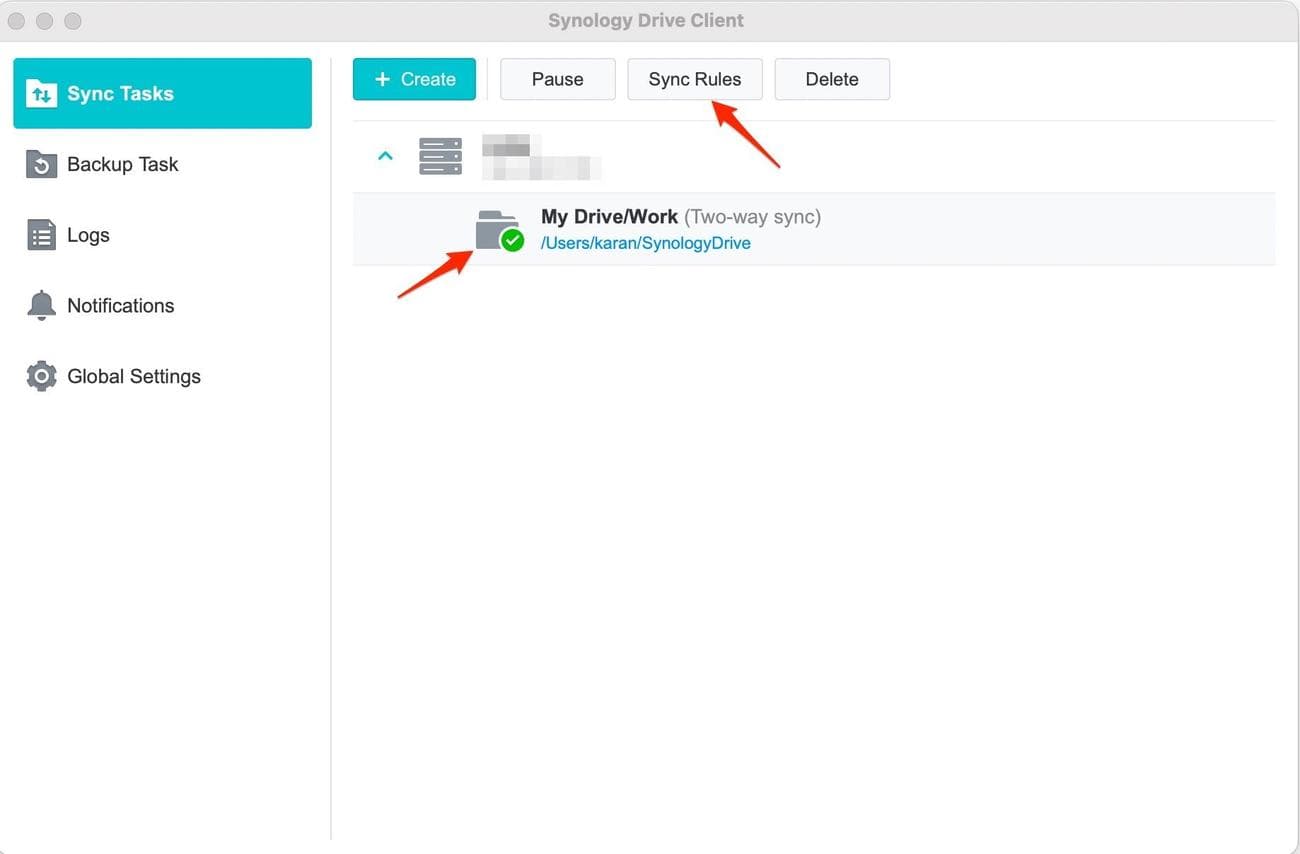
-
To alter advanced settings for the sync, select it and click
Sync Rules
.
With the backup tool, you can back up and access your files through the NAS by mapping them to your computer’s file manager. By enabling syncing, a copy of the files and folders is created and takes up space on the internal storage of all synced computers. They are distinct features that have some overlap, so you can use one method or both simultaneously.
Pros and cons of leaving Google Drive for Synology
Synology Drive is a versatile tool with many smart features. Think of it as a spruced-up version of the regular file manager, which gives it some advantages and a few disadvantages that we’ll discuss below.
Synology Drive for Android
The original Synology Drive app for Android was already a step up from the company’s deprecated file management app DS File. But Synology Drive recently got a major design overhaul, bringing a modern and clutter-free interface that easily rivals Google Drive. The tabbed interface lets you quickly jump to your custom file selection, like the ones you recently visited, starred, or labeled. Additionally, you can browse the app based on the file kind, such as photos, videos, audio, and documents.
You can save files offline on your phone for offline access when you can’t connect to the internet. And a good thing about the app is that the bottom navigation bar is dynamic, so it changes based on the app section you’re in to show you the most relevant options depending on the content. While the app has long allowed you to back up your files on your phone to your NAS, this new app version supports data backup even on mobile data (as long as QuickConnect is enabled on your Synology NAS).
Synology Drive has even added a built-in music player in the app with a fun little animation on the app’s home page. However, the app doesn’t support opening common document file formats like PDF. The company could integrate Synology Office (more on that later) within the Drive app to make the user experience even better.
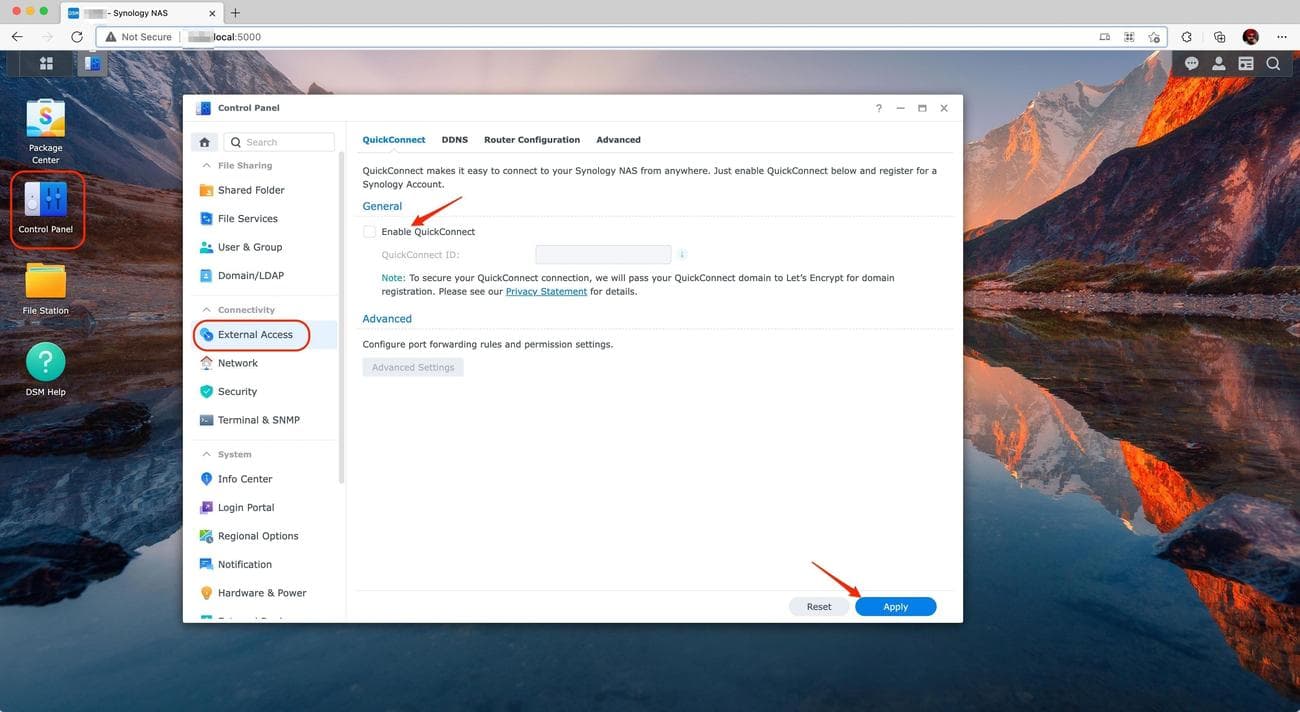
Connecting to your Synology NAS over the internet
Cloud storage apps like Google Drive have become popular partly because you can access your files anywhere. All you need is an internet connection. It’s possible to do that with your NAS, and the simplest way is to use Synology’s solution: QuickConnect.
You can turn it on by navigating to
Control Panel
>
External Access
>
QuickConnect
>
Enable QuickConnect
. Make sure you have a Synology account (not your NAS user account) linked to your NAS for the feature to work. This way, you get a custom web address where you can sign in to your NAS from virtually anywhere in the world.
Team sharing
A big perk of using Synology Drive is setting up sync across multiple devices and users so that everybody on the network has an updated copy of the shared files and folders. You can enable team sharing by selecting
Synology Drive Admin Console
>
Team Folder
. Once you’ve selected the relevant shared folders, click
Enable
.
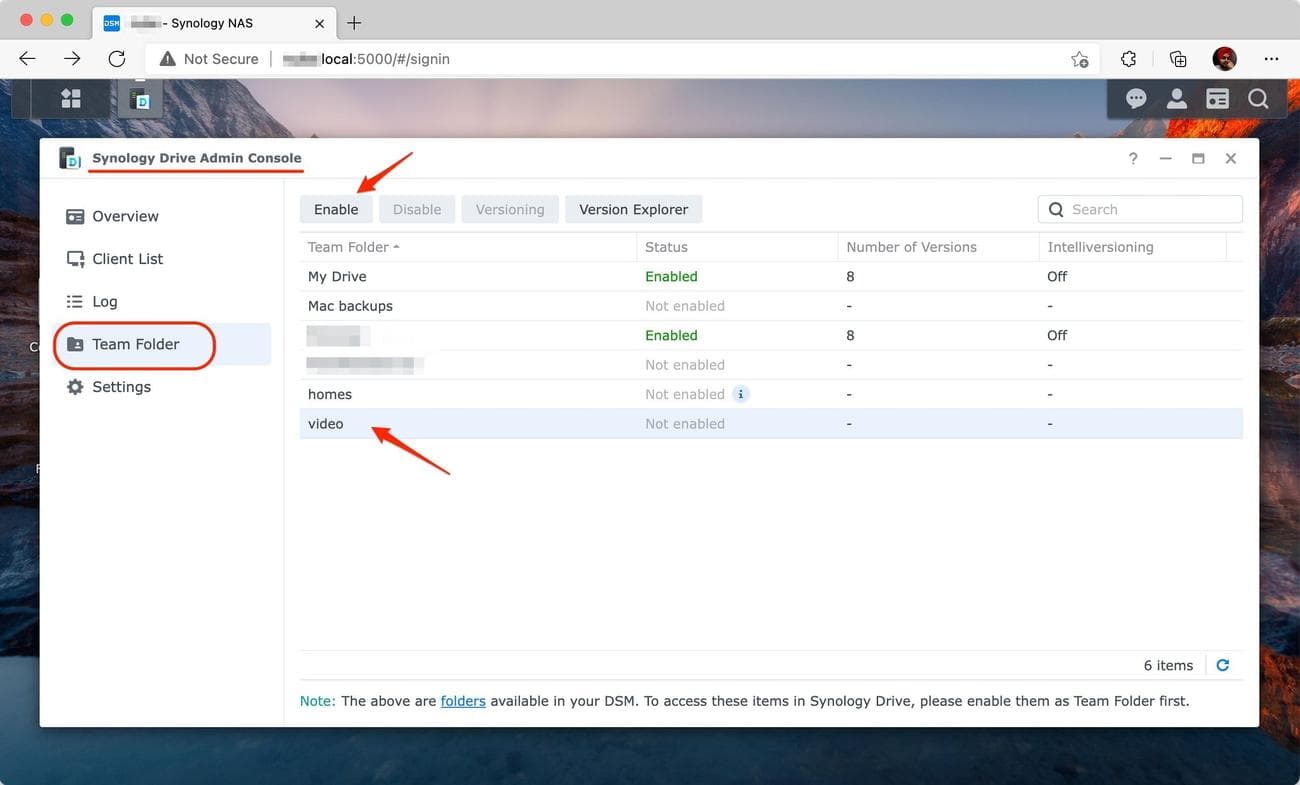
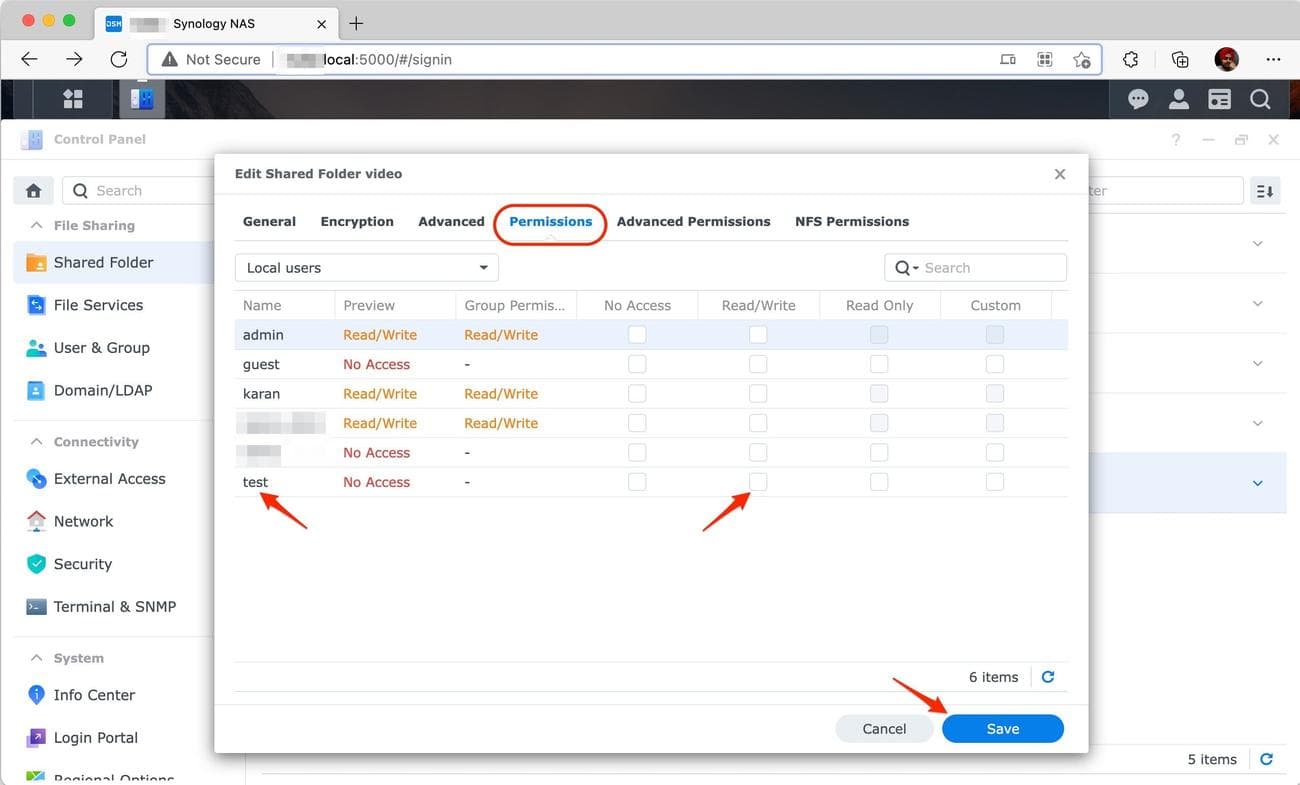
You’ll need to repeat the sync/backup steps on any additional computers you want the synced folders to appear on. Only existing Shared Folders on your Synology can be added to the Team Folder, so make sure users have read/write permissions to that folder for the sync to work properly.
To change permissions:
-
Select
Control Panel
>
Shared Folder
. - Choose the folder.
-
Select
Edit
.
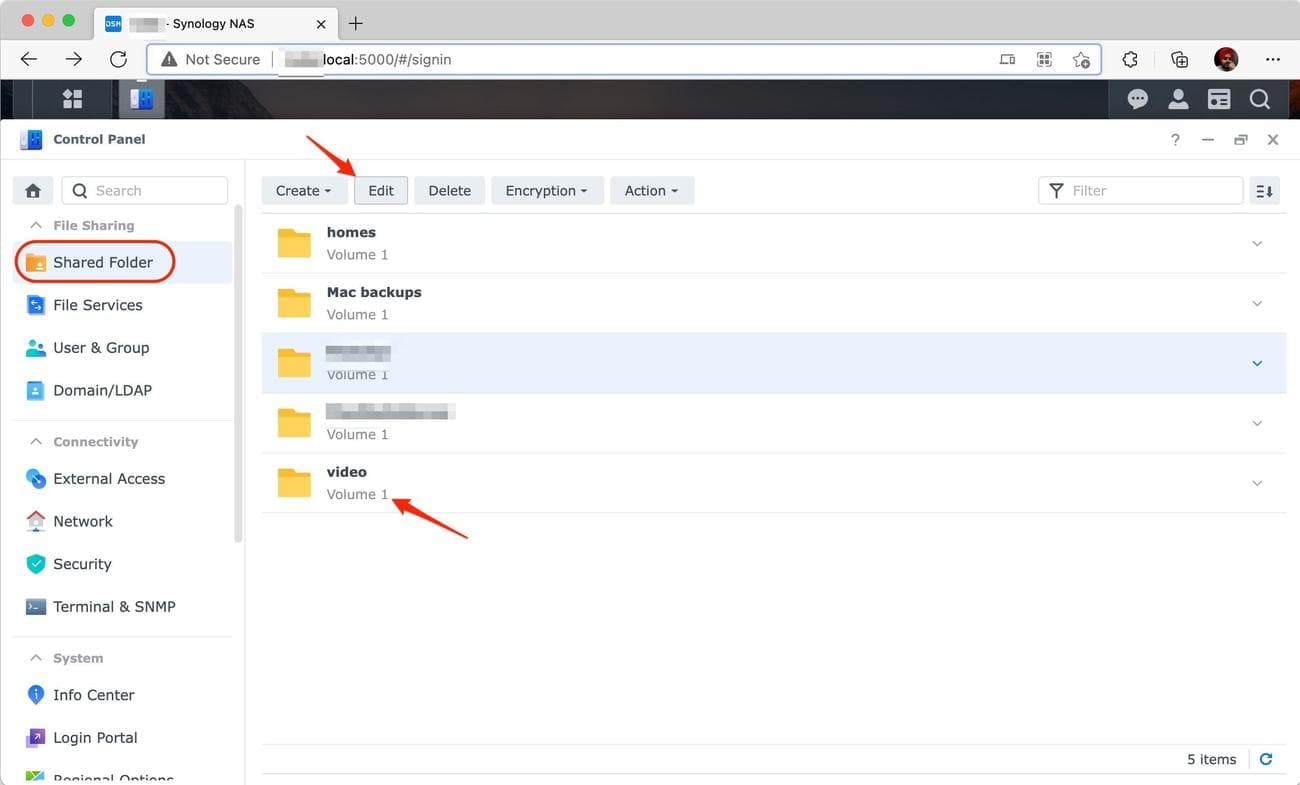
-
Go to the
Permissions
tab and make the changes.
Synology Office
Synology matches the industry standards for productivity apps. Installing the Synology Office package on your DSM integrates into the Drive app on the web. This allows Drive to open Microsoft Office files, though you’ll need to convert them to Synology’s proprietary formats to edit them. While basic text-only files convert without formatting issues, complex documents could be more difficult.
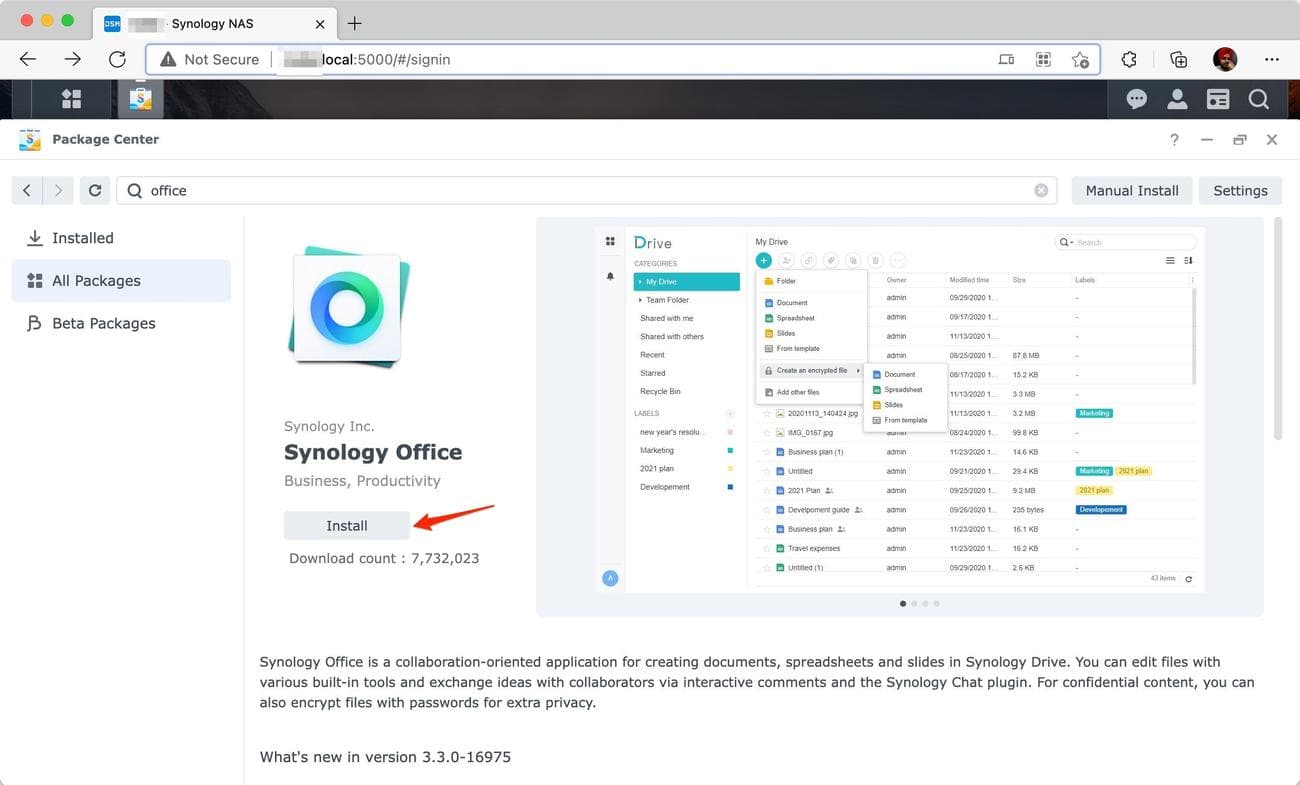
The editor screen should feel familiar. Synology keeps the basic formatting tools where they belong, so you’ll feel at home. There are also options to export files in .docx and .pdf formats. In short, Synology Office is good for basic work. Still, it isn’t trying to replace more sophisticated tools like MS Office.

What you’ll miss when you ditch Google Drive
Synology may have brought over most of the important Google Drive features to make users feel at home. But the biggest strength of Google Drive is the larger Google ecosystem and how ubiquitous Google’s services are, which Synology still can’t match. When sharing a file with someone on Google Drive or collaborating in a Google Docs file, you can almost always assume the other person has a Google account.
When it comes to the convenience of storing and accessing your files, especially for consumers, Google Drive wins hands down because you can get started with just a Gmail account. Synology Drive has a tedious initial setup process and a substantial upfront cost.
How to move files from Google Drive to Synology Drive
Now that you’ve set up everything on the Synology Drive side, it’s time to move your existing files in Google Drive to your NAS. With the new Google Drive for Desktop tool, the process isn’t complicated, though it can take some time when syncing several hundred GBs of data.
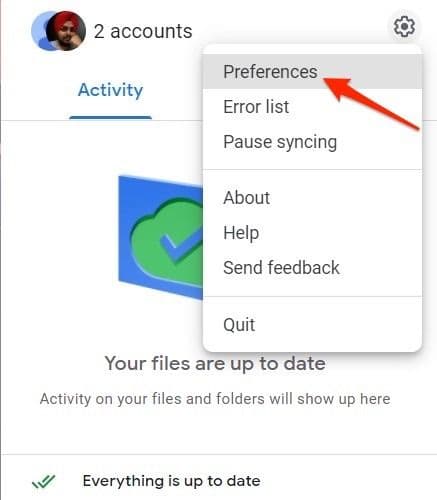
-
Using the Google Drive widget on your computer (download the
desktop app
if you don’t have it), go to
Preferences
.
-
Click
Google Drive
.
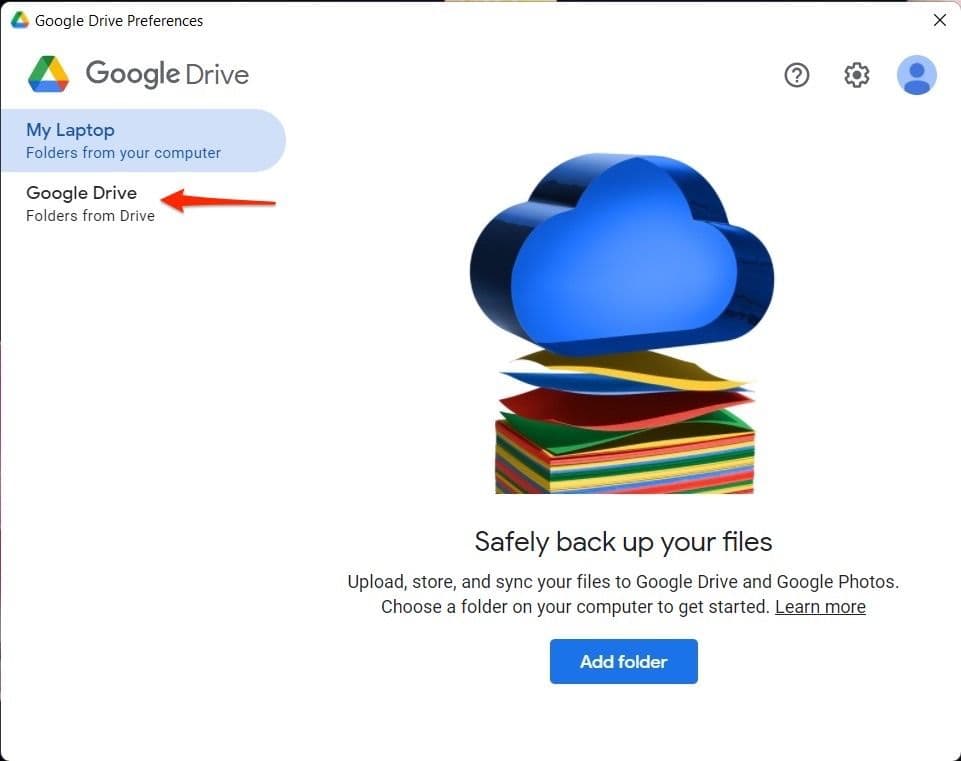
-
Select
Mirror files
and confirm the save location.
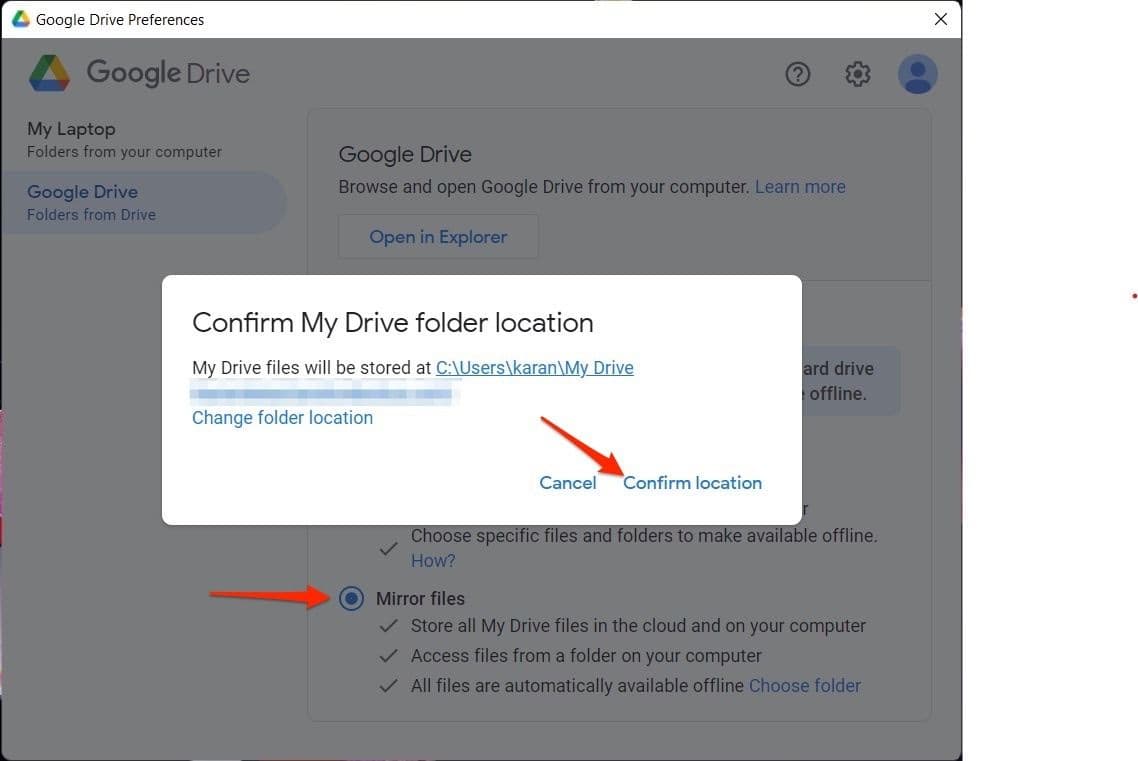
This process downloads the files stored in the cloud onto your computer. If you’re moving many files, make sure you have enough disk space or use an external hard disk. Once the synced folder populates, upload those files to your Synology NAS using one of the two methods discussed earlier.
Use a Synology NAS to build your own personal storage setup
It may take some time to complete the switch, and it may not be for everyone, but the advantages of using Synology are undeniable. Between having a mirror of your hard drive, syncing a few important folders, and controlling a securely located backup source that is accessible anywhere, the positives are hard to argue. You might be able to cancel your Google One subscription, especially if you decide to move your Google Photos content to a Synology NAS.
If you’re looking for a solid starter Synology NAS, the DiskStation DS220+ is a great option. Once you’ve completed the switch, it’s worthwhile to investigate the best NAS hard drives to improve your setup.
