
How to use Shizuku for ADB rootless mods on any Android device
In the earlier days of Android, modding a device was a popular hobby that offered more user control and new features not found in
stock
Android. However, with every new major release of Android, we get more options and features that make modding even less likely for the average user. Today, you can customize one of the most affordable Android phones without jumping through extra hoops. You can still mod your device for more power using Shizuku, and we show you how in the
guide
below.
What makes Shizuku different?
Those who still mod their Android devices are known as power users, but Shizuku changed how on-device modding works. This allows everyone to tweak and mod their devices, from beginners to advanced users. The Shizuku app uses a unique service that allows third-party apps access to system-level
Application Programming Interfaces (APIs)
. It achieves this through the Android Debug Bridge (ADB) interface. ADB commands are limited by nature. However, combining them with system APIs gives you more control over your device. You also don’t need root access to use Shizuku, which is one of its biggest appeals.
Install Shizuku and prepare your device
Before using custom mods or tweaks on your Android device, install the Shizuku app first. Short of having full root access integrated with the Shizuku service, using the ADB interface for the setup process is the next best option. Shizuku uses the hidden developer options on your Android device for the non-root methods in this guide. We show you everything you need to know in the section below.
To install Shizuku and activate the developer options, do the following:
-
Install the
Shizuku app
from the
Google
Play Store. -
Open the
Settings
app on your device. -
Go to
System
>
About Phone
. -
Scroll down to the
Build number
section and rapidly tap it seven times to continue.

- Enter your PIN or password as needed.
-
You’ll see a notification popup that states, “You are now a developer!”

The method to turn on the developer options can differ slightly based on the Android device manufacturer. However, the process is the same overall regardless of your device model. If you find a
Build number
section for your Android version, tap it rapidly seven times to activate the developer options.
With the developer options now activated, you’re done with basic preparations. You can move on to setting up Shizuku.
How to set up Shizuku with the wireless debugging
feature
Starting with Android 11, Google added the wireless debugging feature to the developer options, which allows you to execute ADB commands over Wi-Fi. Before this, the only other option was connecting your Android device to a computer via a USB cable.
The learning curve with the ADB interface is steep enough to prevent the average user from trying it out for themselves. However, the on-device wireless debugging feature makes it easy for anyone to use ADB commands. No computer or complicated steps are required. Shizuku relies on this feature to keep the setup process as simple as possible.
Pair your device with Shizuku
The next part involves getting a unique pairing code and linking your device with the Shizuku app. The process is simple. When you complete this step, you won’t have to do it again unless something changes.
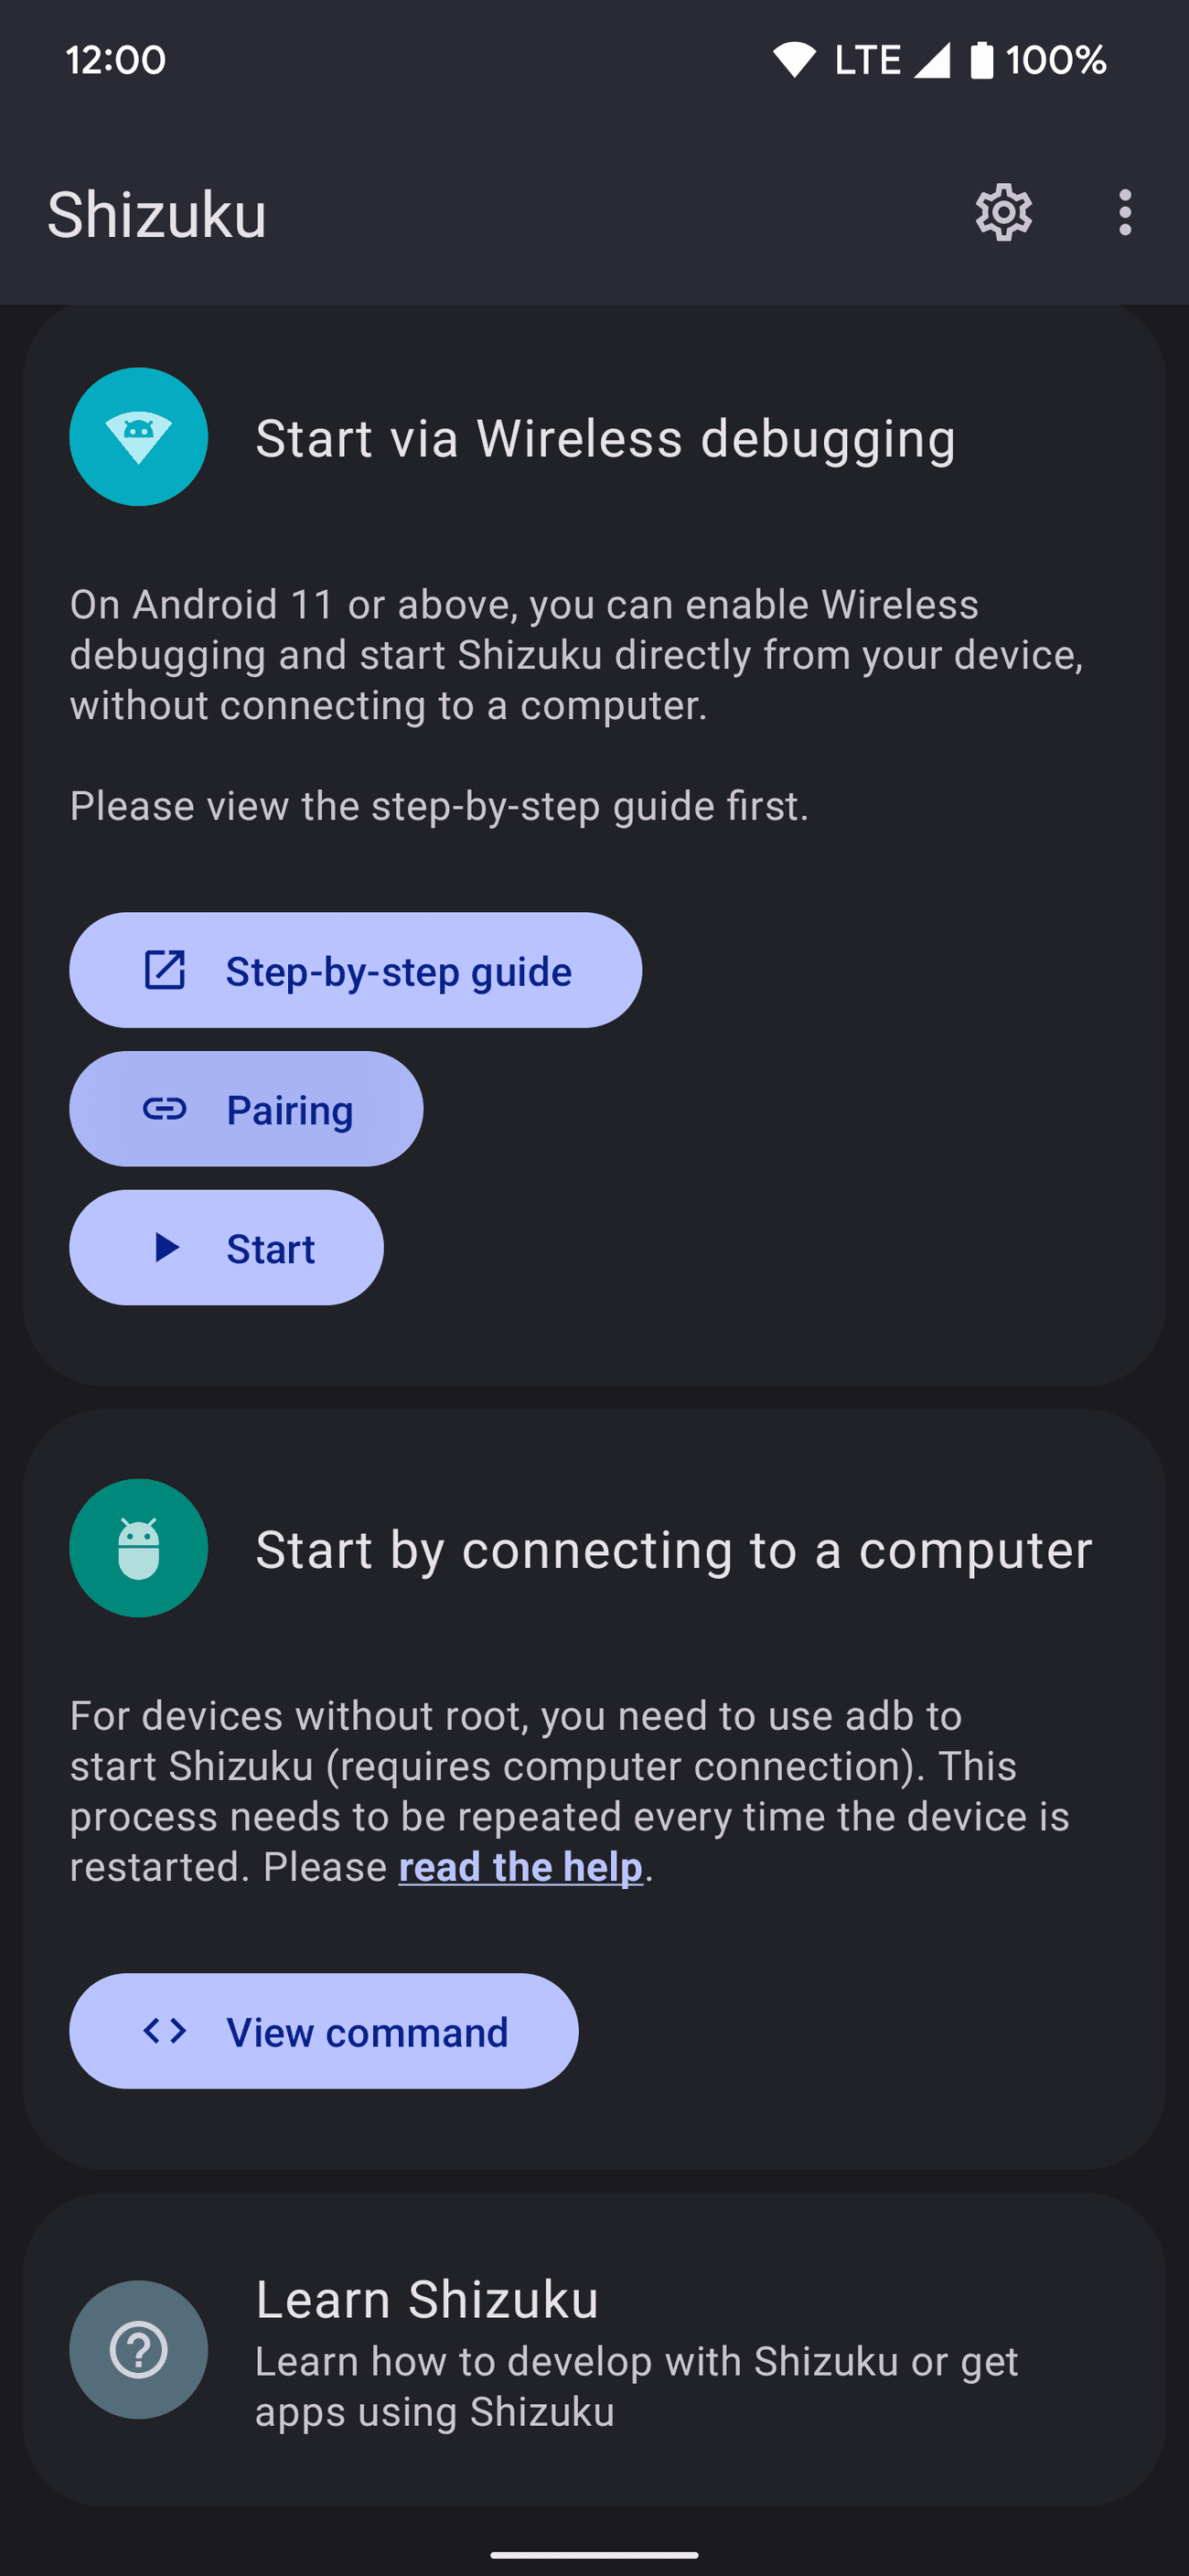
You can use Shizuku with the wireless debugging feature by doing the following:
-
Open the
Shizuku app
. -
Scroll down to the
Start via Wireless debugging
section. -
Tap the
Pairing
button. -
Tap
Developer options
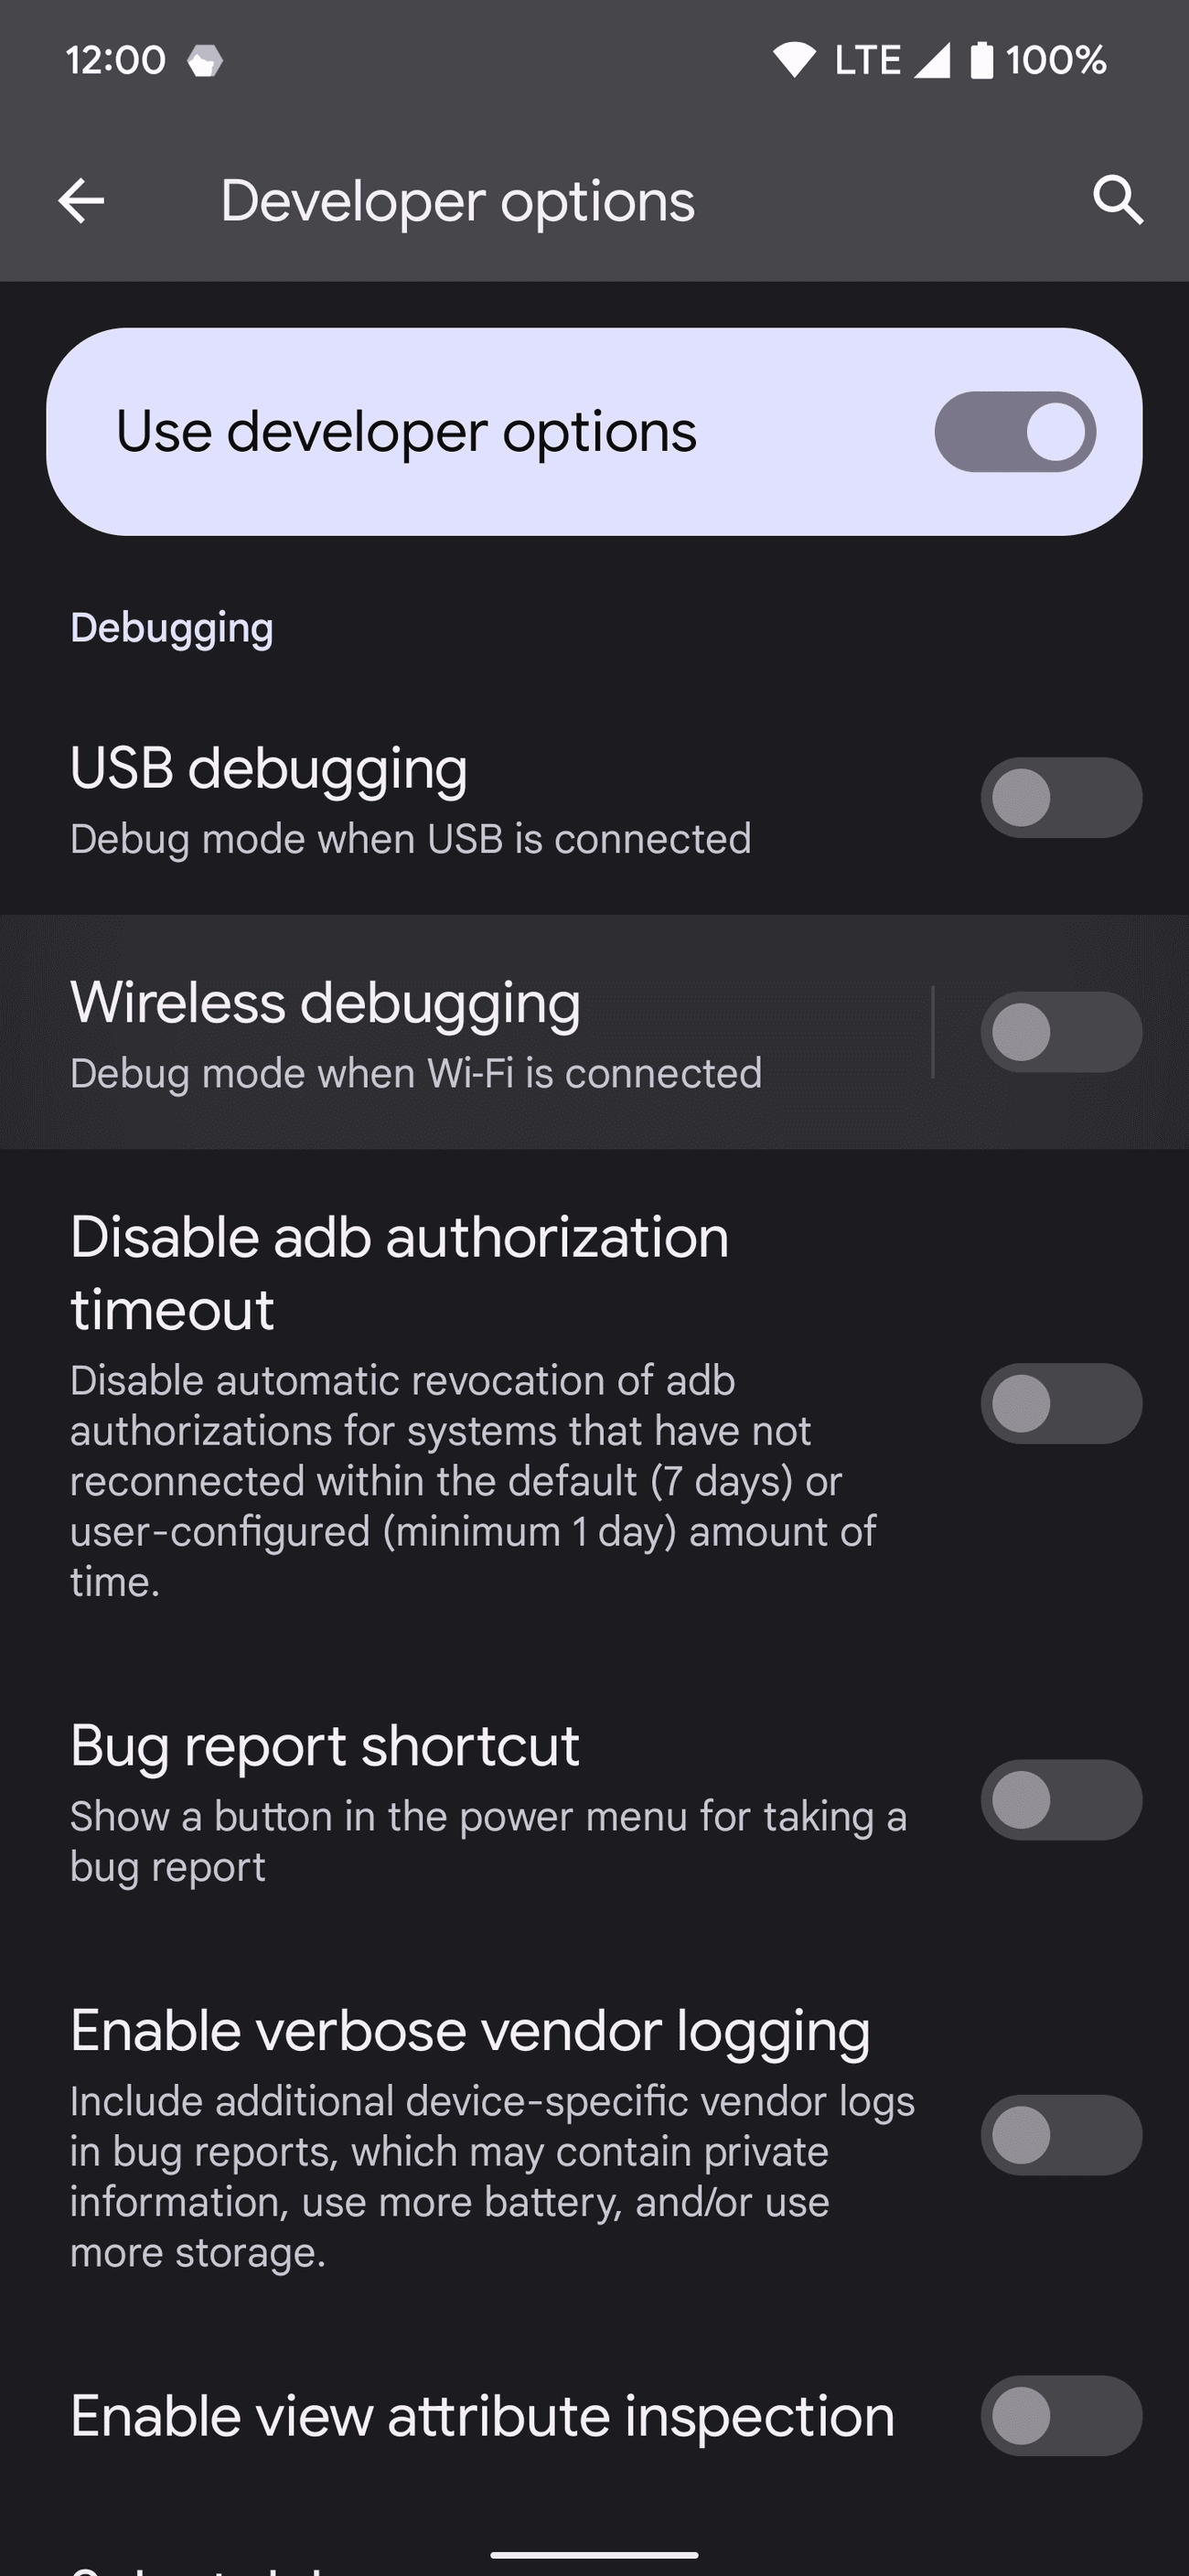
at the bottom.
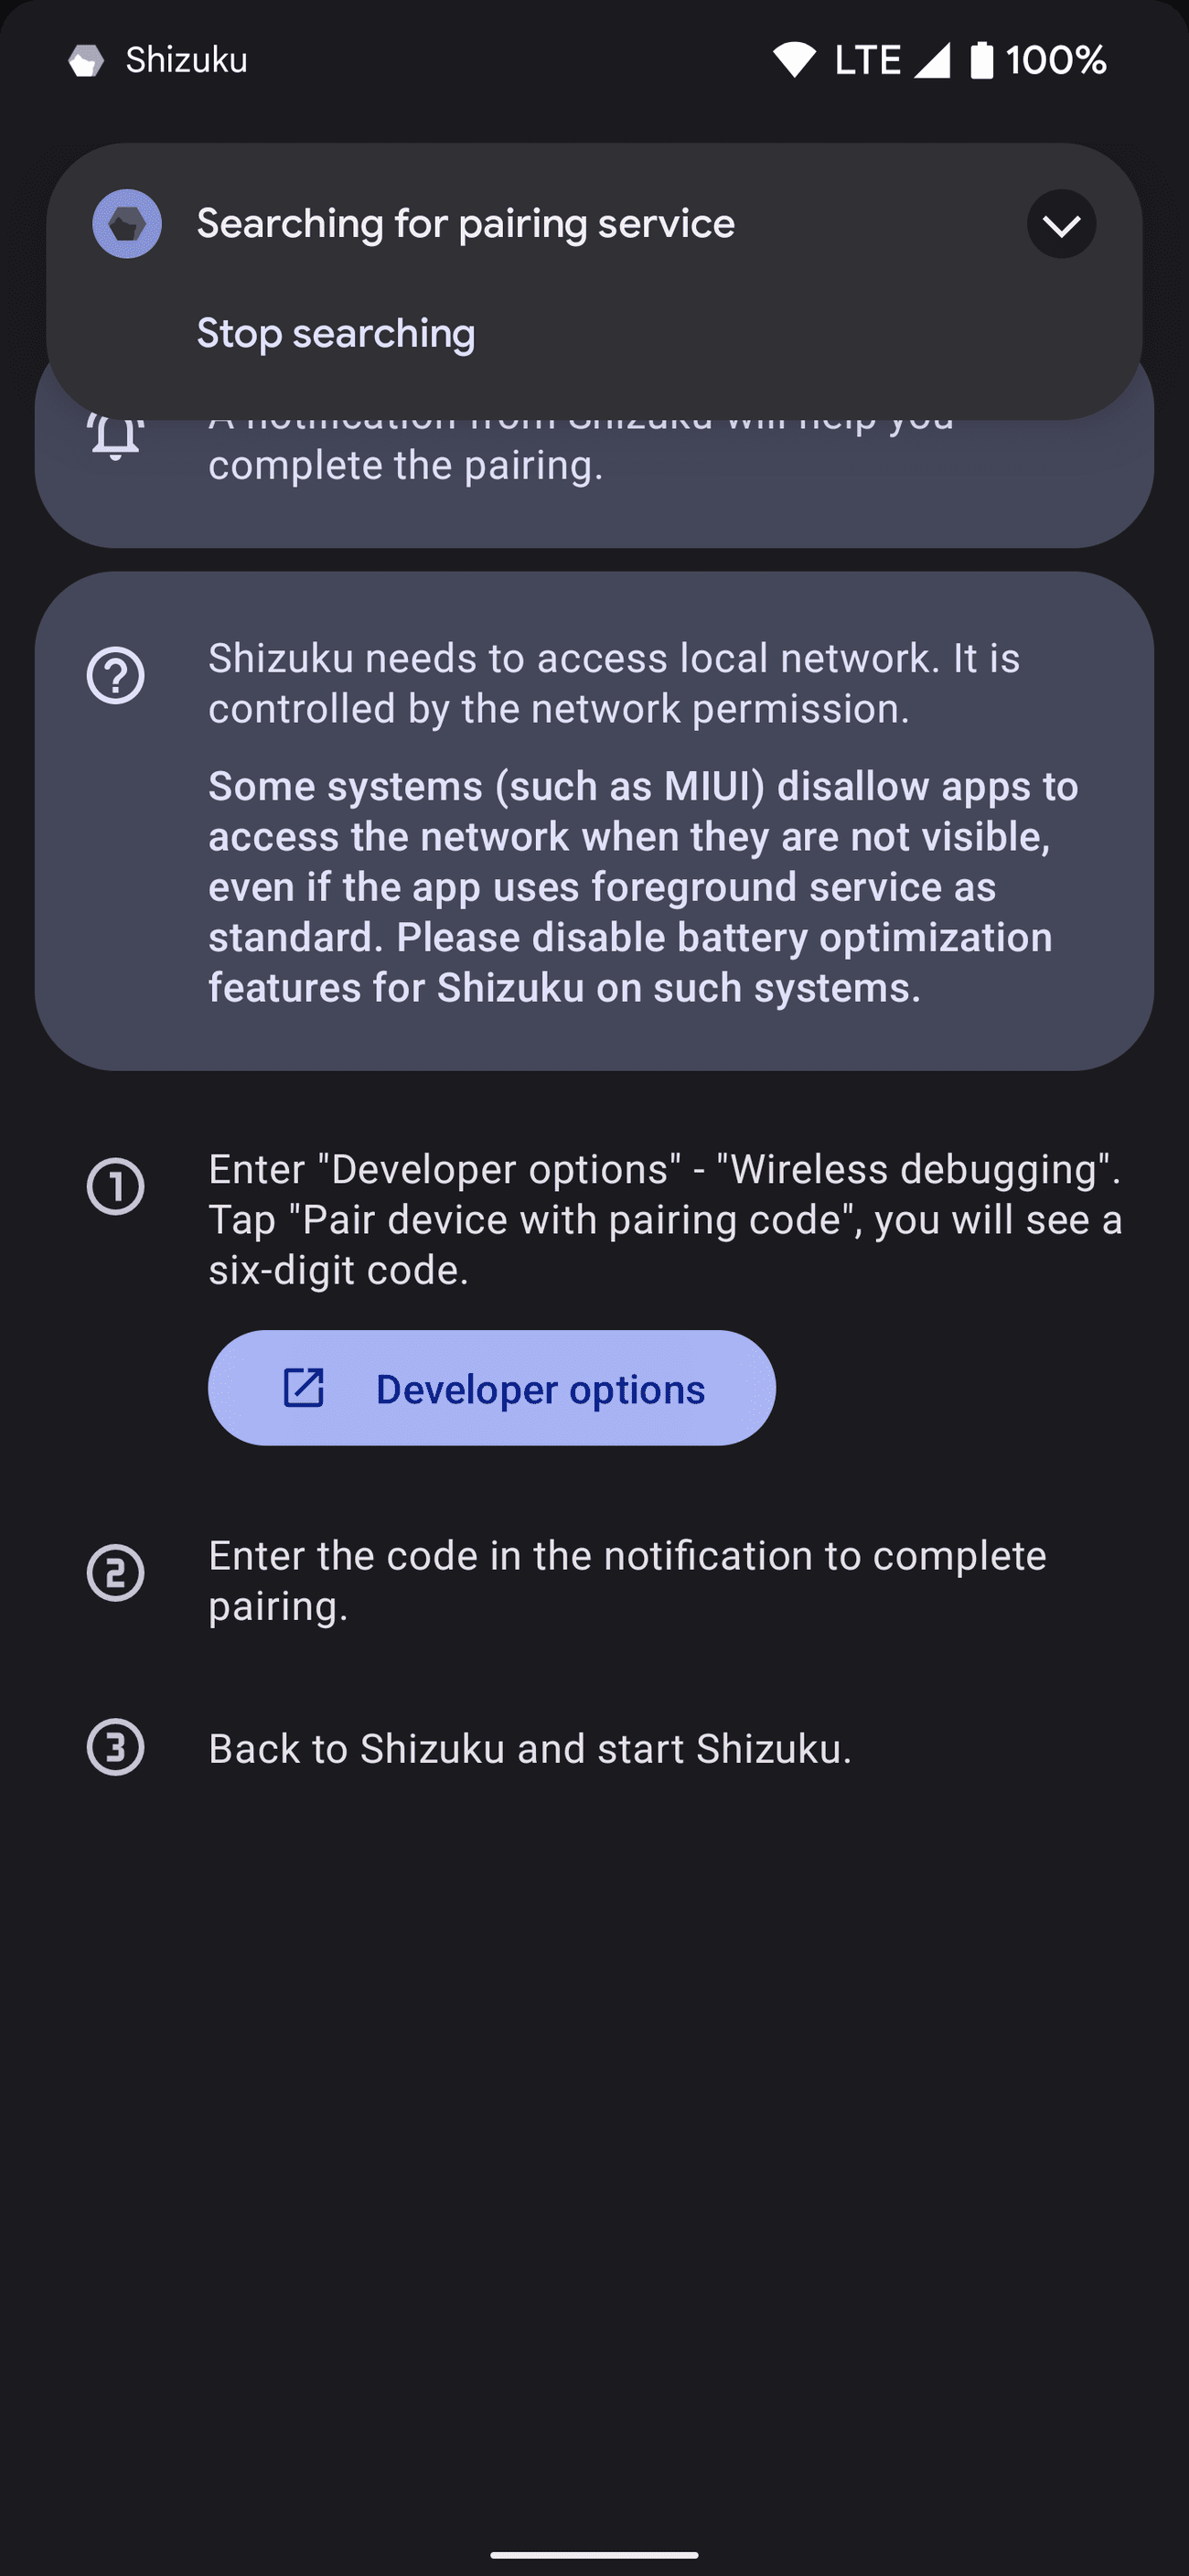
-
Scroll down until you find the
Wireless debugging
option. -
Tap the
Use wireless debugging
button.

-
Check the
Always allow on this network
checkbox. -
Tap
Allow
to turn on the feature. -
Tap
Pair device with pairing code
to bring up the
Pair with device
popup.
Enter the pairing code and activate the Shizuku service
Now that you have the pairing code for linking Shizuku with your device, type or paste that code into the appropriate text field.
To pair your device with Shizuku and finish the setup, check out the following:
-
Enter the unique six-digit
Wi-Fi pairing code
exactly as it appears into the Shizuku
Pairing code
notification textbox. If needed, swipe down on your status bar to the Shizuku notification, then tap
Enter pairing code
. -
Enter your
Wi-Fi pairing code
and tap the
Send
button on the right to confirm. You’ll see a
Pairing successful
message if the pairing code is correct. -
Your device is now synced with the Shizuku app.
Start the Shizuku service
Now that your device has been synched with the Shizuku app, it’s time to start the Shizuku background service.
To start the Shizuku service, do the following:
-
Tap the back arrow or gesture a few times until you return to the Shizuku app main screen. You might have to swipe away the
Pairing successful
notification before you can do that. -
Under the
Start via Wireless debugging
section, tap the
Start
button. -
The Shizuku service automatically starts on a new screen. It closes once the process is complete.
-
Scroll back to the top, and you’ll see the
Shizuku is running
status with a version number followed by
adb
.
If you’re stuck at the
Searching for wireless debugging service
message when activating Shizuku, follow these steps:
-
Tap
Developer options
in the message popup. -
Turn off the
Wireless debugging
toggle switch.
-
Turn on the
Wireless debugging
toggle switch.
-
Tap the
back arrow
to return to the Shizuku app, and it starts the service immediately after that.
Now that the Shizuku service is ready and waiting on your device, you can use it for any app or mod that supports it. You must start the service again after every reboot, so keep that in mind.
How to set up Shizuku with ADB commands on a computer
The wireless debugging feature is the best non-root method for most Shizuku users. However, some might prefer to use the ADB interface through a computer. The setup process involves more than the on-device wireless debugging feature introduced with Android 11. Once you get past the initial setup phase, it becomes easier to use.
Download the platform-tools folder and start the setup process
In this part, you’ll download the platform-tools folder, which has everything you need to run ADB commands from your computer.
To start Shizuku with ADB commands on a computer, do the following:
-
Download the latest
Android SDK platform-tools
and extract the folder to your desktop for easy access.
-
Install the
Google USB drivers
if needed (for Windows users). -
Turn on
USB debugging
on your Android device. -
Open the
Settings
app, then go to
System
>
Developer options
. -
Scroll down and tap the
USB debugging
option. -
Tap
OK
to activate it.
Finish the ADB setup process and activate Shizuku
Now that the platform-tools folder is ready to go and USB debugging has been activated, you’ll link your computer with your phone. From there, you’ll run a specific ADB command to start the Shizuku service on your phone.
To finish the setup process and activate Shizuku, do the following:
- Connect your phone to your computer via a USB cable.
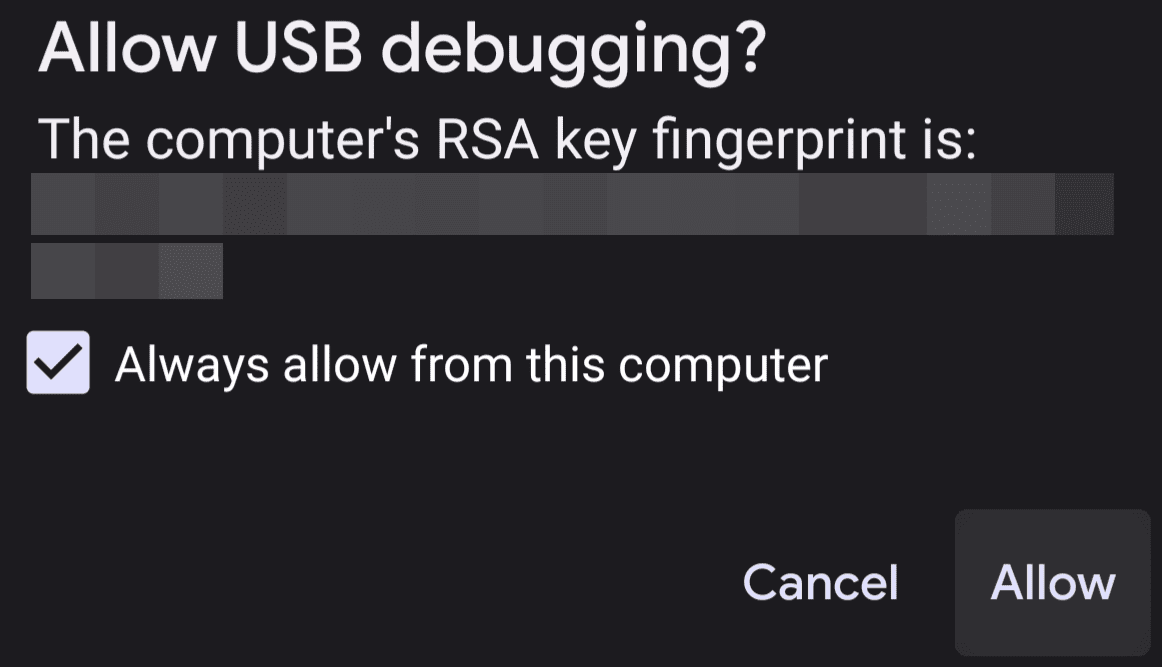
-
On your Android device, confirm the fingerprint key for the computer by pressing
Allow
when required. Check the
Always allow from this computer
box to avoid potential connection issues.
-
Open a command window or terminal in the
platform-tools
folder. If you use Windows, click the address bar in the
platform-tools
folder, type
cmd
, and press
Enter
. This opens a new command window in the
platform-tools
folder.
-
To double-check that your device is connected through ADB properly, type
adb devices
in the command window or terminal, then press
Enter
. Initiating the ADB command asks you to confirm your computer’s fingerprint key if it didn’t appear earlier. -
You’ll see a unique device identifier number under
List of devices attached
, letting you know it’s connected and recognized by the ADB interface. -
Copy and paste
adb shell sh /sdcard/Android/data/moe.shizuku.privileged.api/start.sh
into the command window or terminal, then press
Enter
. On some platforms (especially Mac and Linux), enter ADB
commands with “
./
” minus the quotes at the beginning for them to work correctly. -
The command starts the Shizuku service on your Android device, showing an
exit with 0
status within a few seconds. If you see this at the end, you’re good to go. The service was successfully started.
-
Check your Shizuku app at the top, and you’ll see the
Shizuku is running
status with a version number followed by
adb
.
As with the wireless debugging feature, you must reactivate the Shizuku service each time you reboot your device. These two methods rely on the ADB interface, which only makes temporary changes to your device without root access. Since you don’t need to reboot that often these days, it shouldn’t be an issue for most.
How to use Shizuku in a terminal (optional)
If you want to use Shizuku in a terminal environment on Android, follow the in-app instructions by tapping
Use Shizuku in terminal apps
. It asks you to export and edit two
files
with the package name of your terminal app. Move them to a place where the terminal can find them. This is an advanced feature for people who like working with a command-line interface.
How to set up Shizuku with full root access
You don’t need root access to use Shizuku on your Android device. However, it’s the fastest route you can take to activate the service. The setup is as simple as pressing a button, and you can keep the Shizuku service activated after a reboot.
If you want to use Shizuku with full root access, do the following:
-
Open the
Shizuku app
, then go to the
Start (for rooted devices)
section. -
Tap the
Start
button to begin the process. -
Tap
Grant
to give the proper root permissions when requested.
- The Shizuku service starts within a few seconds on a new screen and then automatically closes when it’s finished.
-
Scroll to the top and check that the
Shizuku is running
status with a version number followed by
root
.
If you don’t want to reactivate the Shizuku service after every reboot, follow these steps:
-
Tap the
Settings
cogwheel icon in the upper-right corner. -
Turn on the
Start on boot (root)
option.
-
Once you do that, the Shizuku service stays activated after you reboot your device, making it easier for you to manage.
Shizuku makes on-device rootless mods a reality
Now that you know how to set up Shizuku, you can test different mods for yourself. Root access isn’t needed to benefit from its features. Soon, we should see more unique apps and mods with built-in support for the Shizuku service.
You might want to check out how to restore your device after a factory reset using Shizuku to make your life easier. We walk you through the steps and explain how using Shizuku to back up and restore your device is beneficial.